Office
Manage daily operations efficiently by exploring administration settings and learning how to use the Office module.
Route optimization and transport planning
Once your orders have been generated in pinDeliver, either through Excel upload or API integration, the next step is to start the route optimization and planning process. The timing of this optimization process varies among companies. Some choose to perform route planning the day prior to the scheduled deliveries, while others opt for last-minute planning just before loading their vehicles. The route optimization process itself can be accomplished in a matter of minutes.
Typically, the routing process is automated, allowing you to simply confirm the proposed routes and assign drivers. However, it is worth noting that manual adjustments to suggested routes, including modifications and the addition of new routes, are entirely feasible.
For a comprehensive demonstration of the route planning functionality, watch the video below.
Start route optimization
To start the route optimization for a specific planning order, simply click on the order name. In cases where pinDeliver could not retrieve coordinates for certain customer orders, you will encounter a list of these orders that require manual correction. Otherwise, you will be directed straight to the vehicle list.
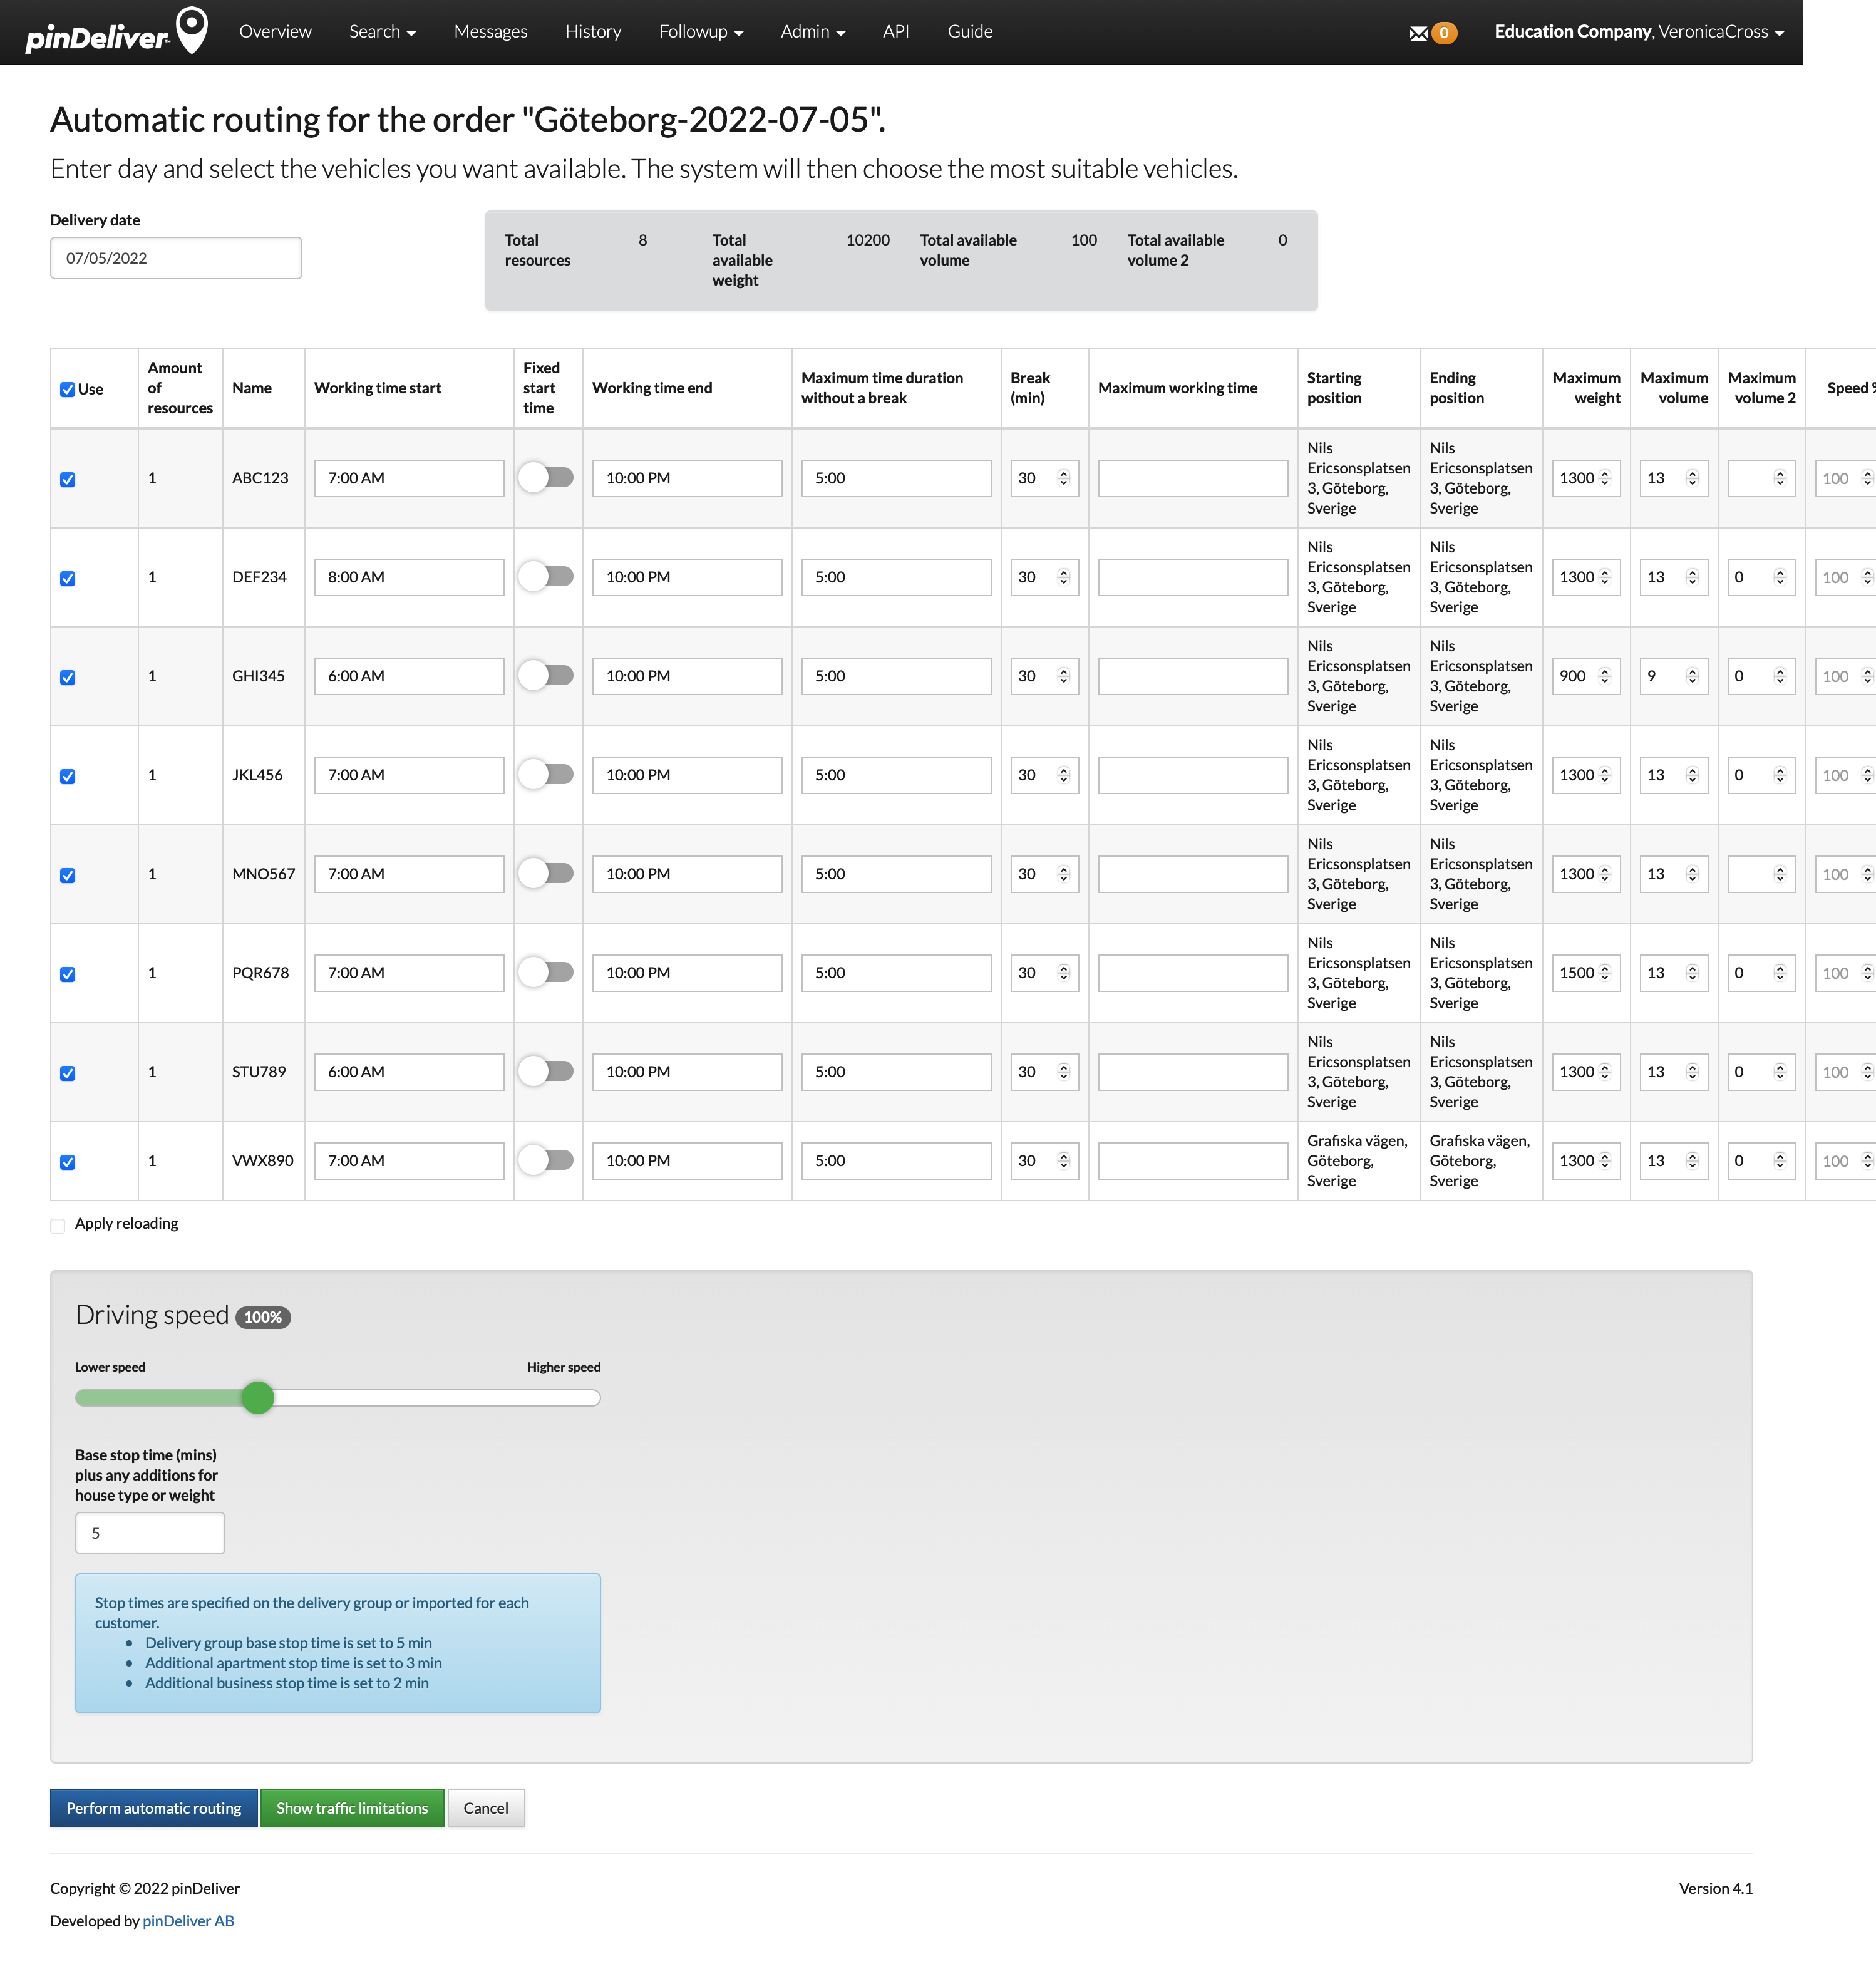
The vehicle list displays all available vehicles associated with the delivery group to which the planning order belongs. You have the flexibility to deselect any vehicles you do not wish to include in this route optimization. Additionally, you can modify predefined values for each vehicle exclusively for this routing, while the default values will remain intact for subsequent routings.
To start the optimization process, click on Perform automatic routing. Depending on the complexity of the planning order, the routing process may vary in duration, but typically, routing is completed in under a minute.
Uploading orders from an Excel sheet
A straightforward method for importing orders into pinDeliver is using an Excel sheet. This eliminates the immediate need for integration development, but it’s worth noting that this integration task is often a future requirement. Many companies initially begin with Excel import functionality and later advance to phase two, where they establish integrations from their ERP or WMS.
To view a tutorial on Excel upload, watch the video below.
The Excel sheet is not restricted to a specific template. Upon uploading the Excel file, you will be prompted to map its columns to corresponding fields within pinDeliver. Subsequently, when you upload another Excel file, pinDeliver will retain your previous field mappings to streamline the process. You only need to confirm that the new file maintains the same structure.
The mandatory fields include: Name, Address, City, and Packages. Packages can be managed in two distinct ways. You can either allocate one column for each package type (description), or you can consolidate all package information into a single cell. If you opt for separate columns for each package type, ensure that these columns are positioned at the far right end of the file.
Example files
Below, you will find two Excel file examples illustrating different approaches to package information representation. The first example illustrates separate columns for the number of boxes and the number of bags. In the second example, these two values are combined within a single cell, with a semicolon serving as the separator.


How to upload Excel
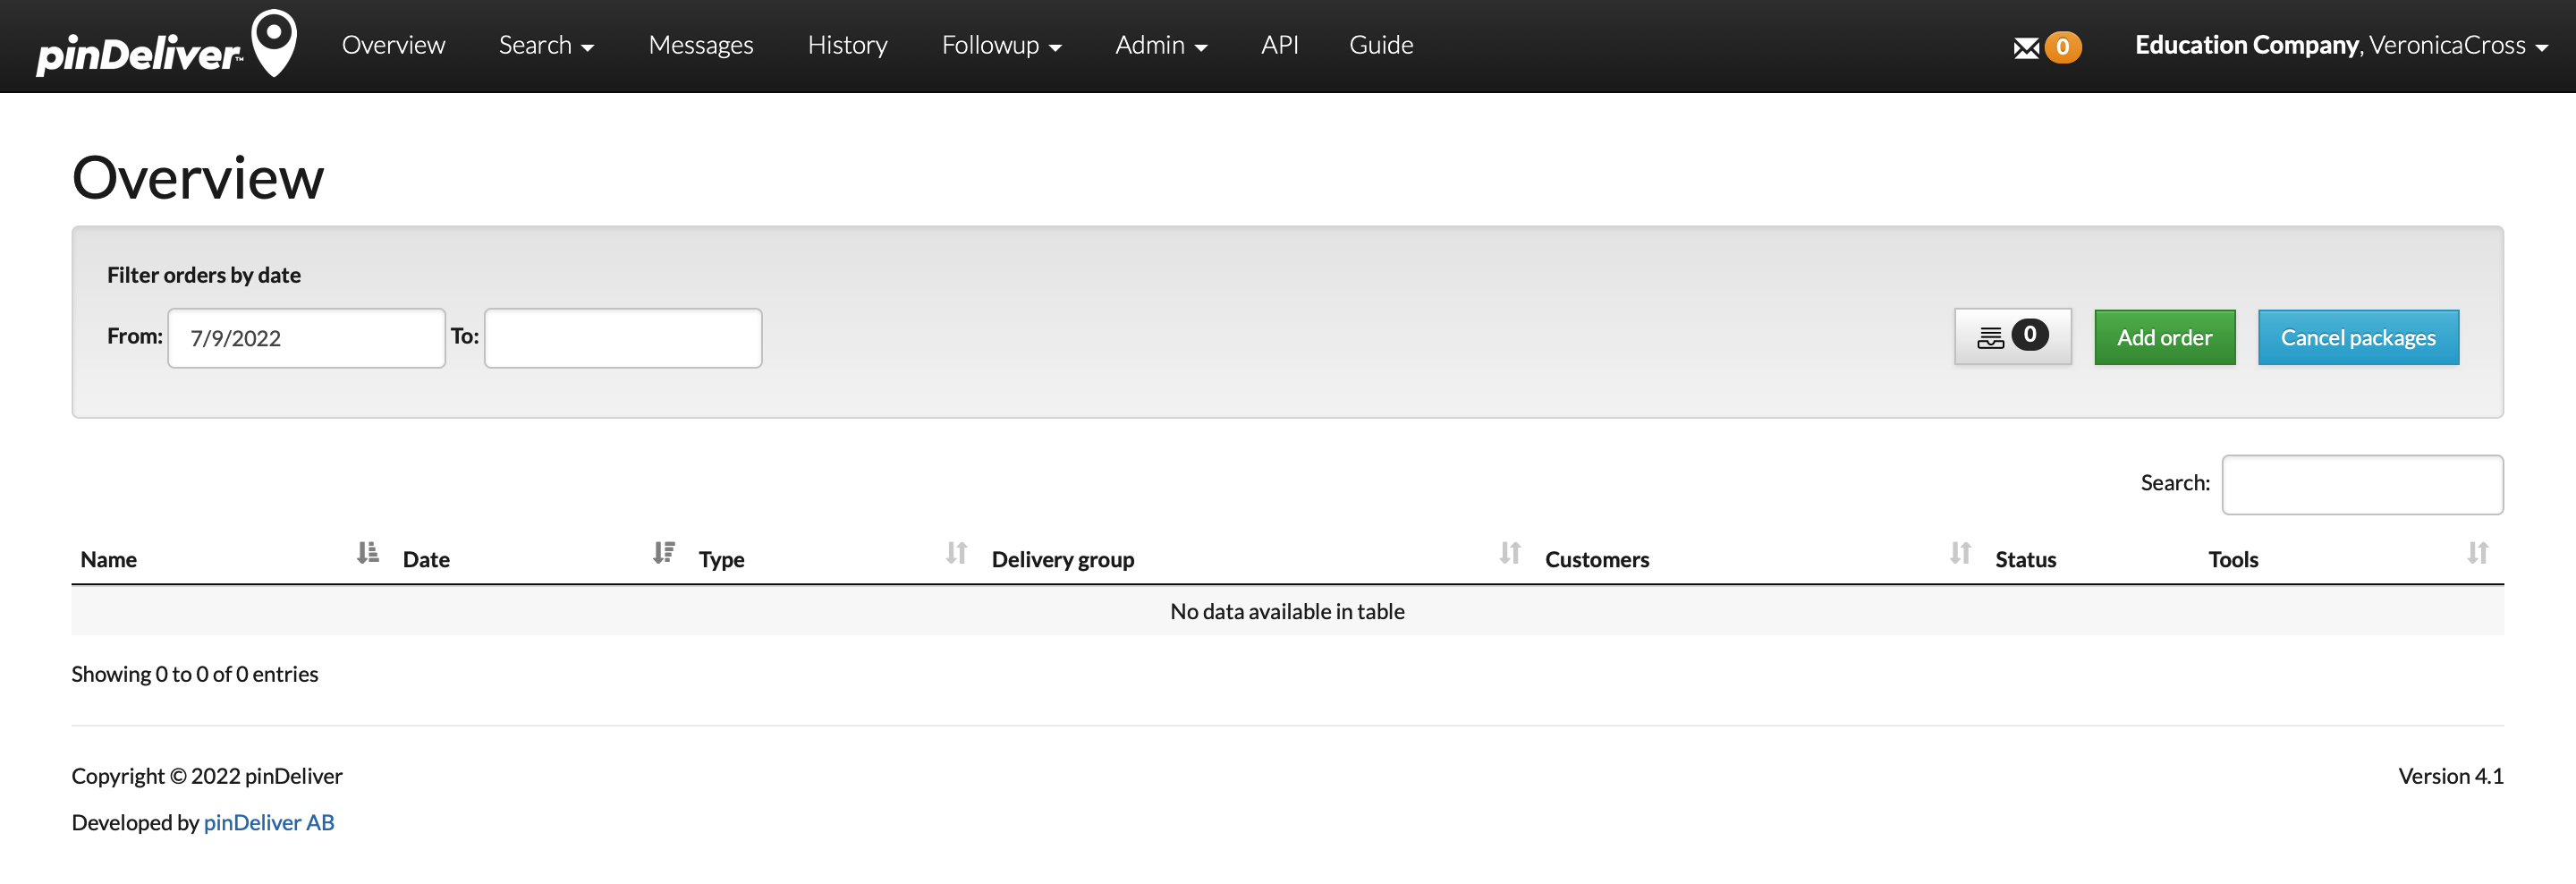
Start with Add order to access the import pages.
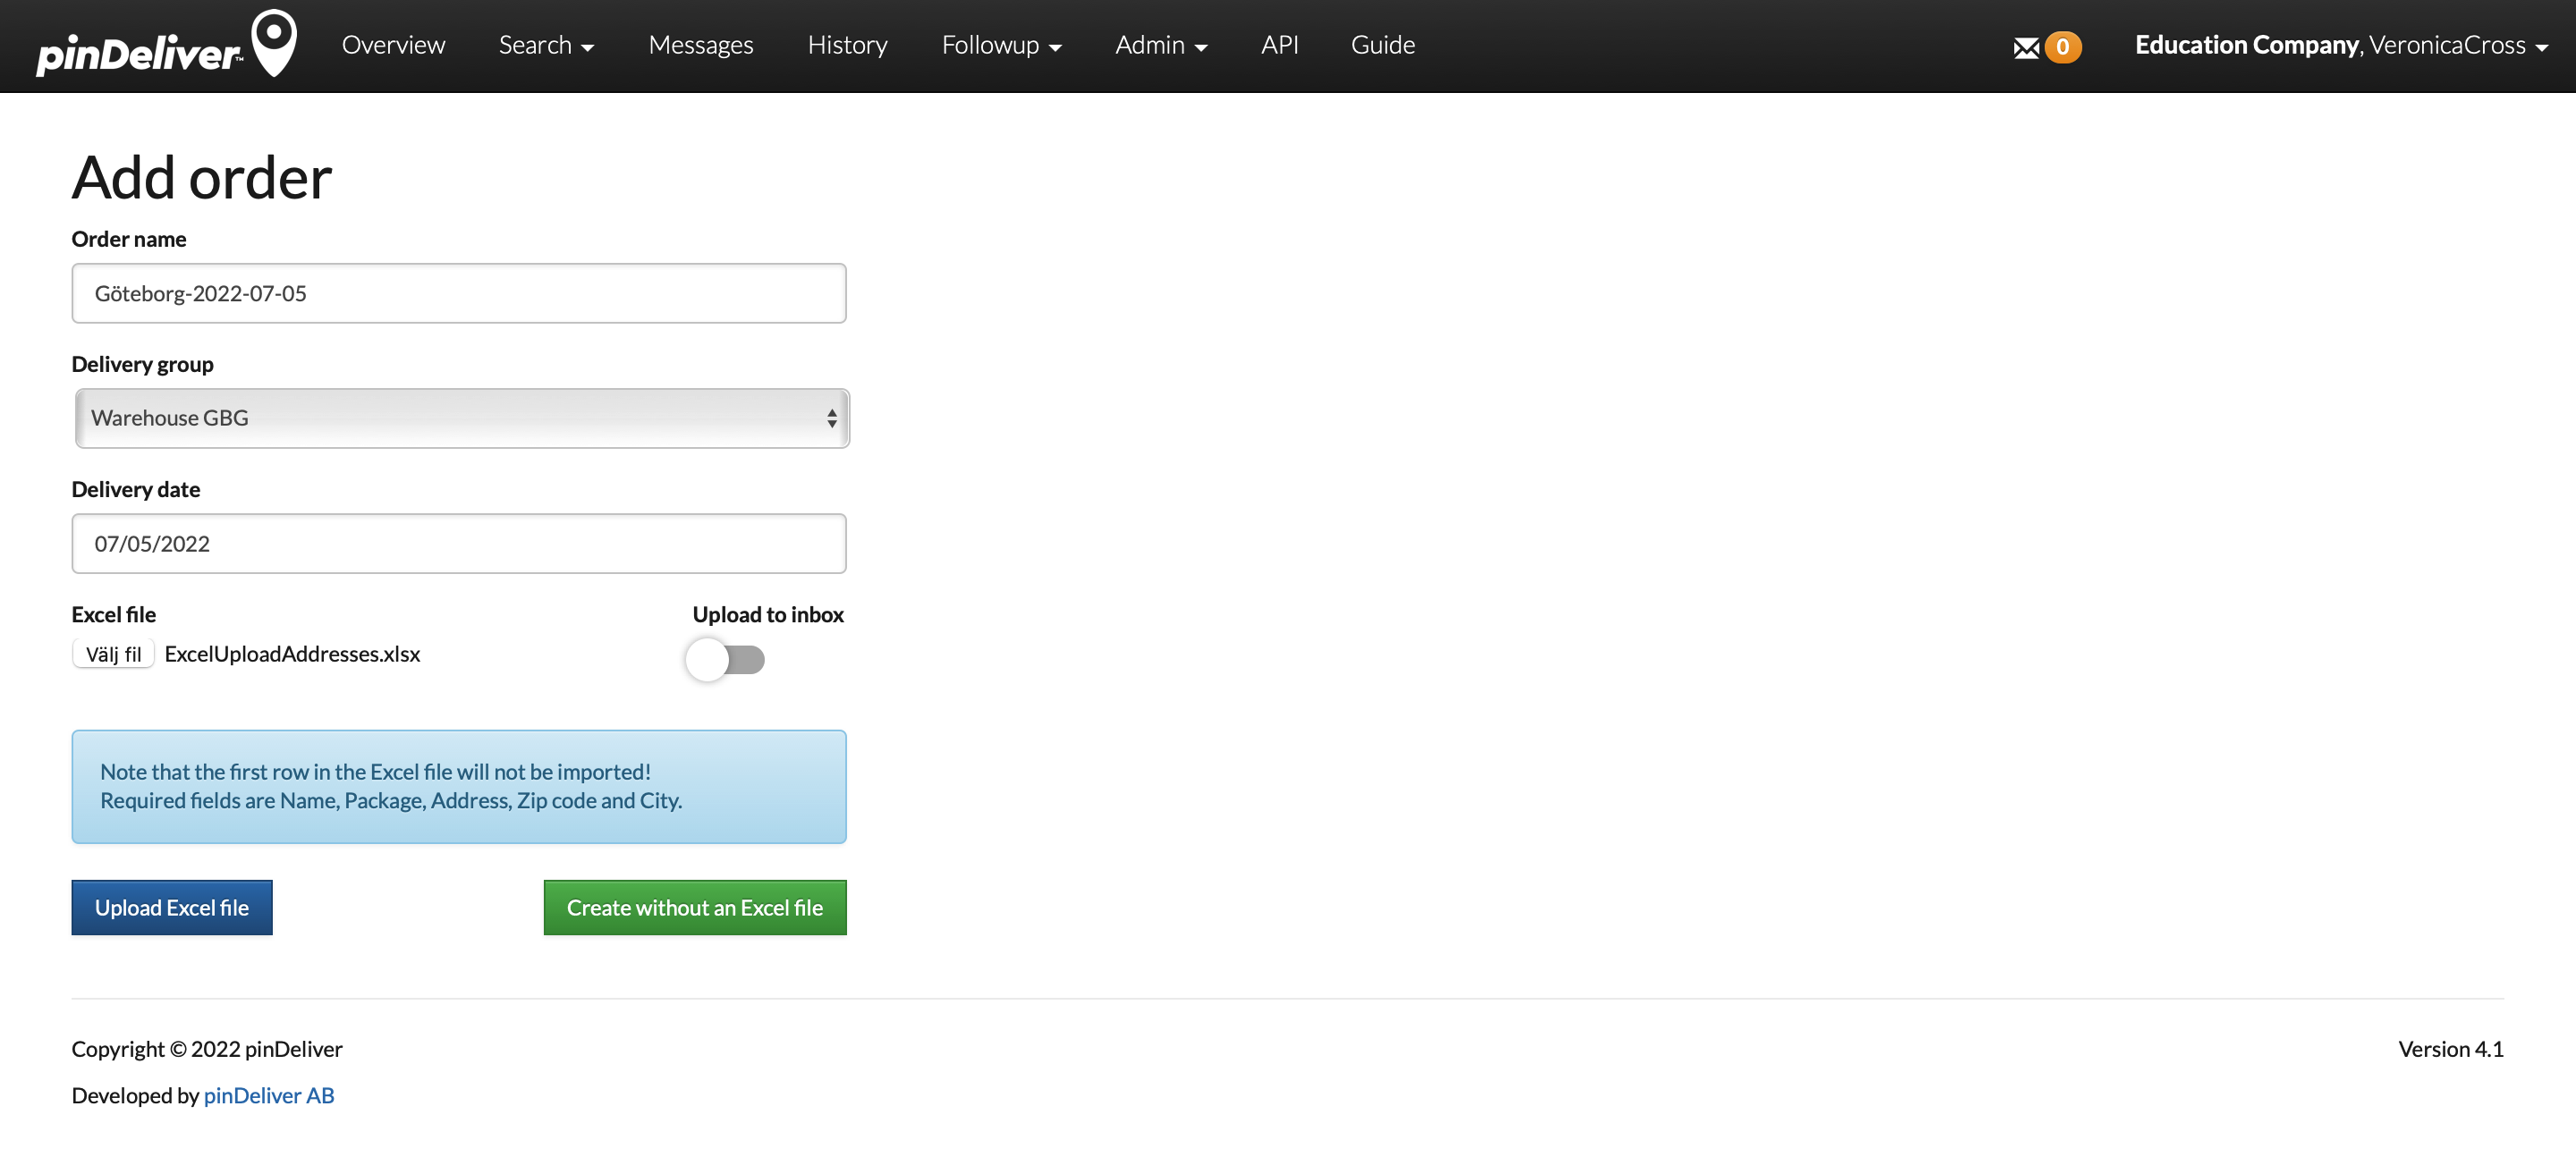
Within the import page, you’ll first define the Order name, Delivery Group and Delivery date. Then, you can select your Excel file by clicking on Choose file. Finally, initiate the upload process by clicking on Upload Excel file. If you opt for Upload to inbox no order will be immediately generated; this will be handled at a later stage within the inbox.
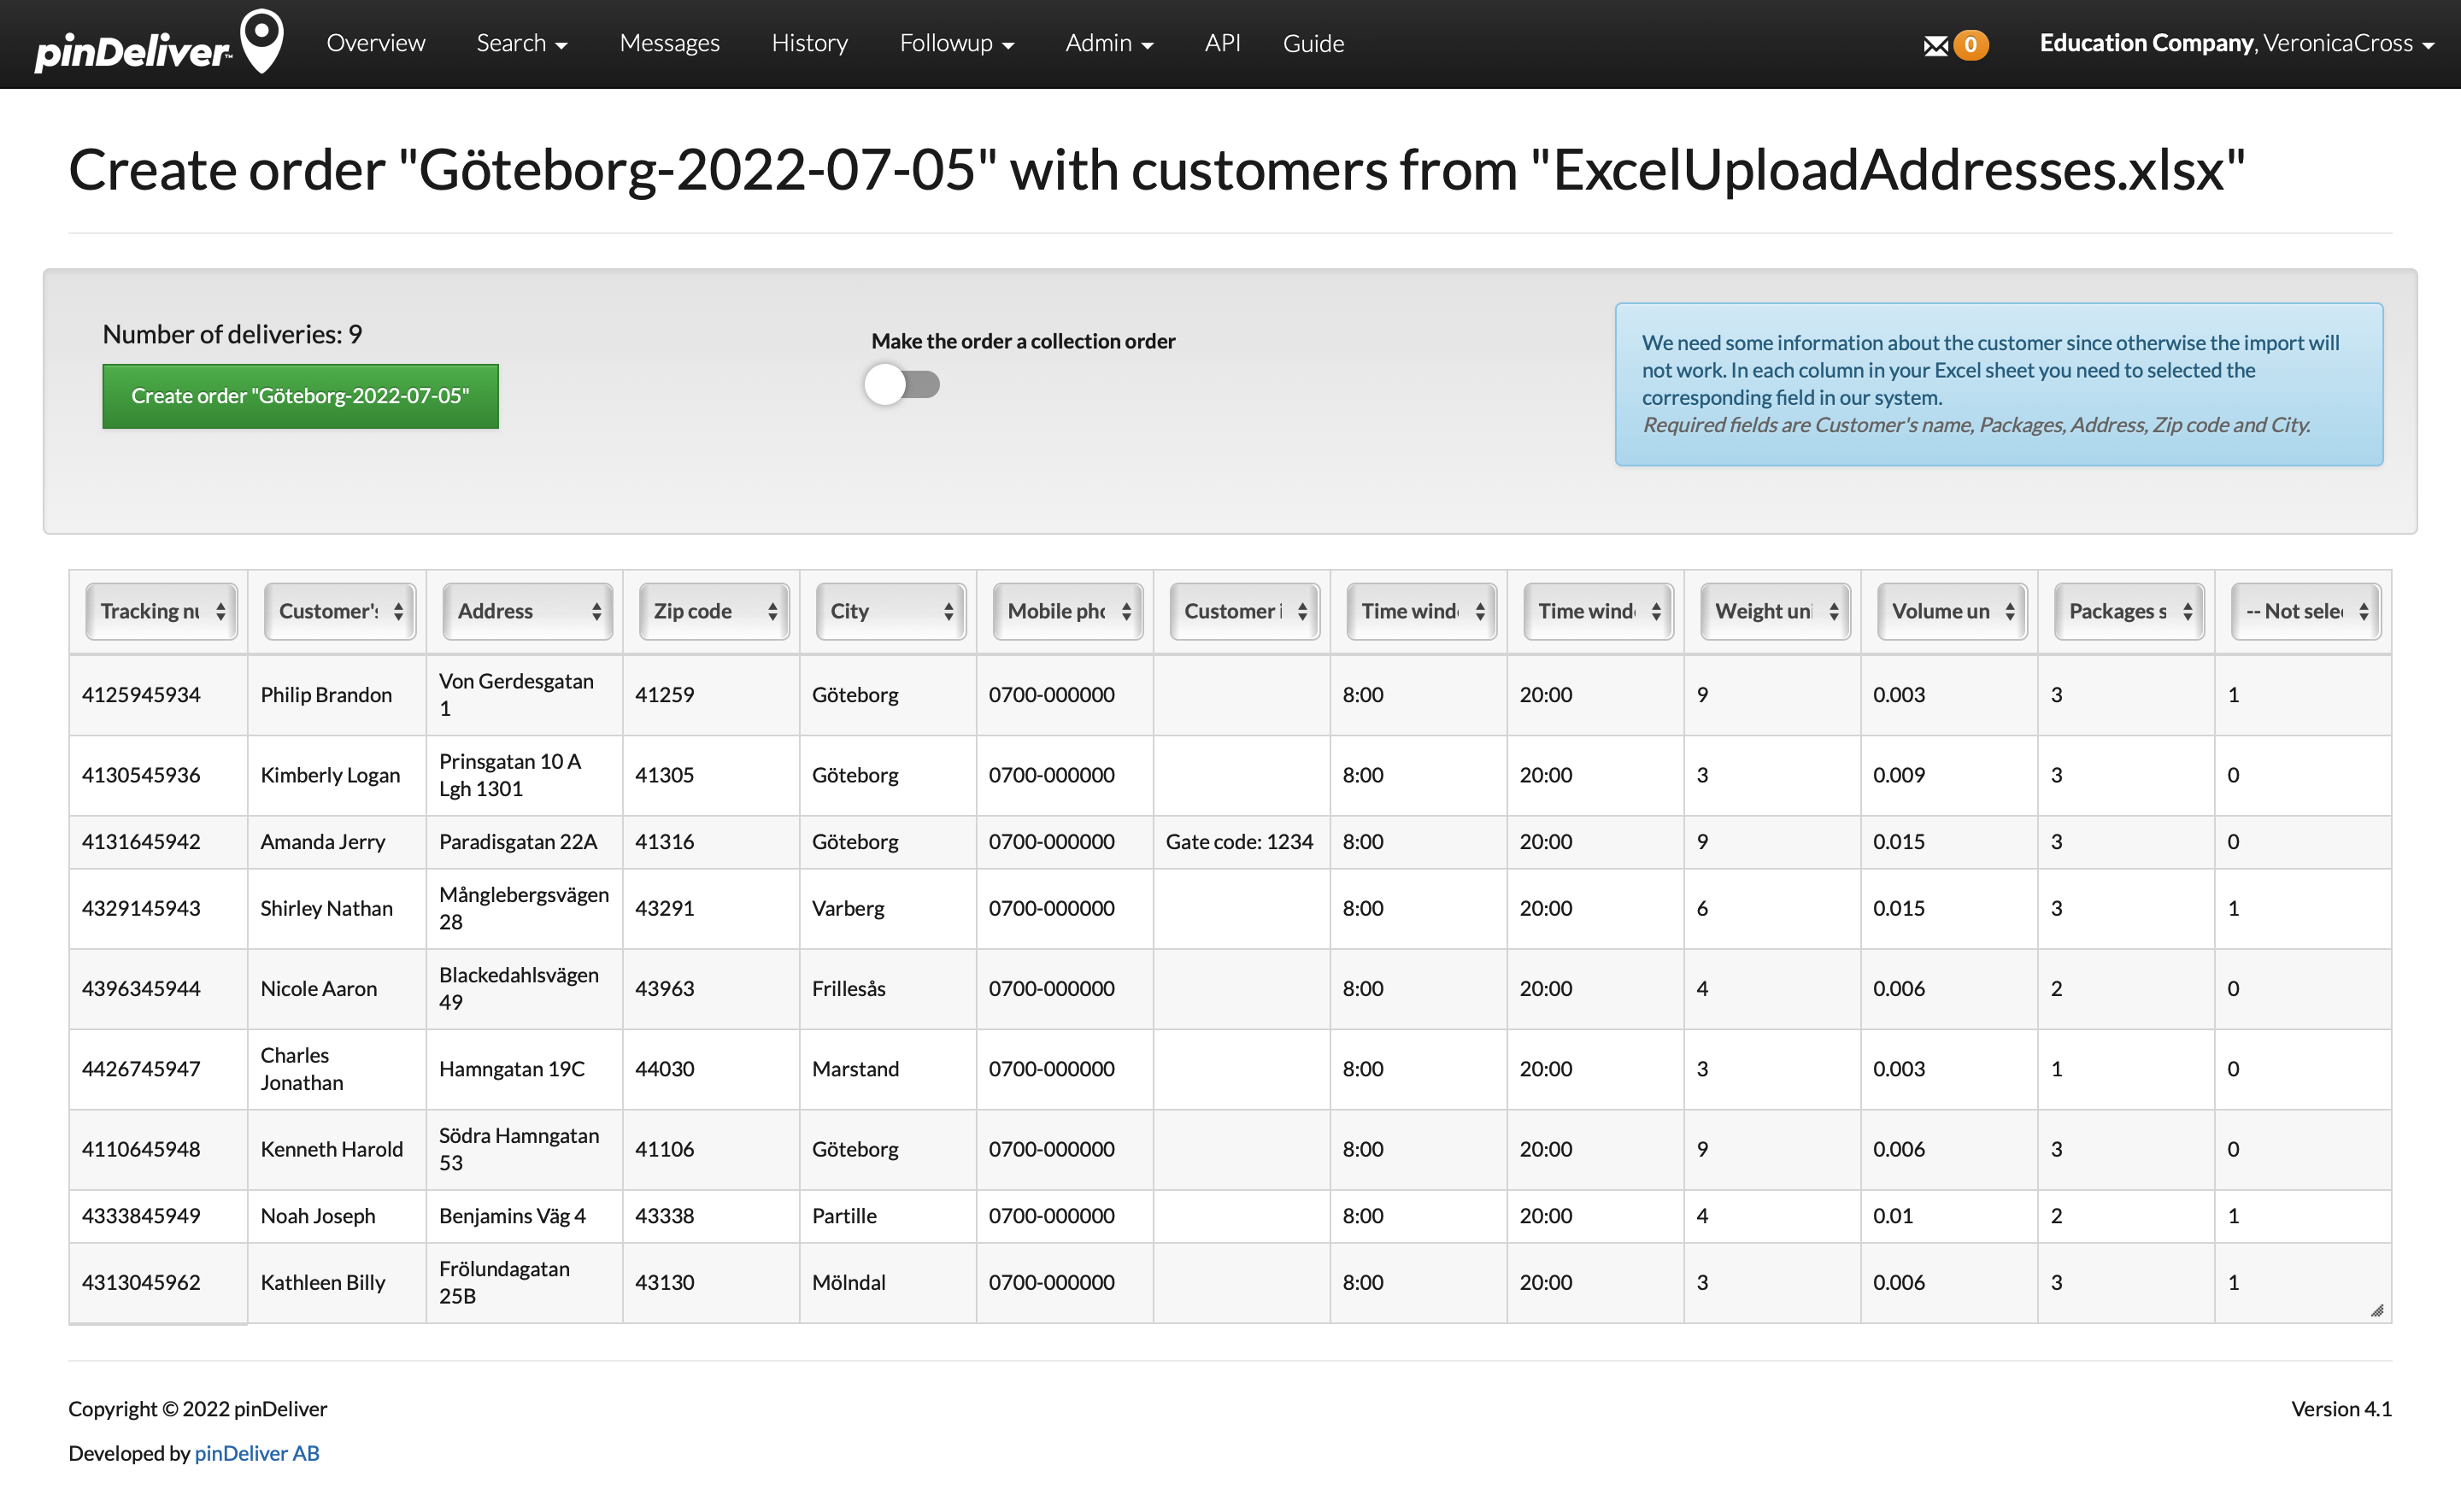
When you import an Excel file for the first time, you will likely encounter numerous red warnings, as you have not yet mapped the Excel columns to their corresponding pinDeliver fields. Mandatory fields that must be mapped include: Name, Address, City, and Packages.
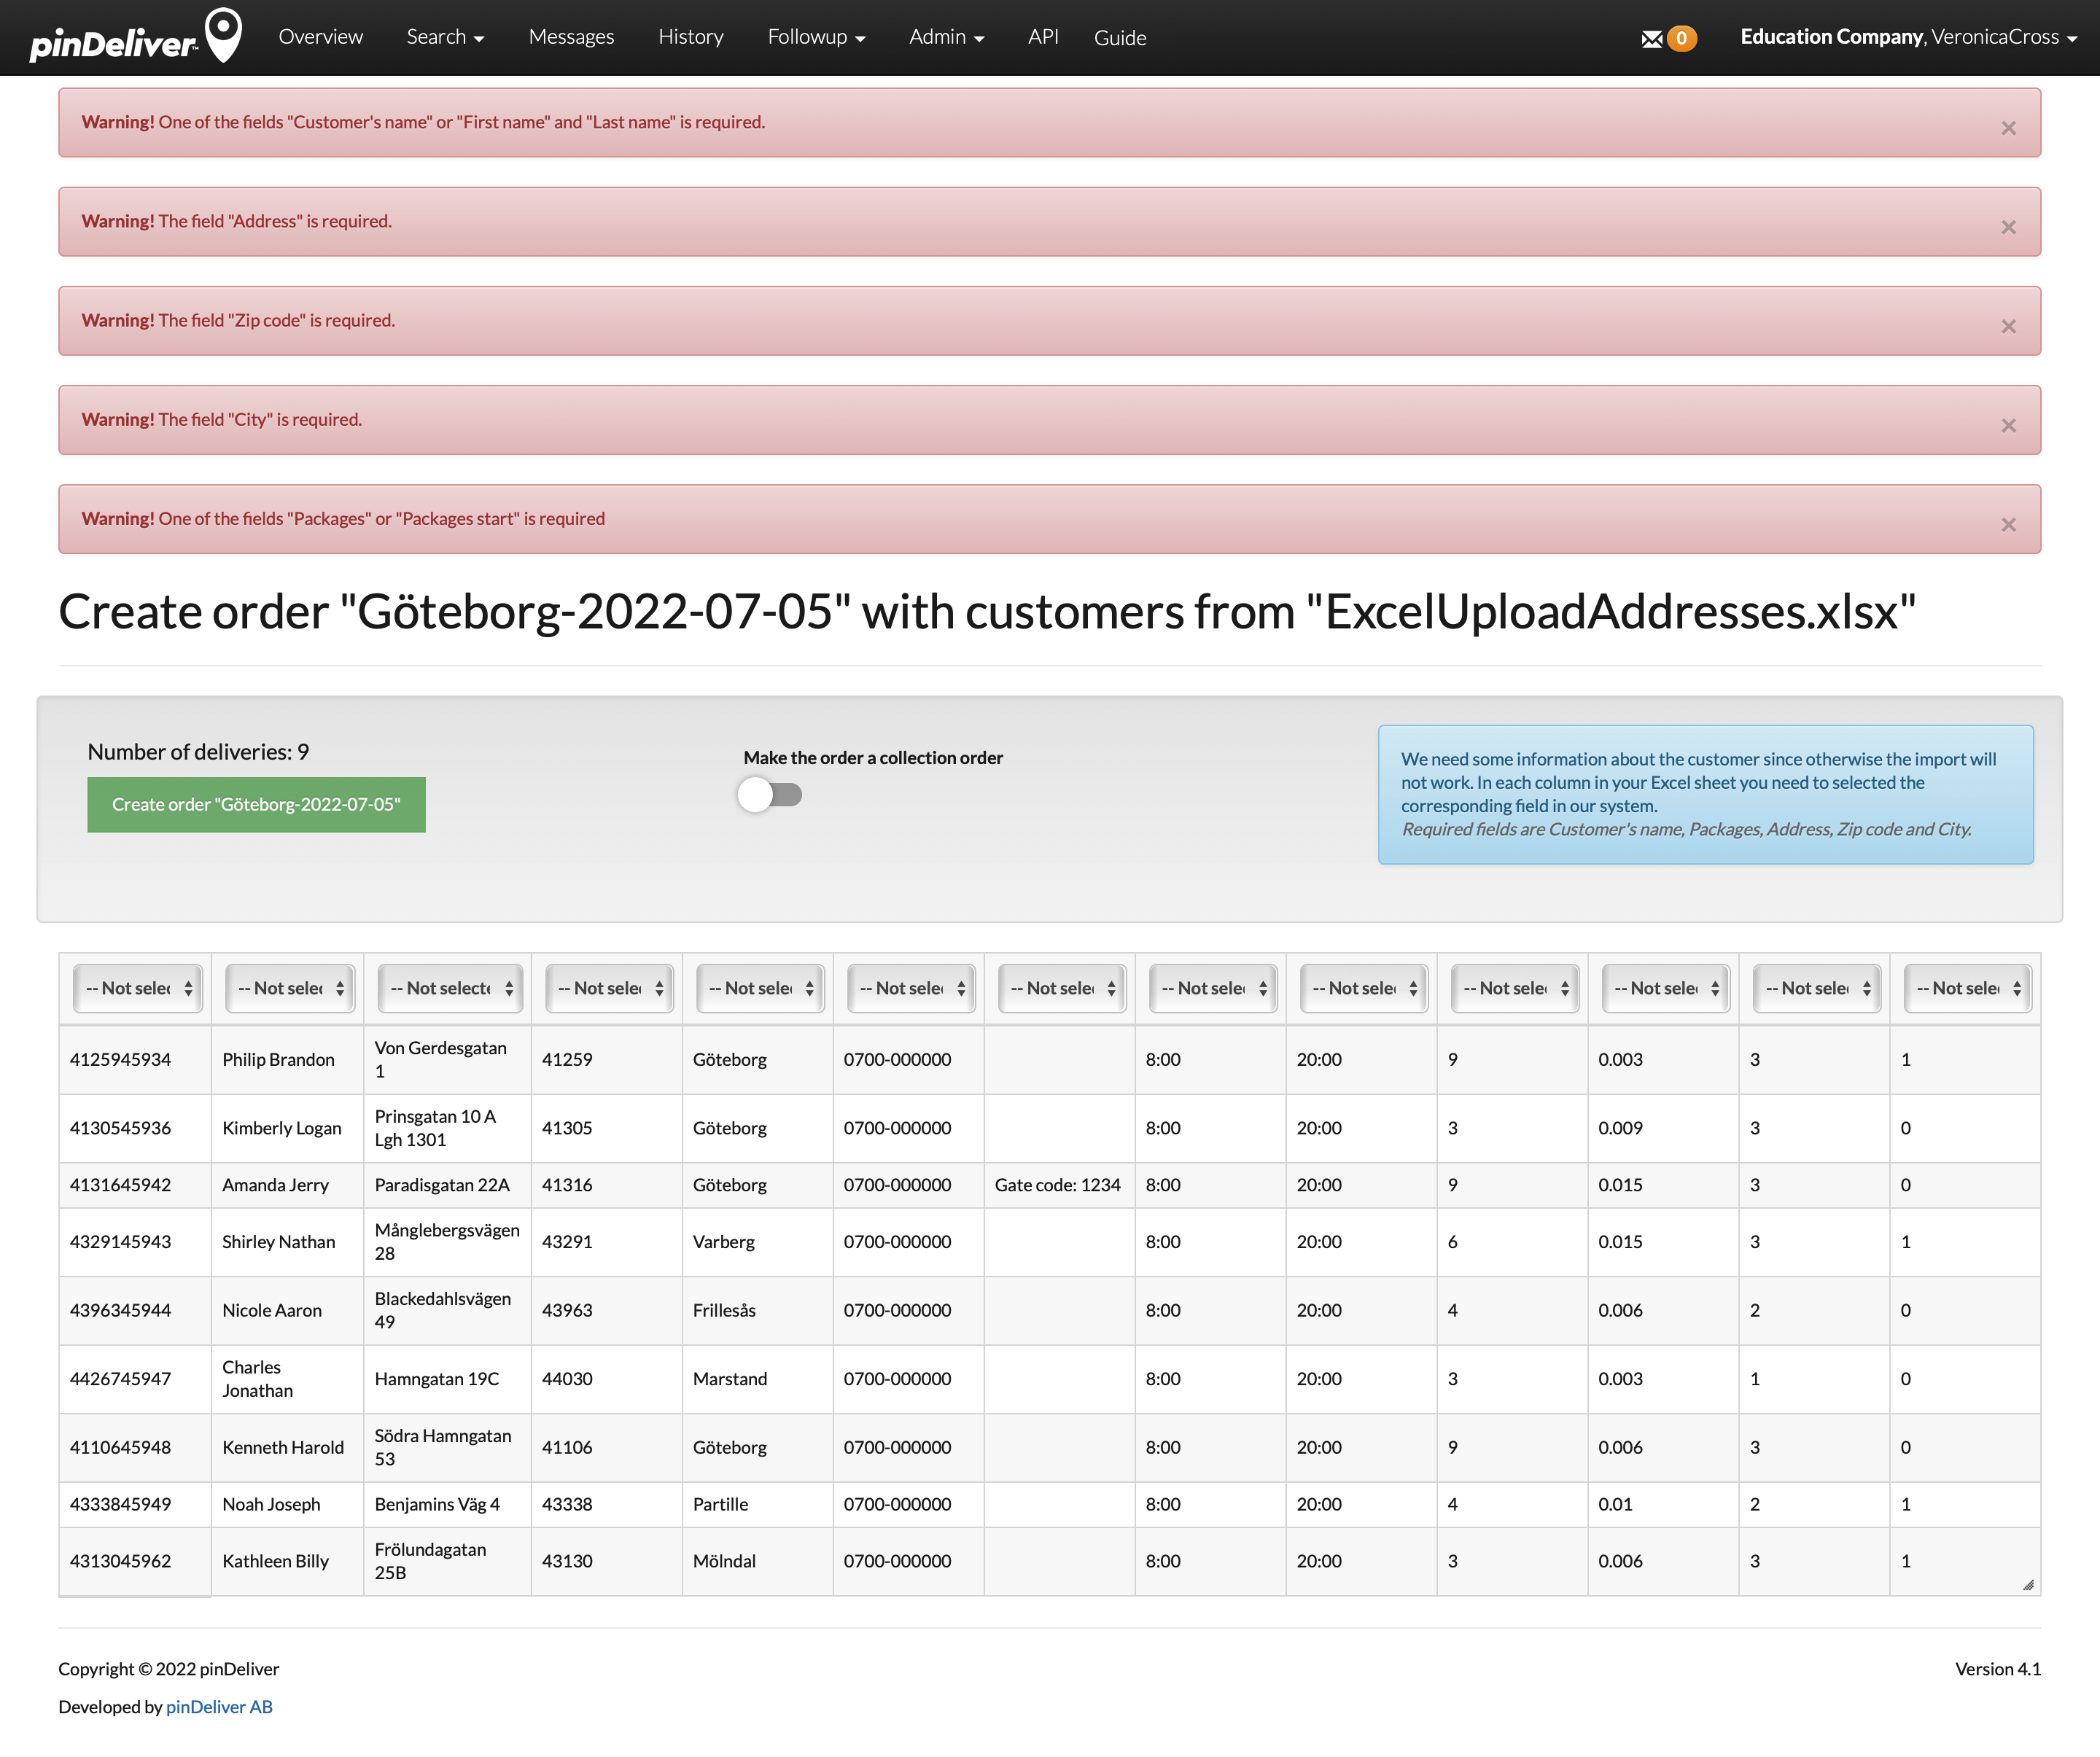
In the example below, the following fields have been mapped in sequential order:
- Tracking number
- Customer’s name
- Address
- Zip
- City
- Mobile phone
- Customer info 1
- Time window start
- Time window end
- Weight units
- Volume units
- Packages start (use Packages instead if two values are merged in one column)
- (Not selected) – (since Packages start is selected)
Once you have mapped the desired columns (please note that mapping all columns is not mandatory), you can proceed by clicking on Create order. If these orders are intended for a Click & Collect order, you must first select Make the order a collection order. Failure to do so will require you to restart the import process.
If all orders feature accurate addresses that can be matched with acceptable latitude and longitude coordinates, you will be directed to the optimization page. Here, you can choose which vehicles you would like to use, as demonstrated below. If you prefer not to perform route optimization at this moment, simply click Cancel to proceed with importing your customer orders without routing optimization.
Click & Collect
With pinDeliver’s Click & Collect functionality, you can implement a professional approach when customers visit your warehouse to personally collect their goods. The process for creating customer orders remains consistent with standard delivery orders. It is essential to note that when utilizing Click & Collect, your Delivery Group must be configured for depot usage.
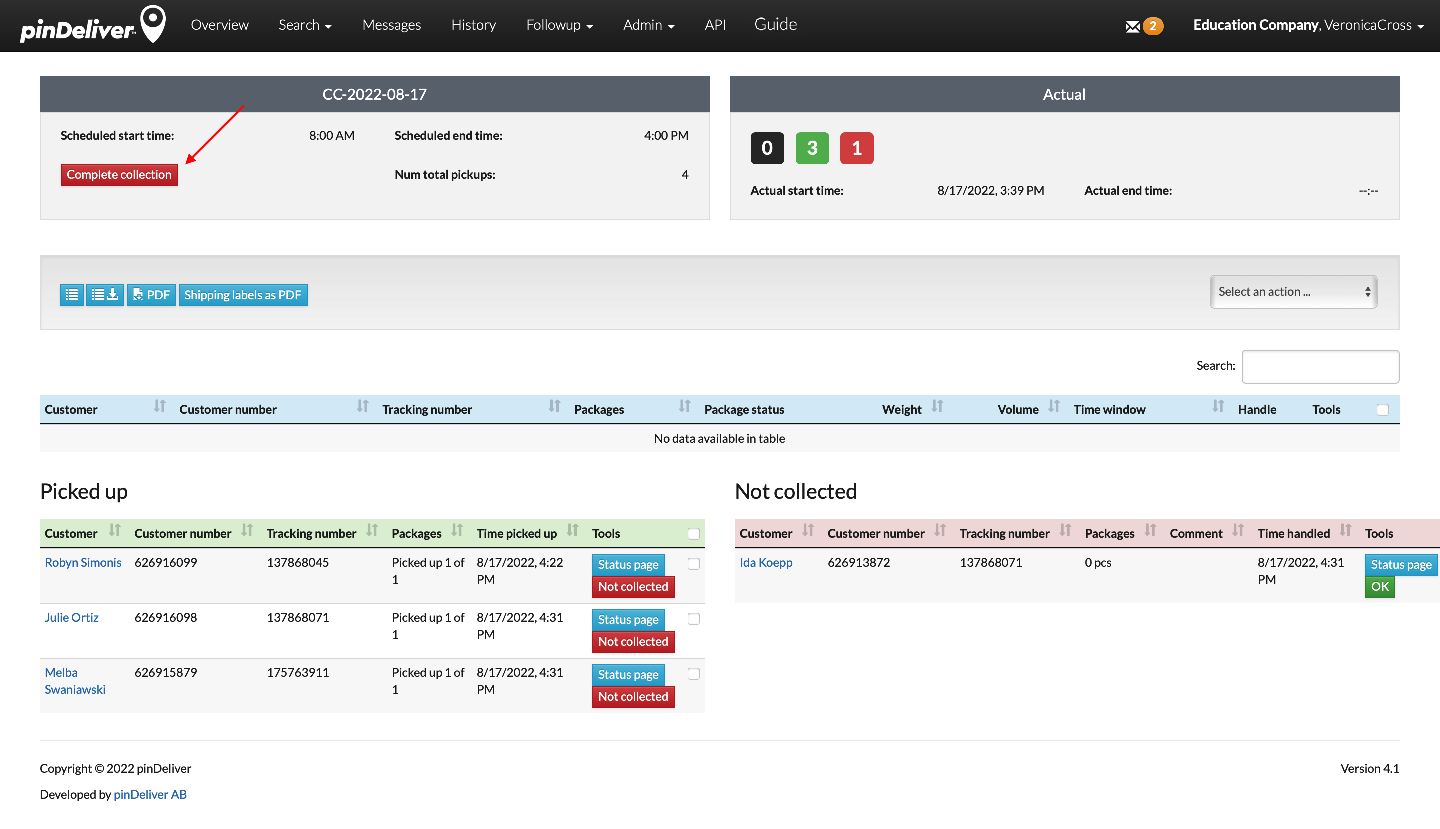
If you import orders from an Excel file, we recommend uploading all customer orders for a given day simultaneously. This will consolidate all customer orders into a single collection order. During Excel uploads, ensure that you tick the checkbox labeled Make the order a collection order, as shown in the image below. Alternatively, if orders are generated through an integration, set the order type to collect. This also enables you to add orders to an existing collection order, even if that collection order has been locked or started.

Once the collection order has been generated, it is time to start the collection process to enable customers to pick up their goods. Click the Lock button to secure the collection order, and subsequently, click the Start collection button. These actions are typically performed one after the other, but the collection can of course start at a later time if preferable. For instance, you may choose to prepare and lock the collection order the day before and trigger SMS messages to customers the following day when you click Start collection.
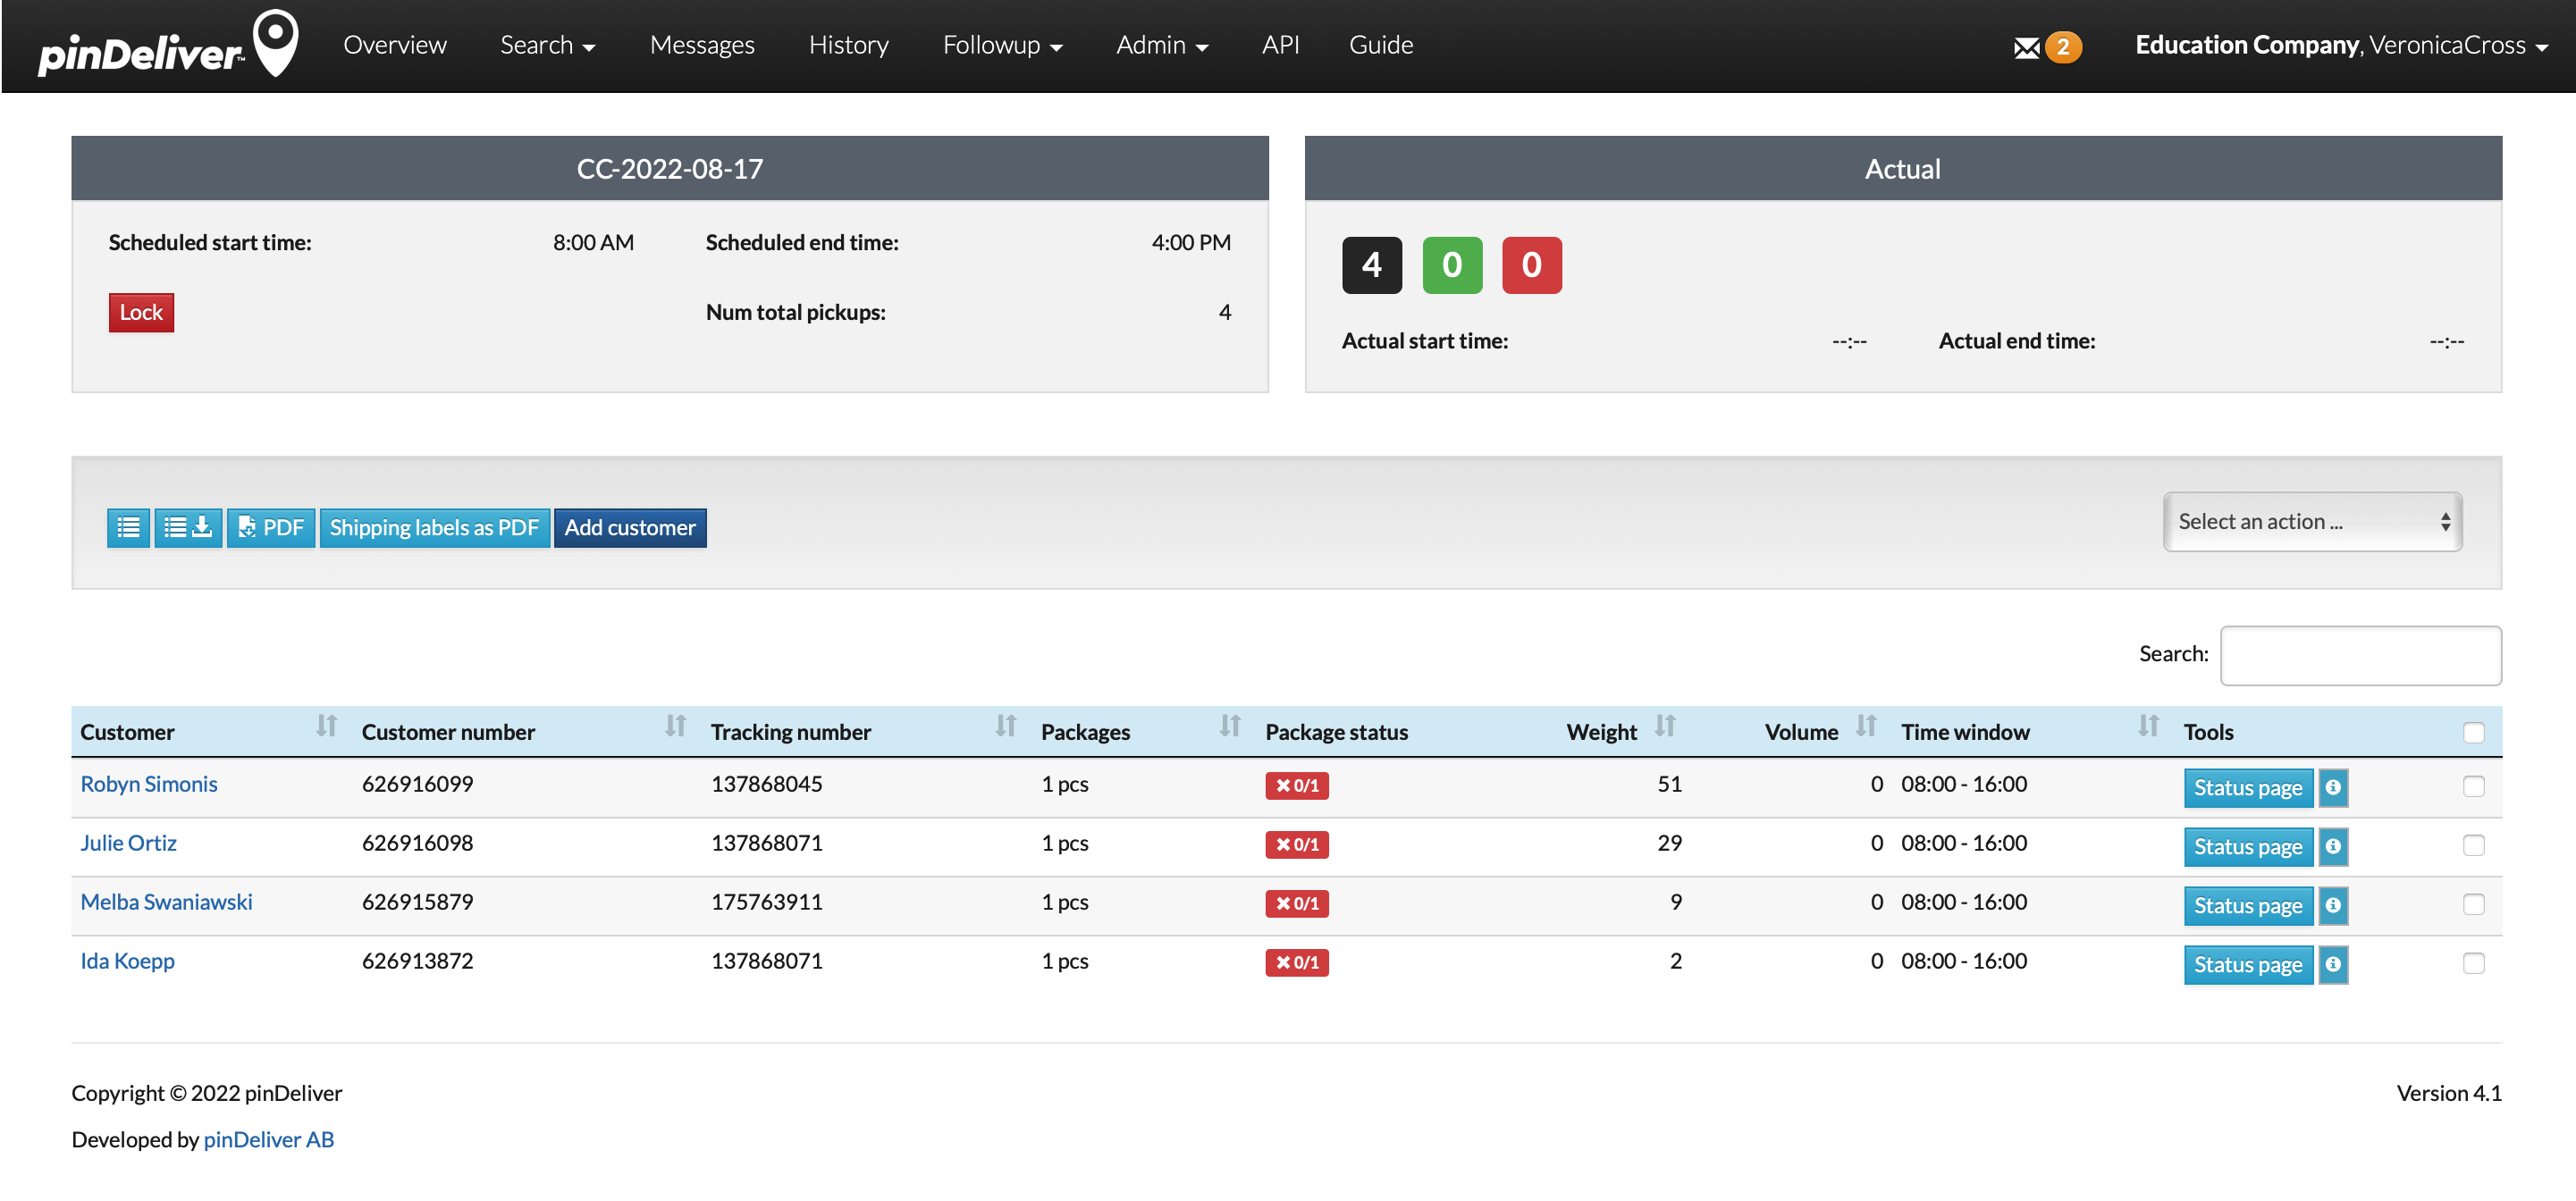

You can track the progress of the collection order. Once customer orders have been picked up, they will be relocated to the lower left corner. Generally, there is no need to manually select orders that have not been collected unless you choose to do so.
Customer information for collect orders
The customer communication for collect orders is quite similar to that of delivery orders. A widely used messaging configuration is demonstrated in the table below, with slight variations depending on whether the customer orders are uploaded from Excel or via an integration.
You can configure messaging settings in the Admin/Settings/SMS section. Alternatively, for sender-specific messages, you have the option to set up unique messages for each sender.
| Event | Description | Excel upload | Integration |
|---|---|---|---|
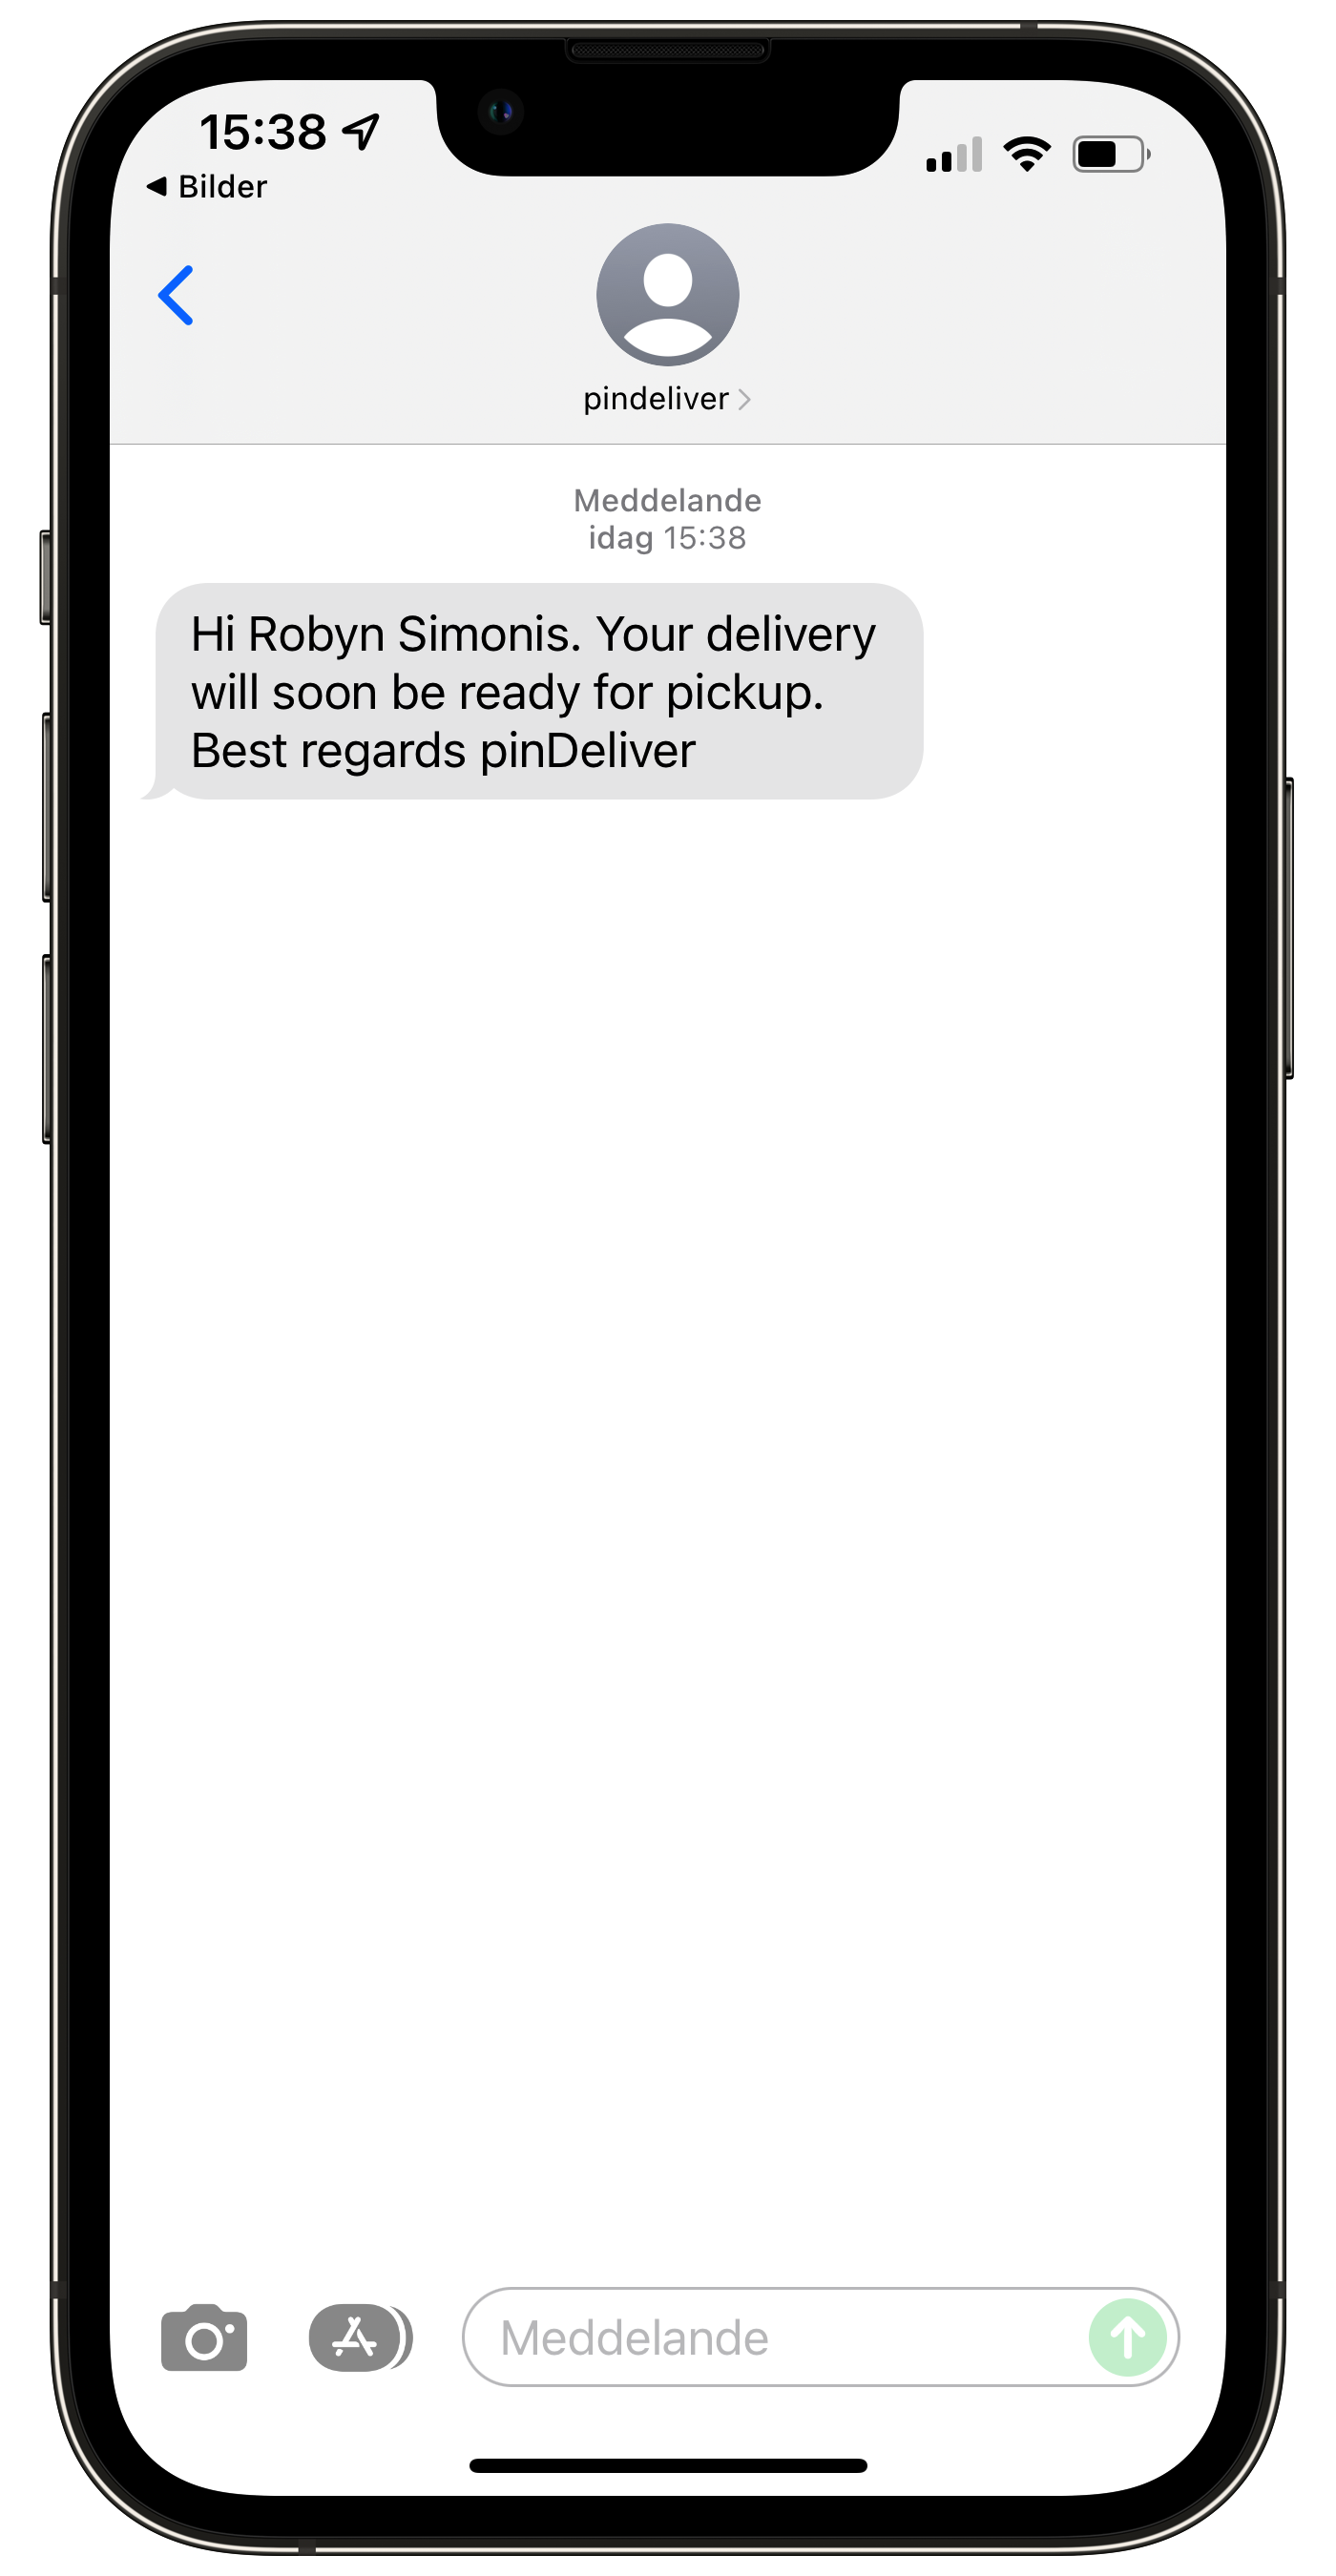
| Send SMS when a customer is created | This feature ensures that as soon as a new customer is created within your system, an SMS notification is automatically sent to them. The system is designed to seamlessly integrate with existing collection orders when customers are added to these orders and the Lock and Start Collection buttons are activated. We recommend composing the SMS as if the collection process has started. | X | X |
| Send SMS to customers when the driver begins collection. | The SMS will be sent when the Start collection is pressed. | X | |
| Send SMS to customers when delivery is not collected | SMS sent to all customers who have not picked up their orders when the collection order is marked as completed. | X | X |
The images below show examples of SMS messages for these three scenarios.
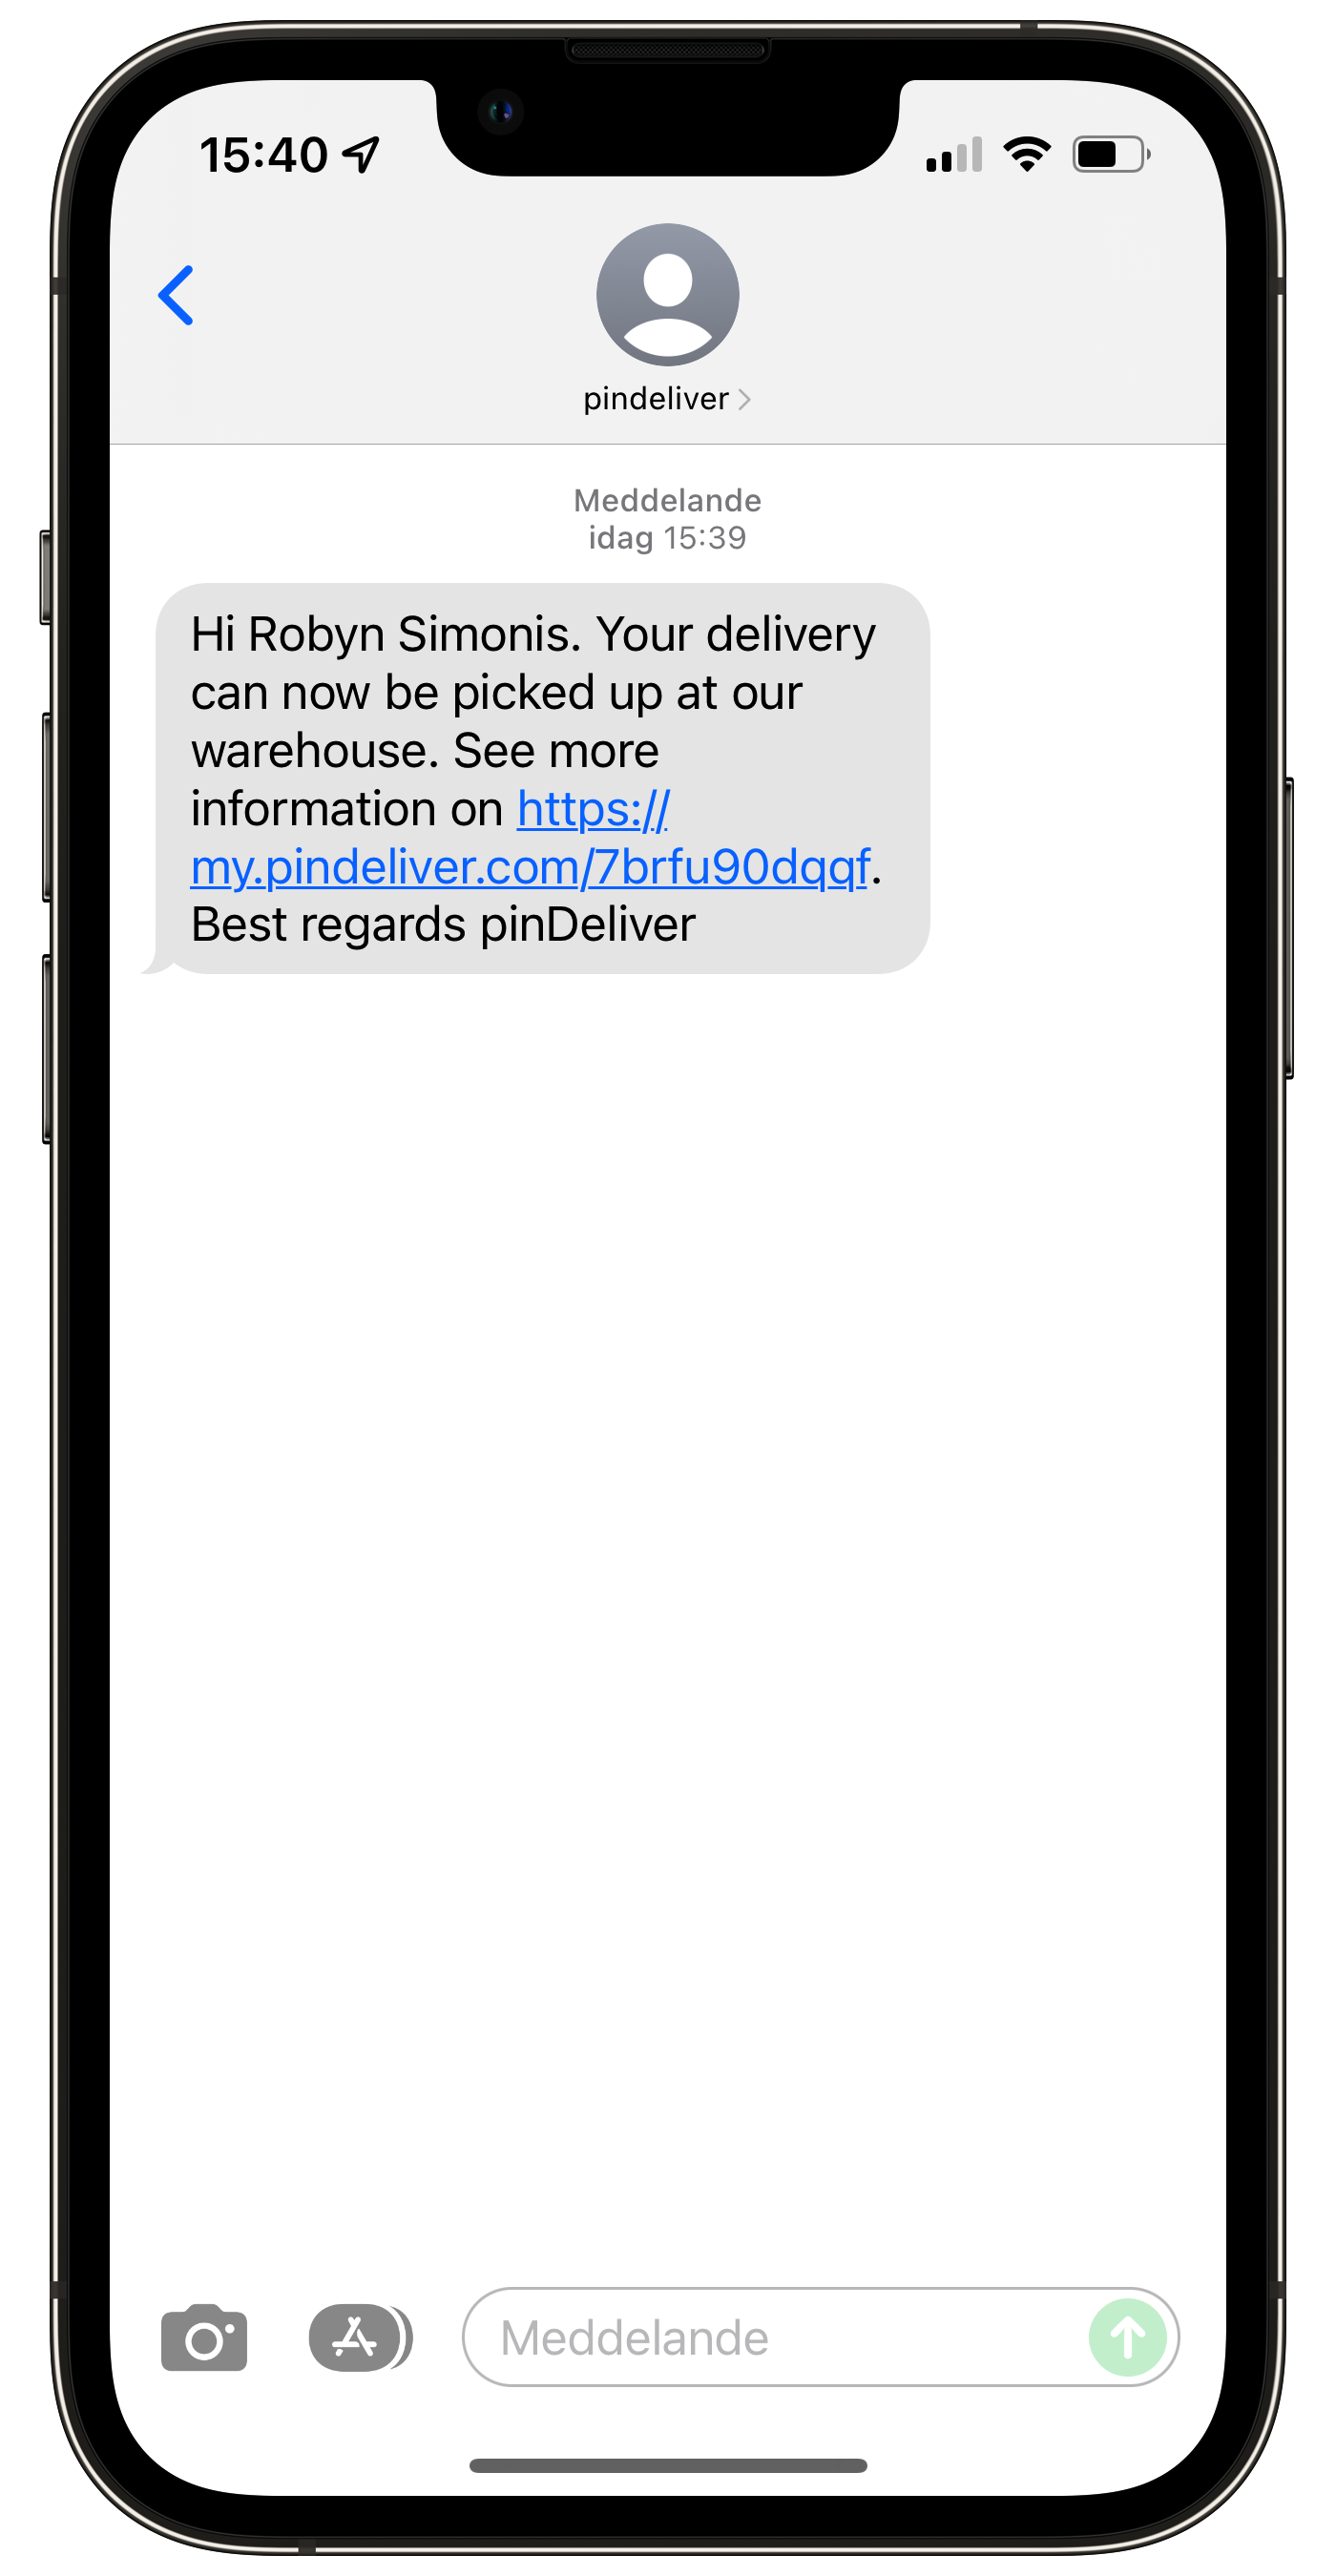
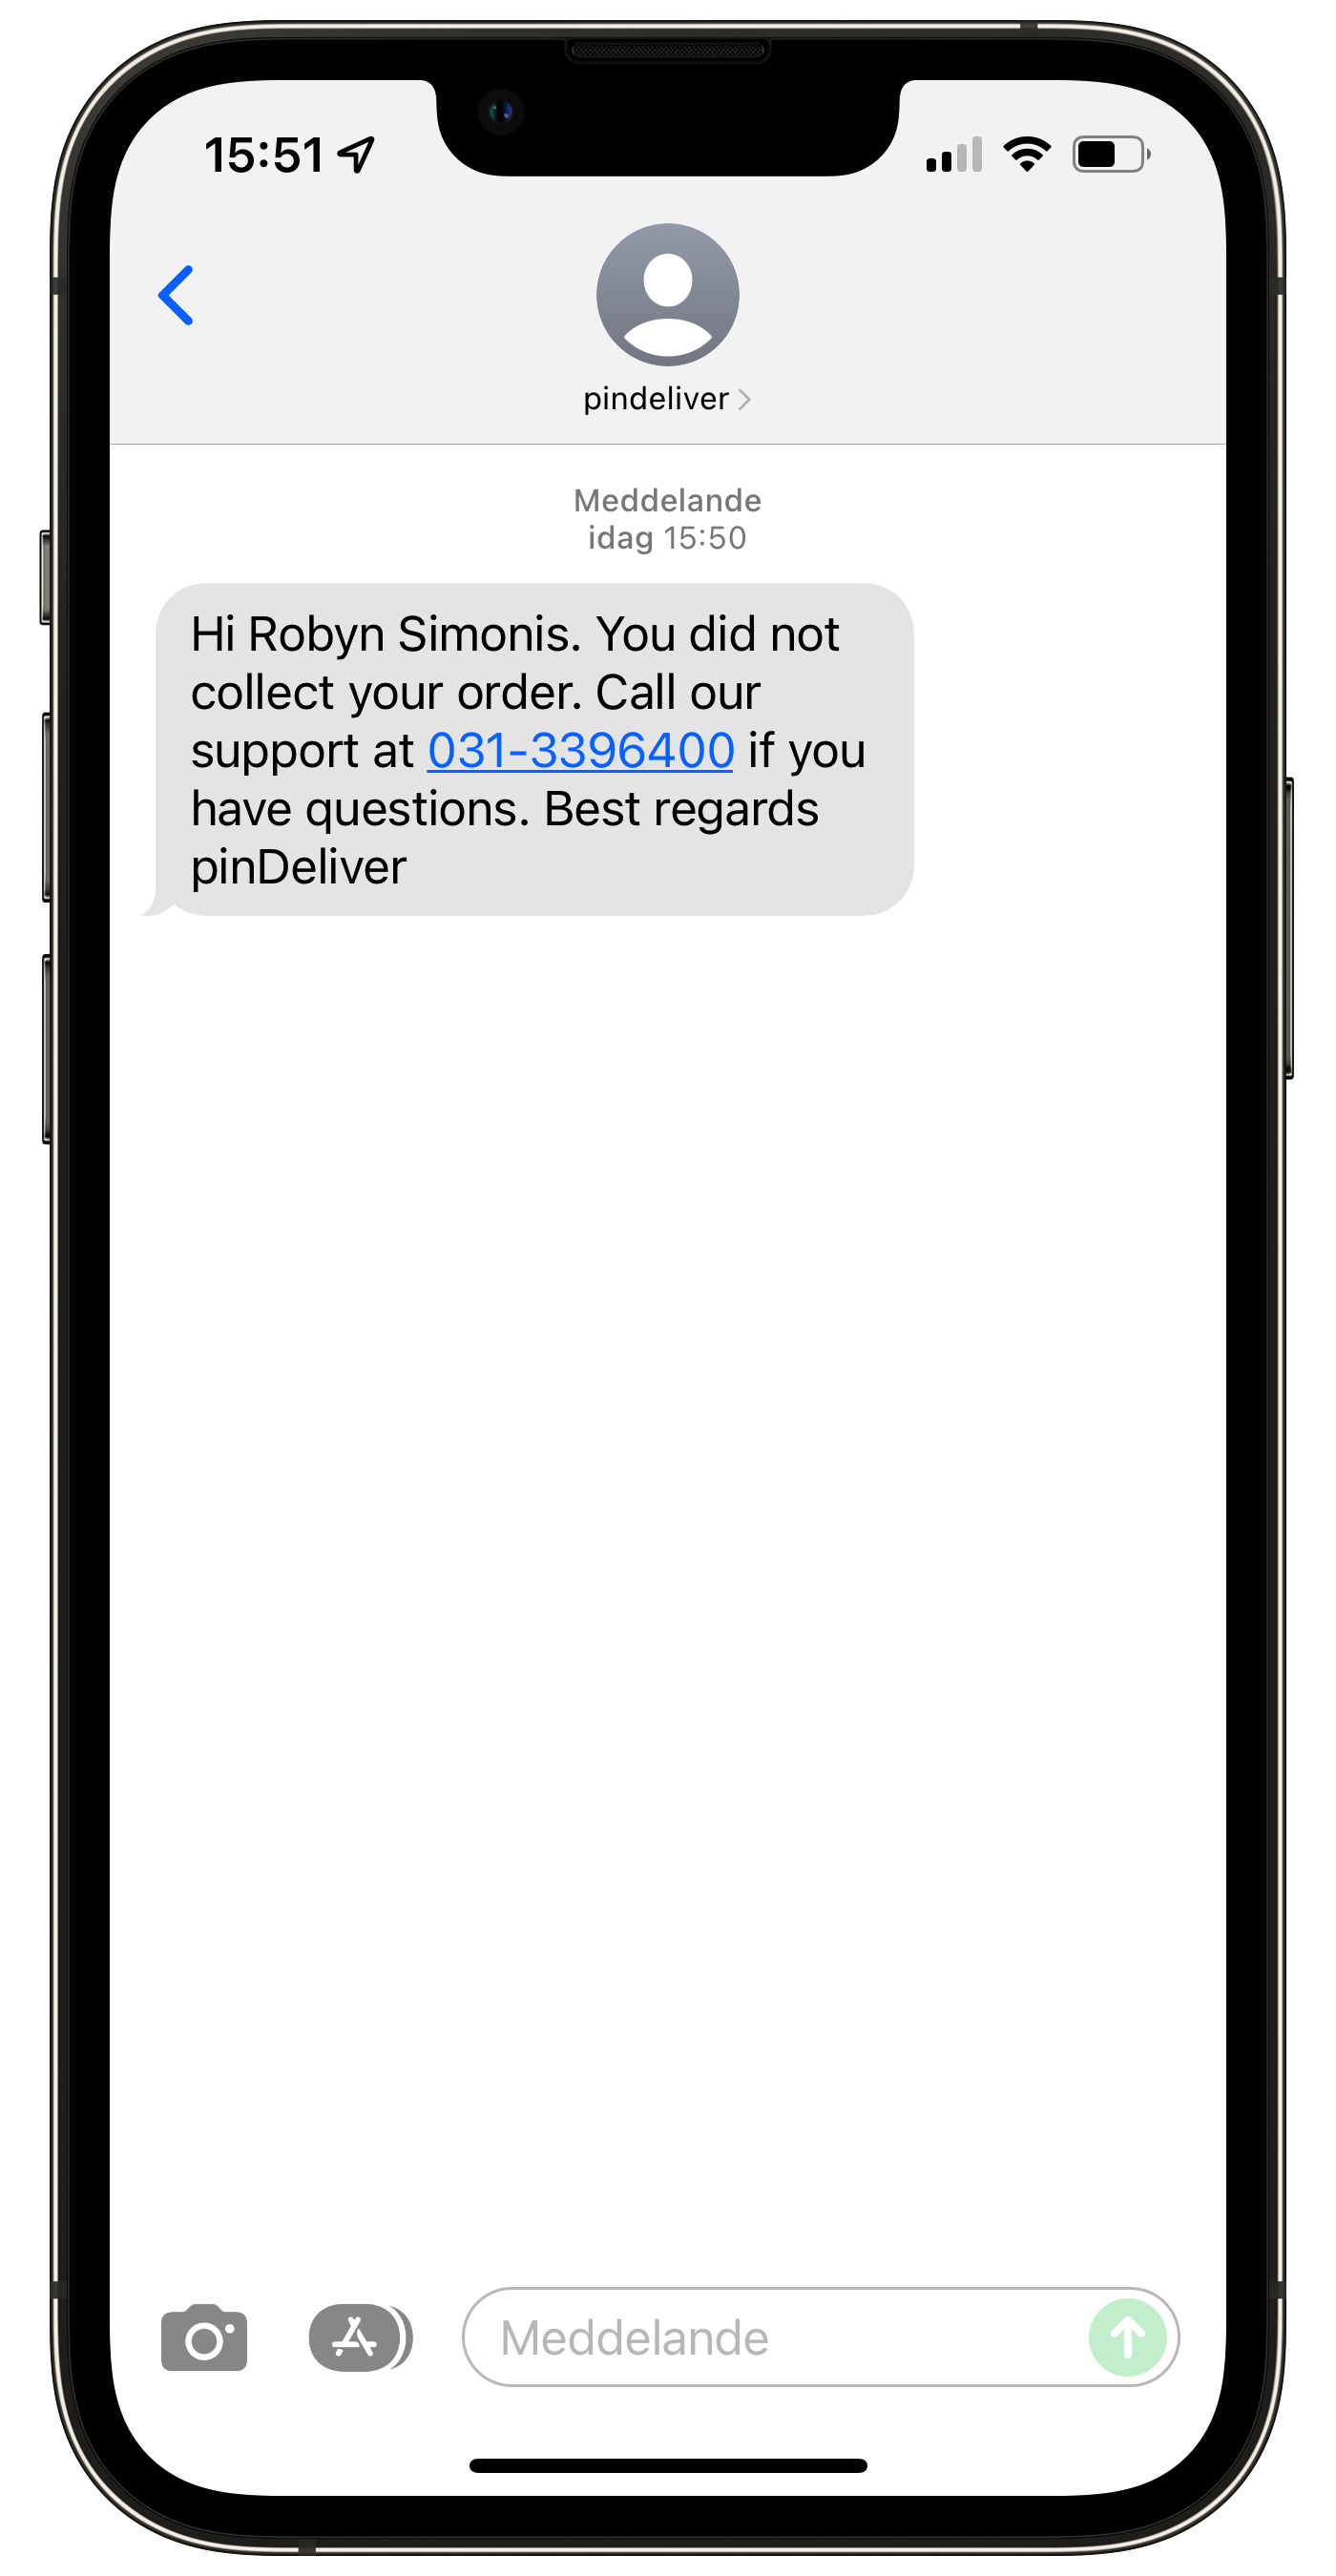
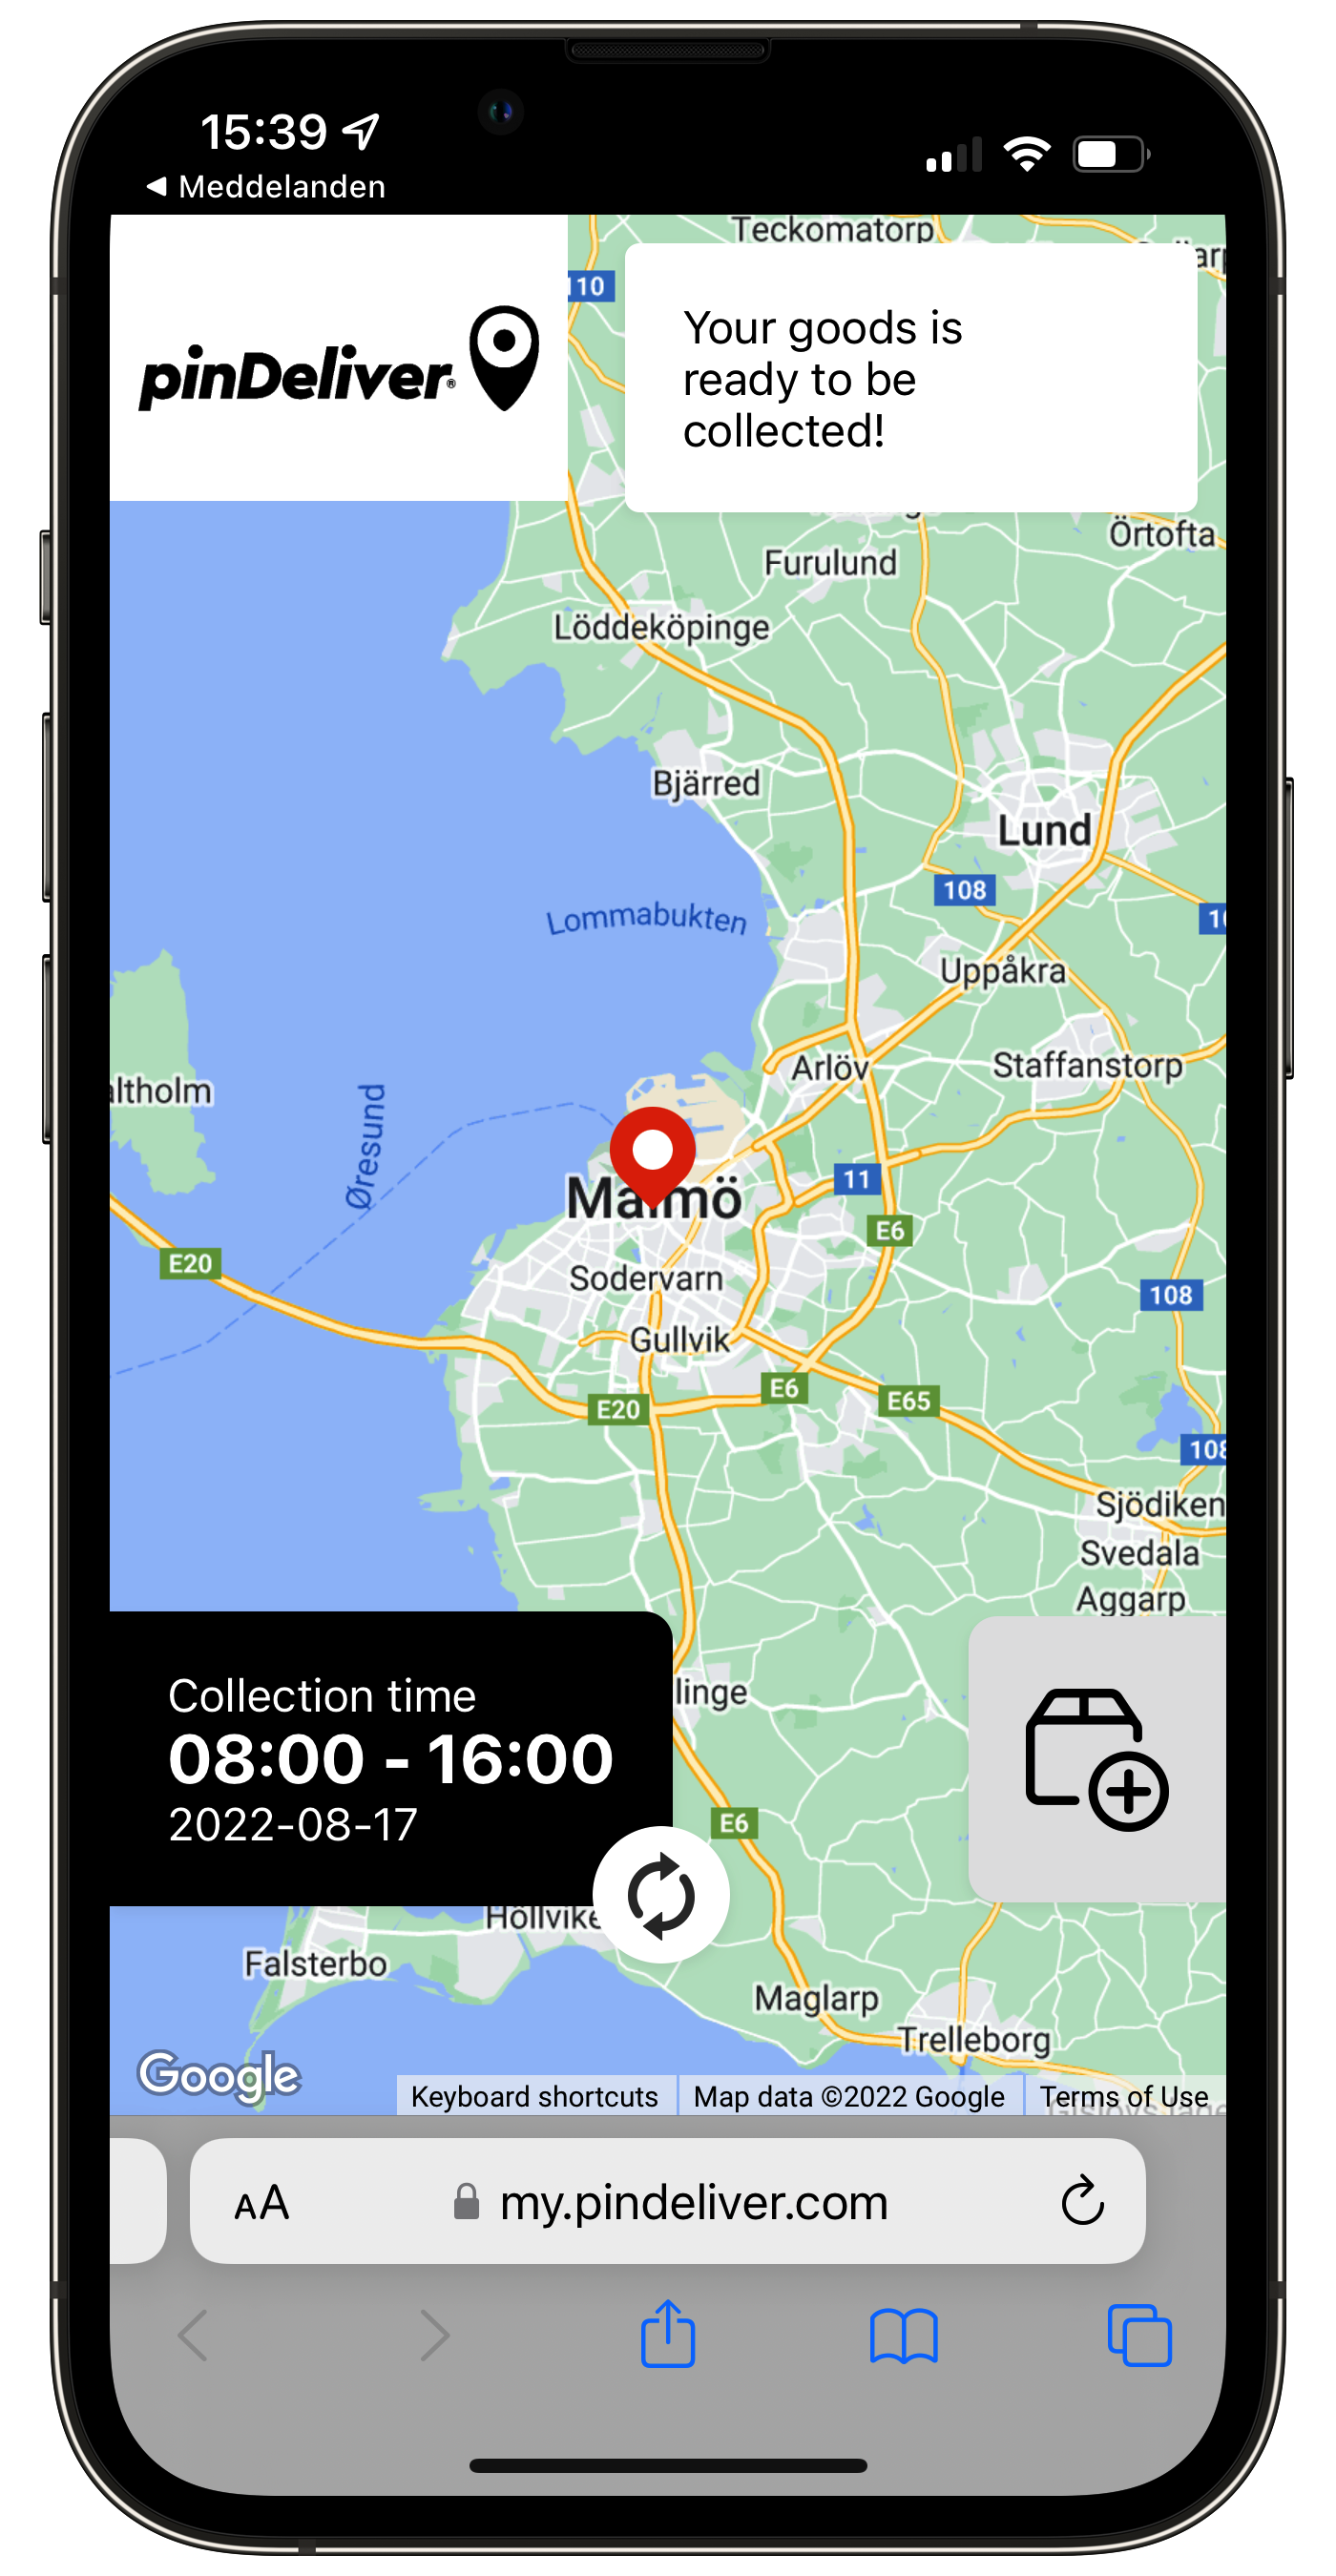
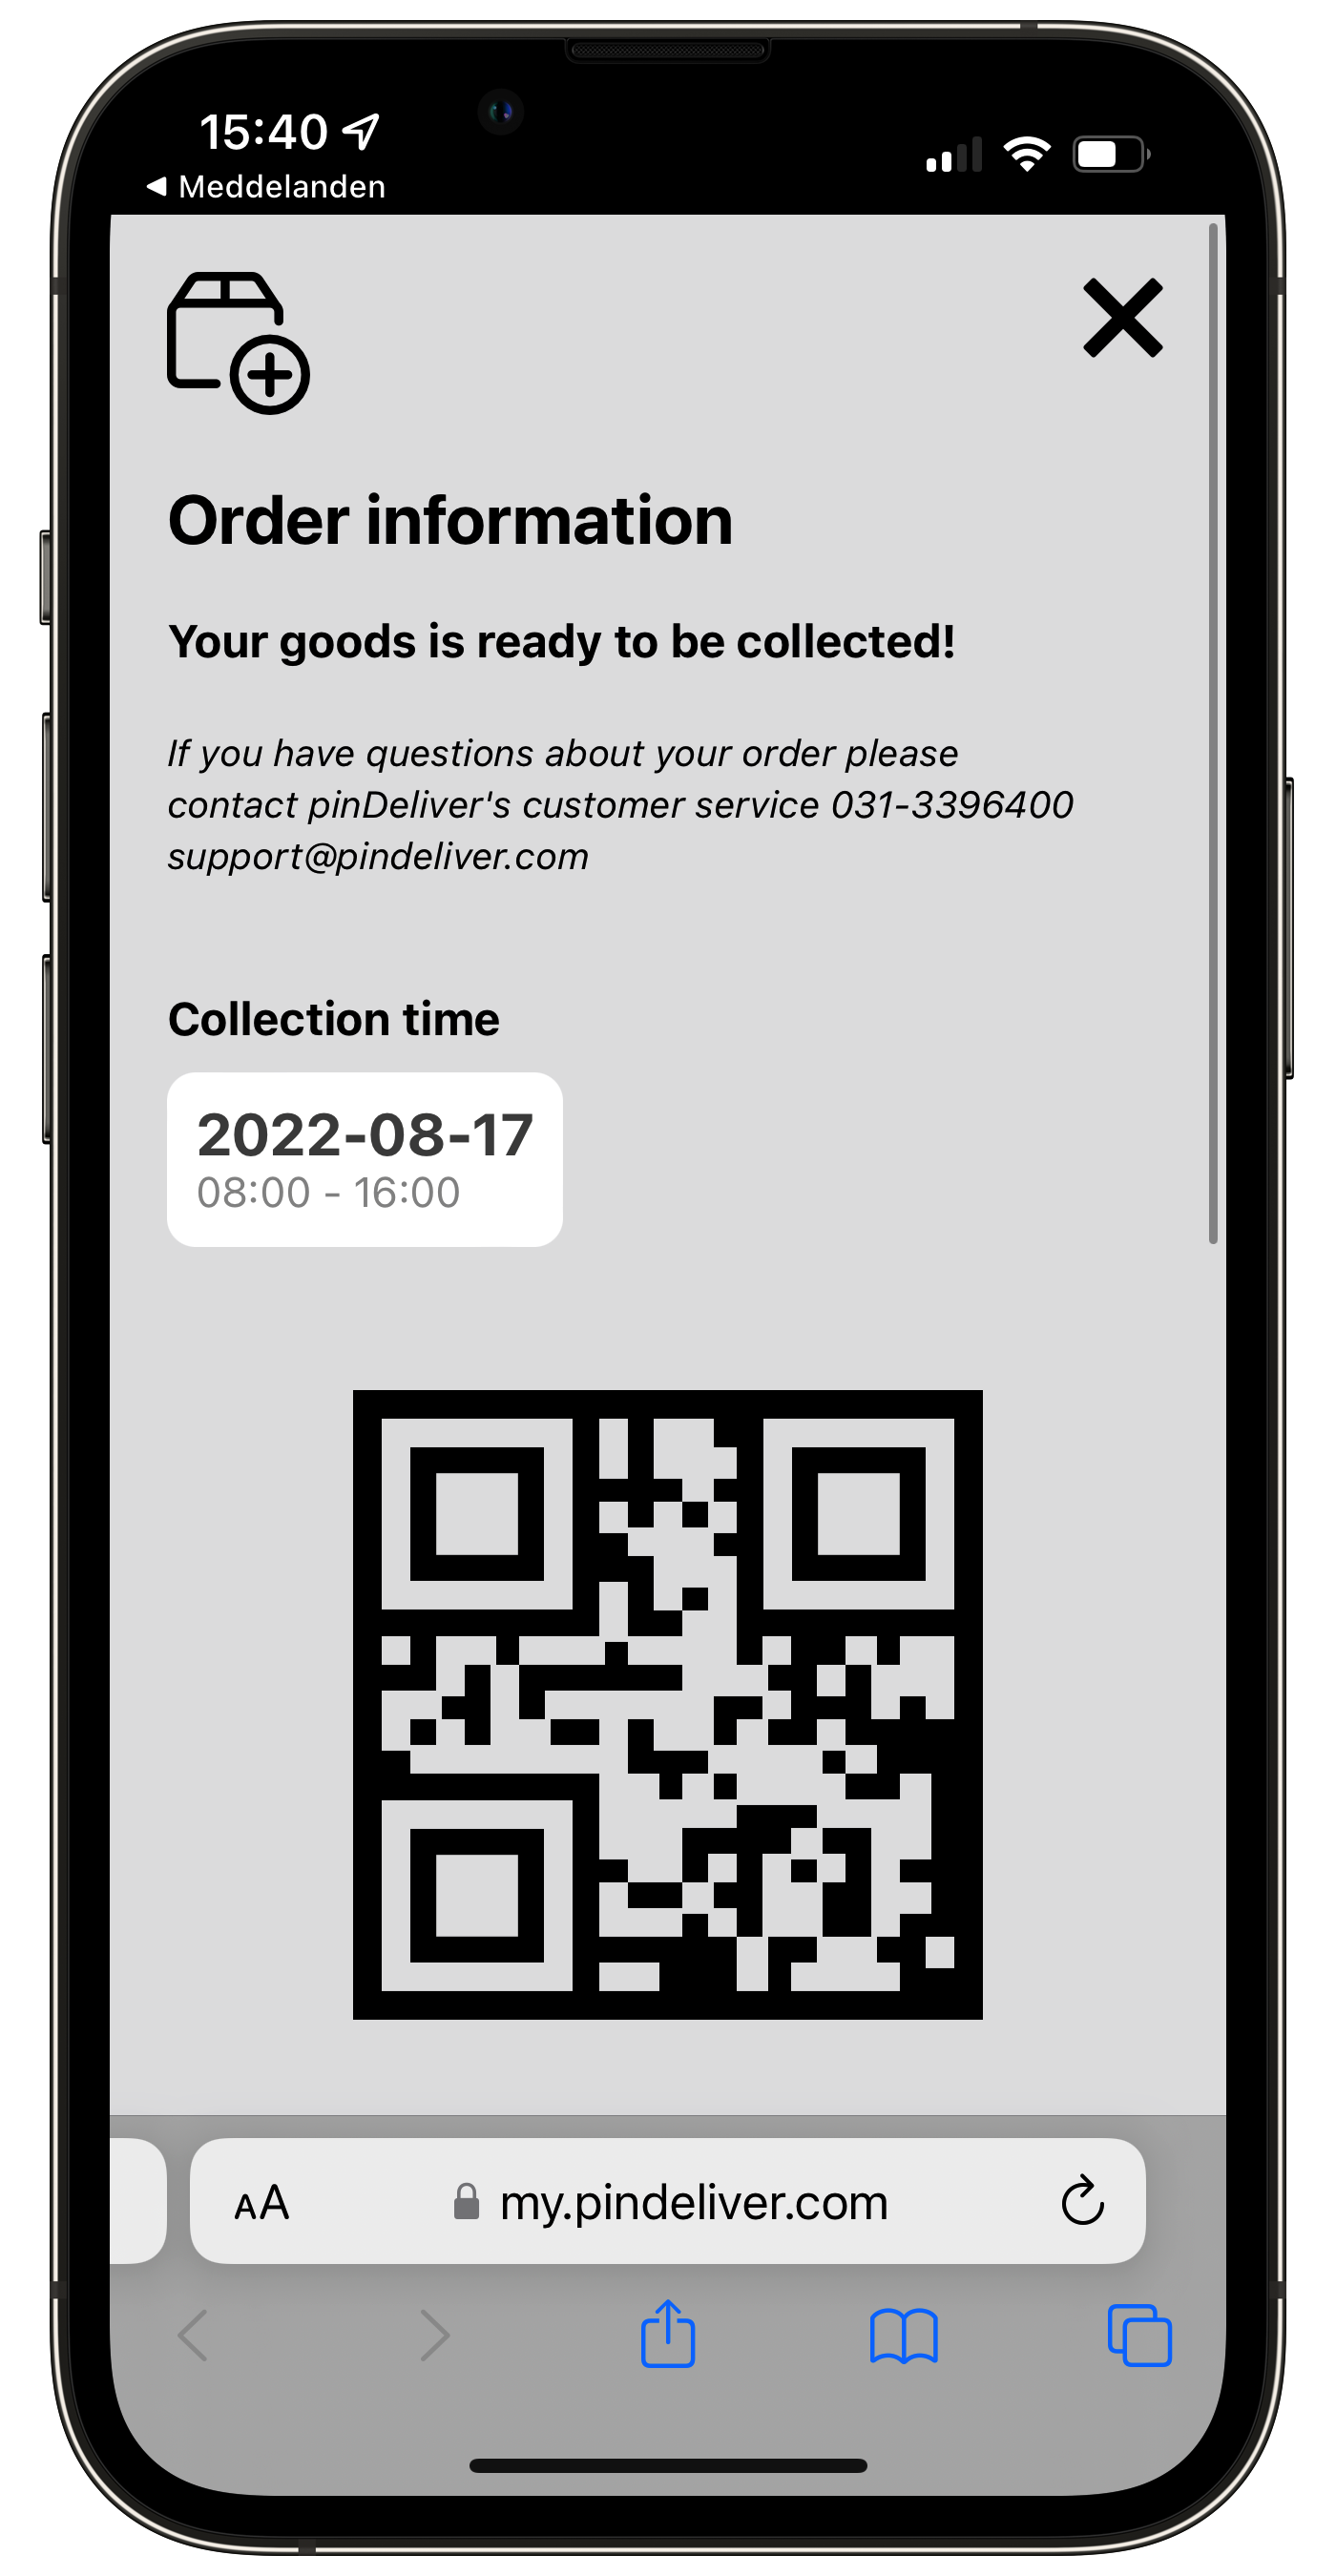
The images below display examples of the customer information page that customers can access. The QR code can be accessed by clicking the package icon located in the lower right corner of the map picture. This QR code is used when the warehouse uses the Hub App to deliver collect orders.
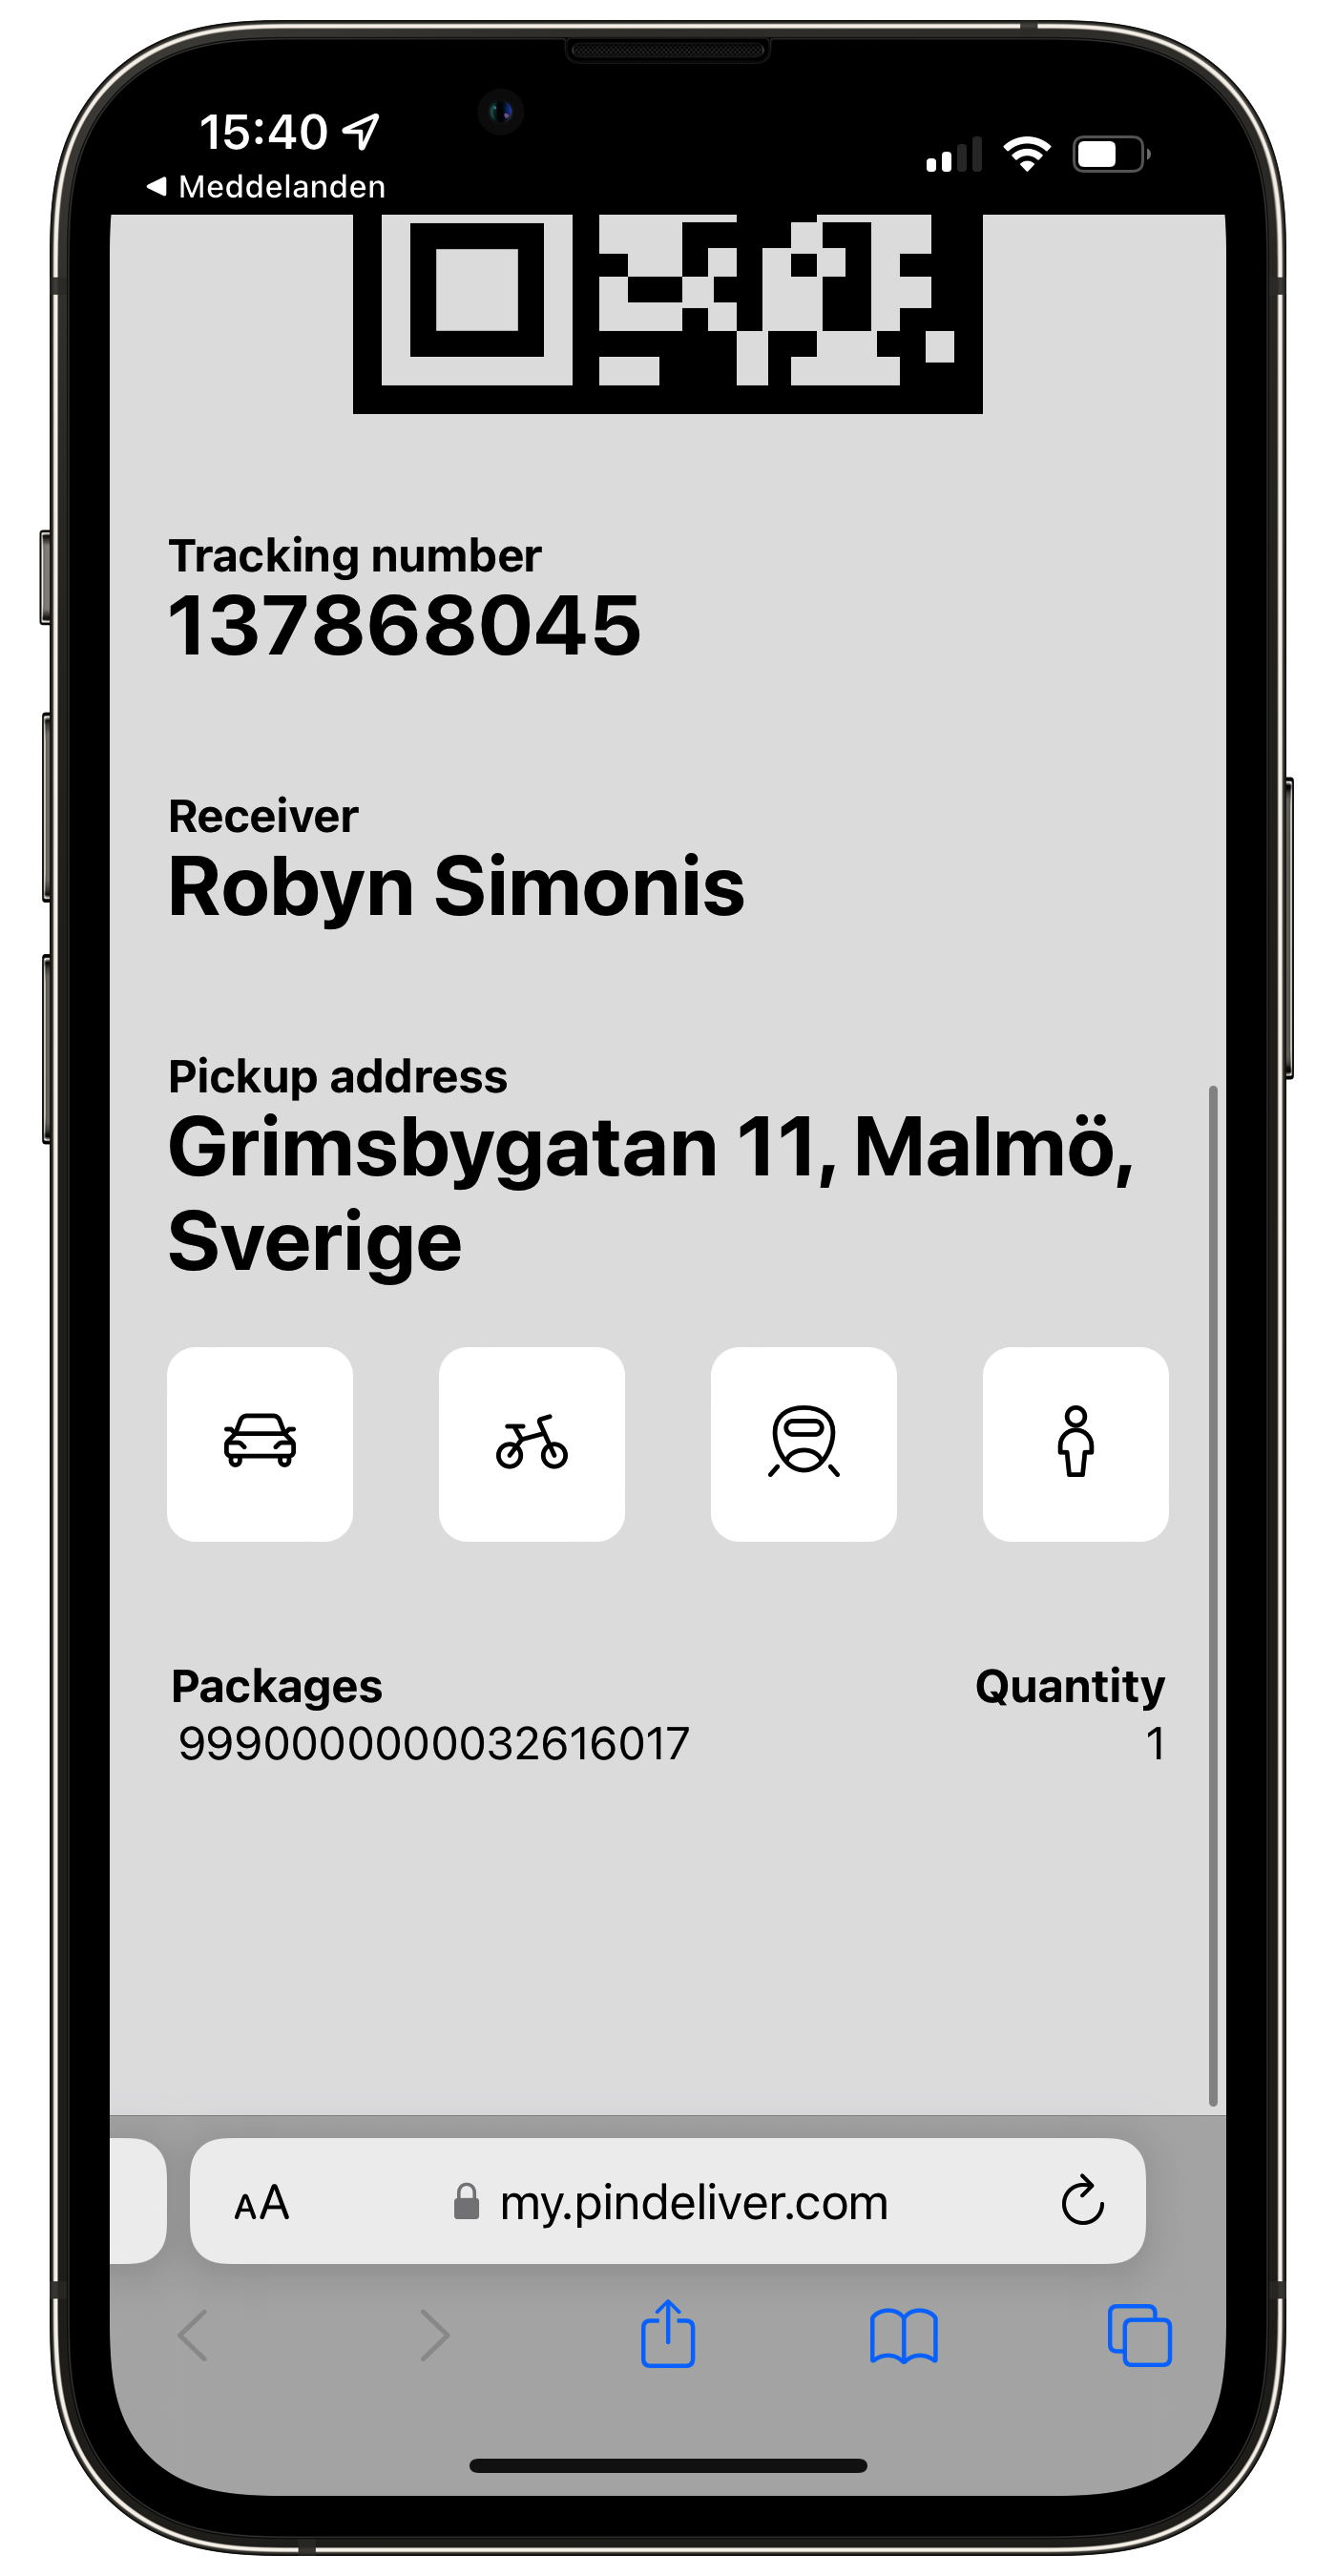
Deliver a collect order
When the customer arrives for pickup, you have two different methods for marking the order as collected; either from pinDeliver Office or from the Hub App.
Delivery from Office
To mark a customer order as collected using Office, simply click the OK button. However, if you know that the customer will not be picking up the order, select Not collected. In this case, if the customer plans to collect the order on a different day, you will need to move the order to another collection order. To do this, check the order on the right, and from the drop-down menu, choose the option to move it to another collection order, for instance a collection order scheduled for the day after.
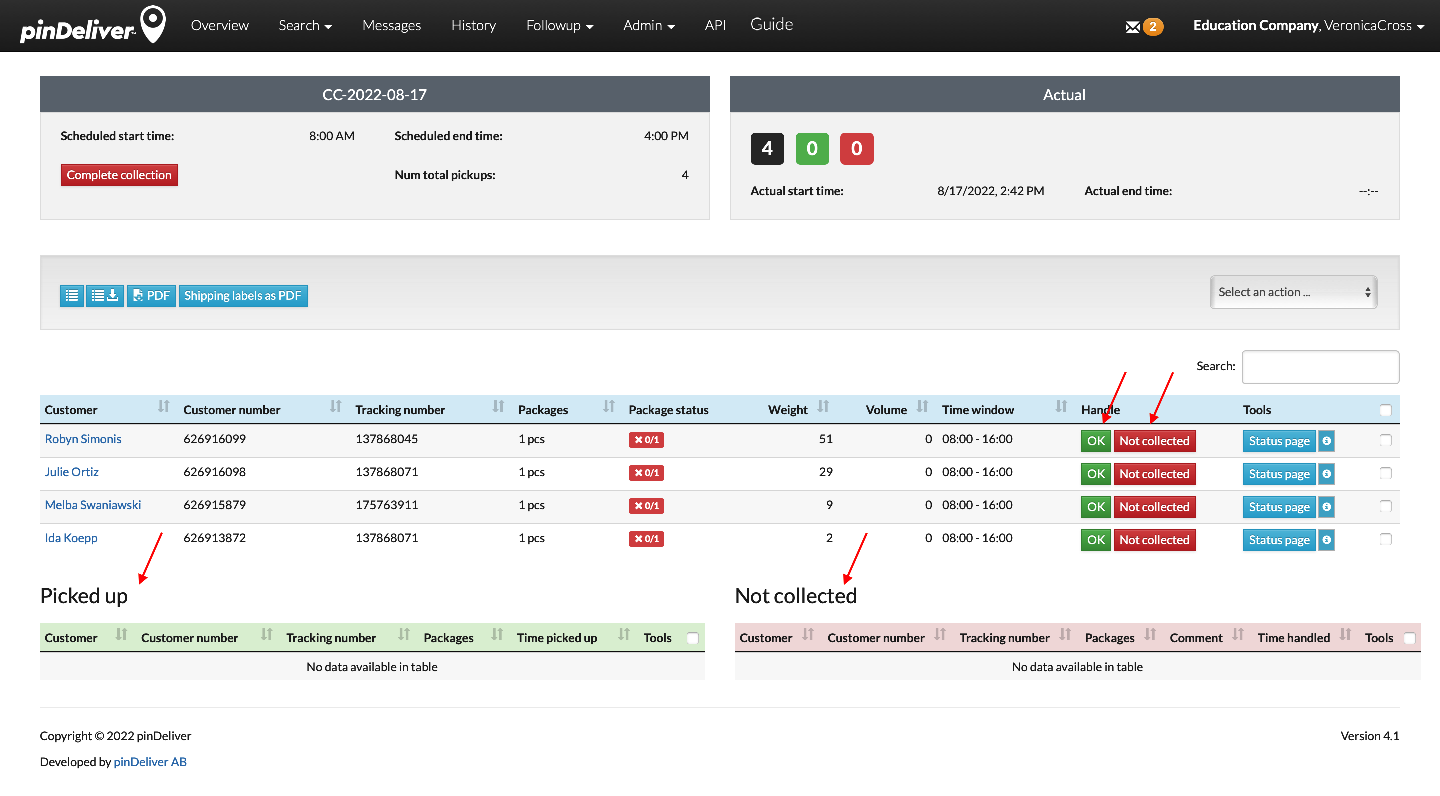
When all customer orders have been collected, you can wrap up the collection order by selecting Lock Collection.
Delivery from the Hub App
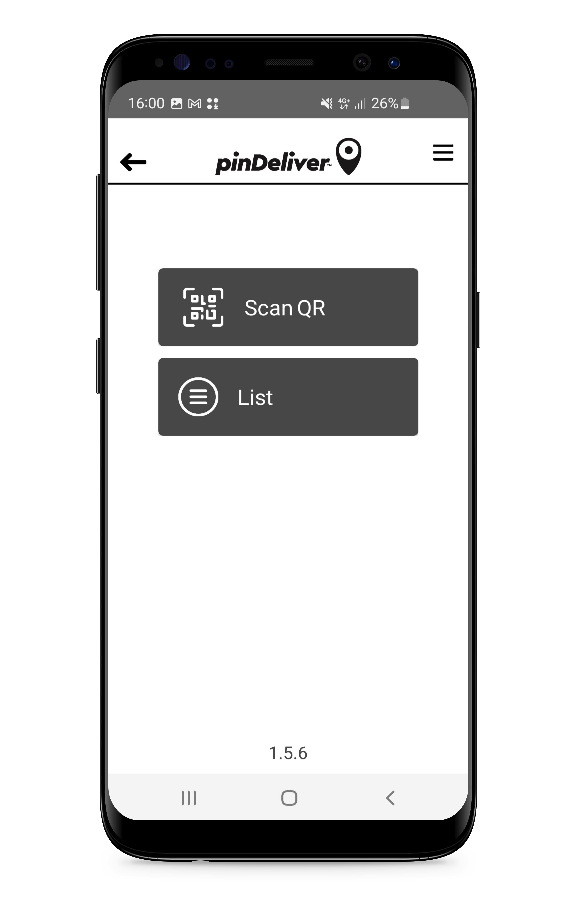
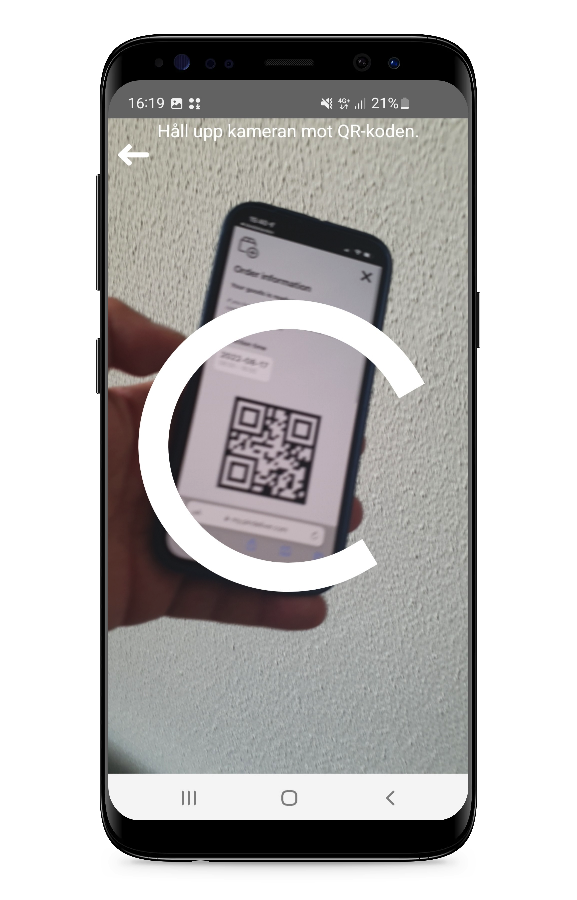
A simple method for marking a customer order as collected is by using the Hub App. Simply select the Scan QRbutton, which will activate the camera. Proceed to scan the QR code from the customer’s phone, confirm the pickup on the popup window, and you are all set.
Complete collection order
To finalize the collection order, typically when all collect orders have been picked up, just click Complete collection. If there are any orders that have not been collected, customers will receive SMS messages if you have configured this in the SMS section..
Drivers
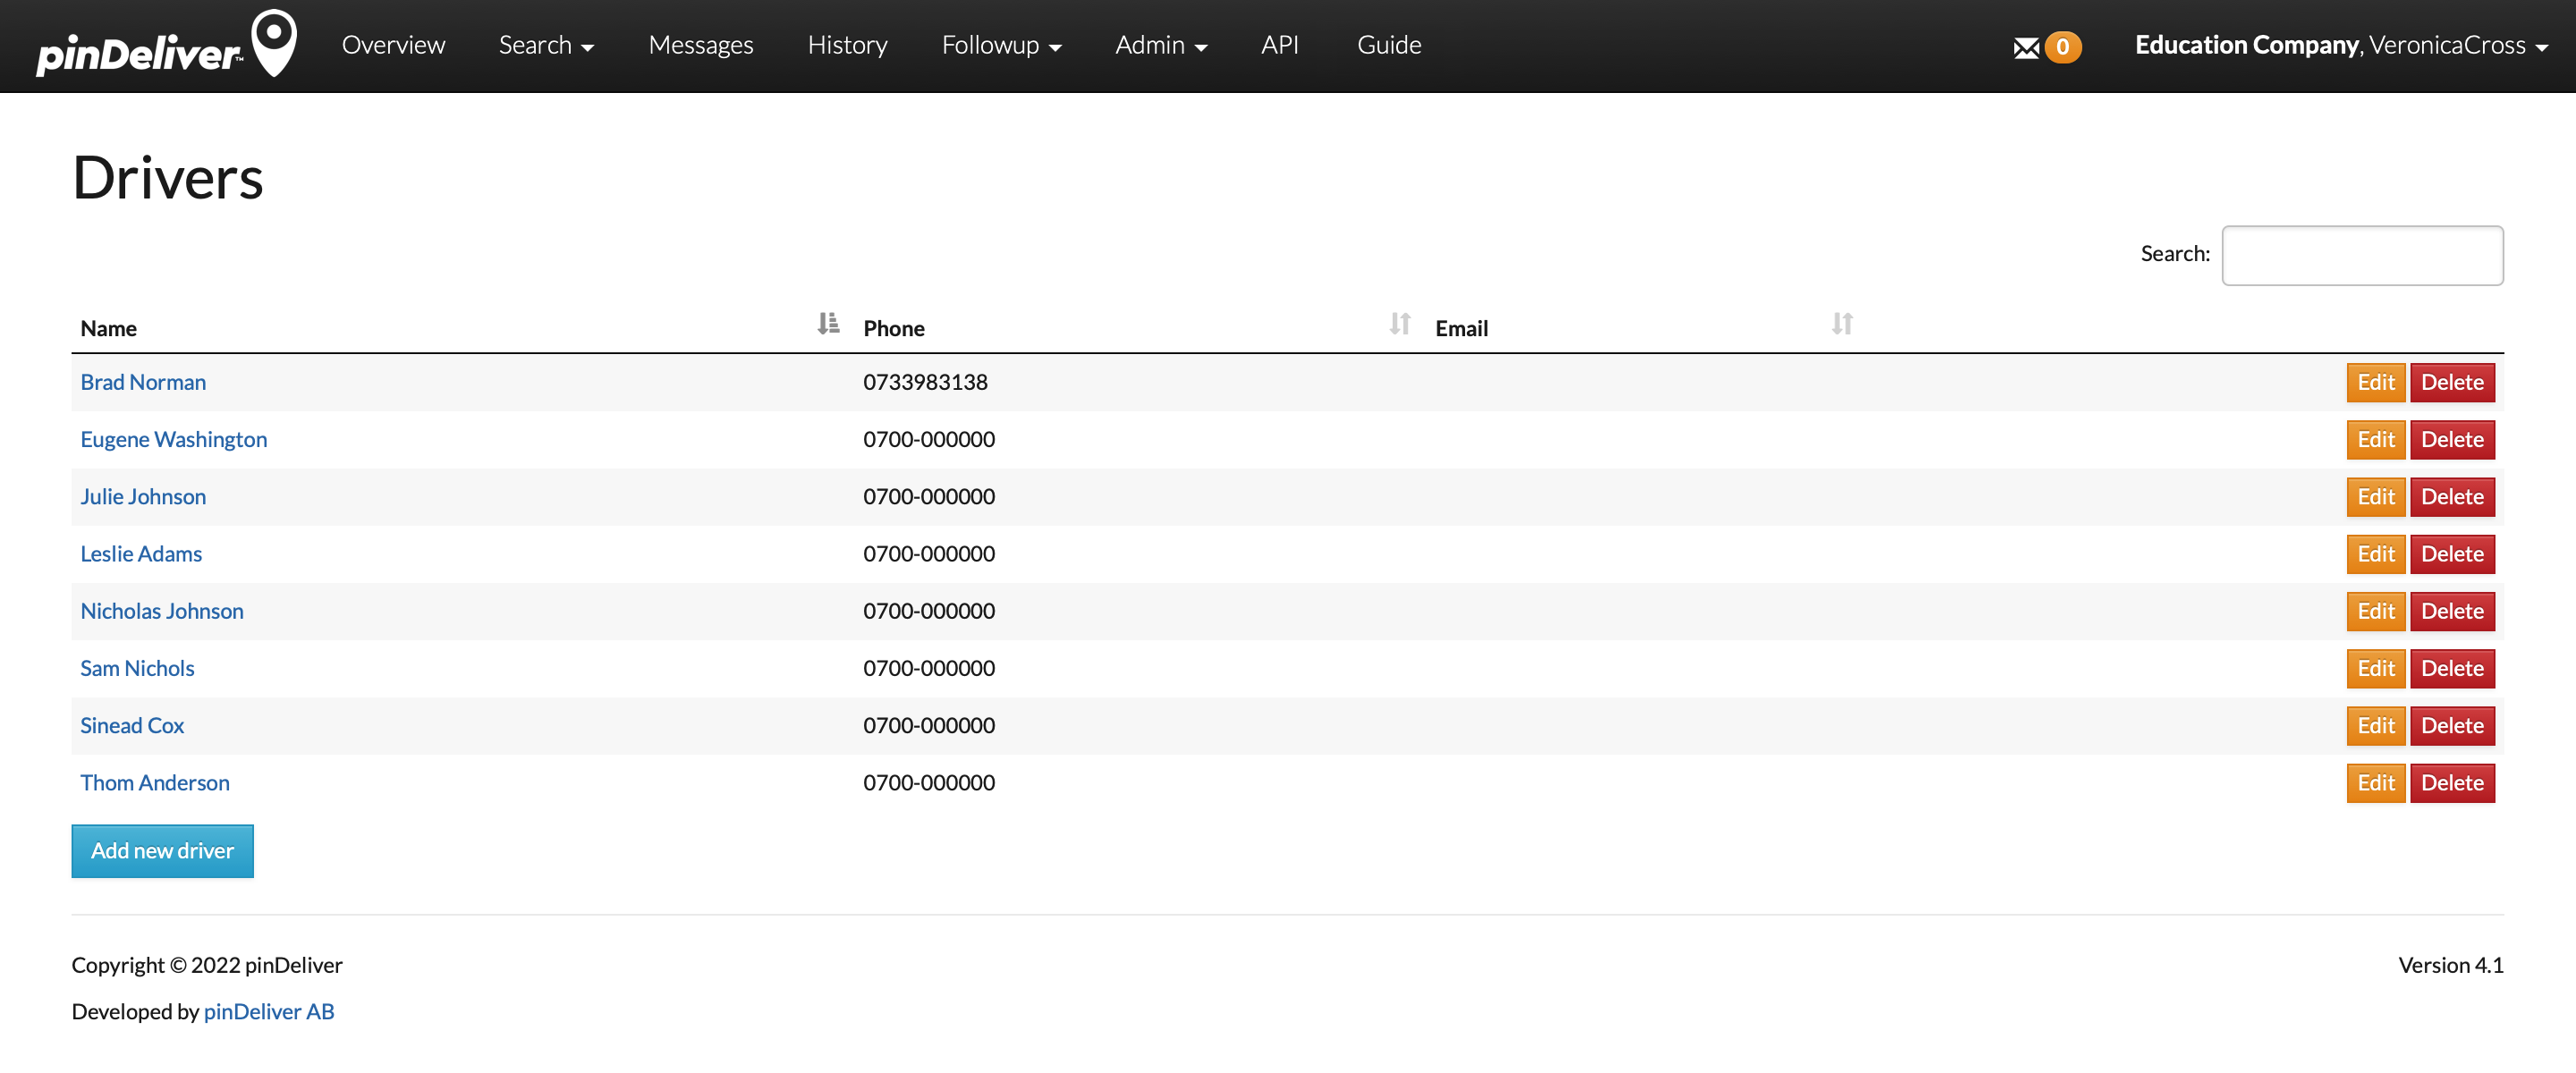
Once you are satisfied with the route optimization, the next step is to assign drivers to each route. It is important to note that a driver is not considered a user in the pinDeliver system. Instead, drivers receive their route instructions as a link, typically sent to their mobile phones, although email is also an option. You can specify whether a driver is available for all delivery groups or only selected ones when adding the driver, as outlined below.
A driver is set up with a name, but you can also create generic drivers. Instead of using individual first and last names, you can assign generic names such as “Driver car 1” or similar. This approach is particularly useful when using phones associated with specific vehicles rather than individual drivers.
To create a new driver, go to Admin/Drivers in the main menu. A list of all drivers will be displayed, and you can simply click Add new driver at the bottom of the list. To make changes to an existing driver, click on the driver’s name or the Edit button to access the driver’s profile.
Complete all applicable fields on the driver card and click Create Driver to save the information. Refer to the image and field explanations below for guidance.

| Field | Explanation |
|---|---|
| First name | Enter the driver’s first name here. Alternatively, you can use a descriptive name if you are assigning generic drivers, such as “Driver Car 1.” |
| Last name | Provide the driver’s last name. |
| Mobile phone number | Enter the driver’s mobile phone number. This phone number will be used to send a link for the GO-app to the driver. This app displays the route and enables the driver to carry out deliveries. |
| Email address | Enter the driver’s email address. This email address will also be used to send a link for the GO-app to the driver. |
| Language | Specify the preferred language for communication with the driver and for the GO-app that the driver will use. |
| Delivery Groups | Here, you can specify the delivery groups for which the driver should be available. This means the driver will only appear in the list of available drivers for assignment to a route if that route belongs to one of these specified delivery groups. |
Vehicles
After the route optimization, the next step is to assign a vehicle to each route. Each vehicle must be associated with a specific delivery group and will only be available for routes within that designated group. Each vehicle comes with set parameters, including availability time, starting position, and optional limitations such as weight capacity, volume, load meters, daily distance, and more.
When adding a vehicle to pinDeliver, you can provide the relevant specifications and any applicable limitations for each vehicle. If you have multiple vehicles with identical specifications and limitations, you can streamline the process by creating a single record and using the Maximum Number of Resources field to indicate that you have multiple vehicles with the same specifications.
To create a new vehicle, go to Admin/Vehicles in the main menu. A list of all created vehicles will be displayed, and you can simply click Add New Vehicle at the bottom of the list. To make changes to an existing vehicle, click on the vehicle’s name or select the Edit button to access the vehicle card. Additionally, you have the option to duplicate existing vehicles when creating multiple identical or similar vehicles.

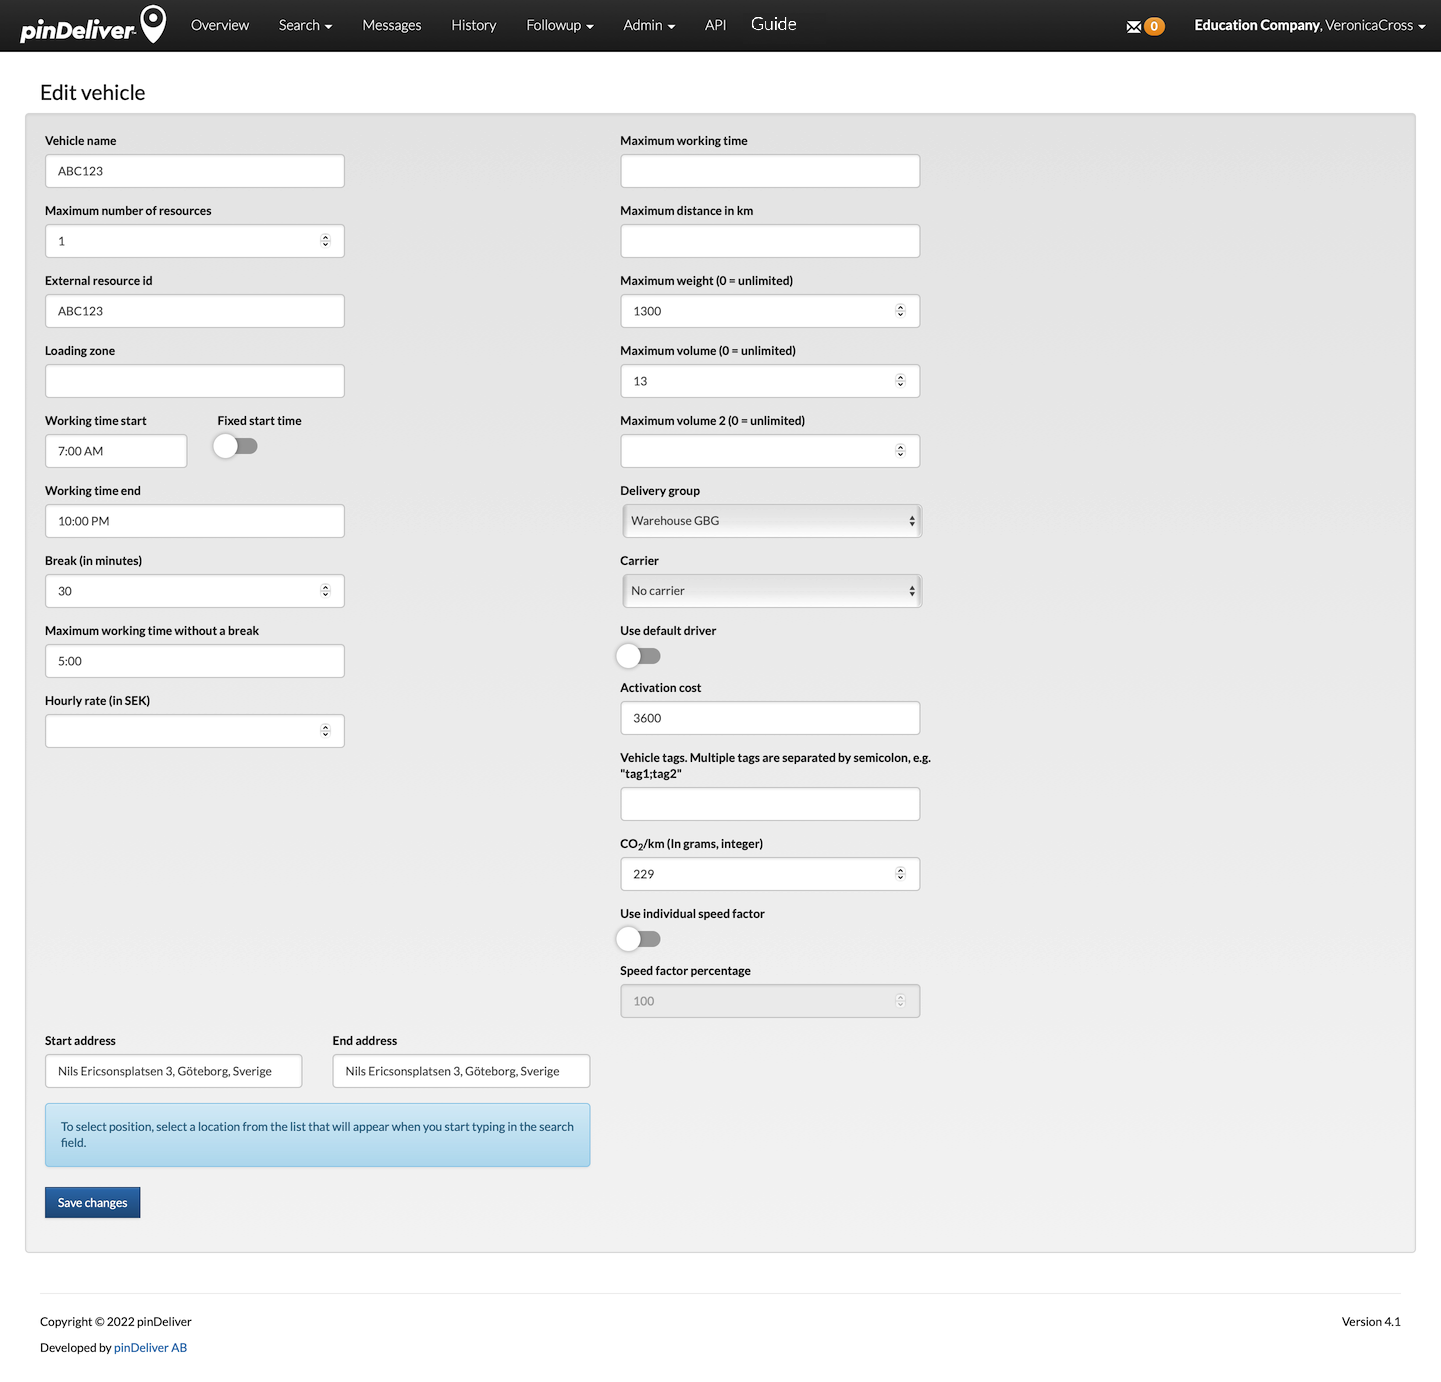
Fill in all relevant fields in the vehicle card, and then click Create Vehicle to save the information. Refer to the image and field explanations below for guidance.
| Field | Explanation |
|---|---|
| Vehicle name | A name for the vehicle or group of vehicles with identical specifications. |
| Maximum number of resources | If you have multiple vehicles with the exact same specifications and limitations, you can specify the quantity here instead of registering each vehicle individually. |
| External resource id | An external identification that can be used when integrating with external systems. Only used when there is a single resource (Maximum number of resources = 1). |
| Working time start | The earliest time of day when the vehicle is available to start work. If it is not always the same, use the “Fixed start time” option. |
| Working time end | The latest time of day until which the vehicle is available. If an “End address” is specified, the vehicle should return there before this time. |
| Fixed start time | Select this if the vehicle always starts at the same time every day, using the “Working time start” as the starting time. |
| Break (in minutes) | Specify a break duration to be planned approximately after the specified “Maximum working time without a break”. |
| Maximum working time without a break | The approximate maximum working time before a break is scheduled for the vehicle. |
| Hourly rate (in SEK) | Set an hourly rate in Swedish Kronor (SEK) for using the vehicle. |
| Start address | The address where the vehicle begins its route each day. It does not have to be the same as the depot address for a delivery group. The route will start by guiding the vehicle to the depot address. |
| End address | The address where the vehicle should end its route daily. Traveling from the last stop to the end address will be included in the route. If no end address is specified, the route will have an “open end”. |
| Maximum working time | The maximum total working time for the vehicle. This means that the daily available working time can be less than the time between “Working time start” and “Working time end”. |
| Maximum distance | Defines the maximum allowable driving distance in kilometers for the vehicle. This is commonly used for electric vehicles with a maximum range before requiring a recharge. |
| Maximum weight (0 = unlimited) | The maximum load weight that can be carried by the vehicle, using a unit you define (use the same unit as your orders). The route optimization ensures vehicles are not overloaded. However, manually moving customer orders between vehicles can lead to overloading unless you reoptimize the vehicles and recalculate delivery times. If so, use the functionality “Recalculate delivery times”. |
| Maximum volume (0 = unlimited) | The maximum volume capacity that the vehicle can accommodate, using a unit you define (use the same unit as your orders). The route optimization ensures vehicles are not overloaded. However, manually moving customer orders between vehicles can lead to overloading unless you reoptimize the vehicles and recalculate delivery times. If so, use the functionality “Recalculate delivery times”. |
| Maximum volume 2 (0 = unlimited) | An additional volume capacity. For instance, Maximum volume can be used for the cold goods capacity, while Maximum volume 2 can be used for the frozen goods capacity. |
| Delivery group | Assign the vehicle to a specific delivery group. The vehicle will only be available for this particular delivery group, ensuring different warehouses have access to their own vehicles if they are set up as separate delivery groups. |
| Carrier | Connect the vehicle to a specific carrier or logistics partner if necessary. |
| Use default driver | If this vehicle is typically driven by a specific driver, you can select the driver here to make it the default association during route planning. |
| Activation cost | A value that determines the ease of adding another vehicle to the route optimization. A higher value means more time savings are required before adding another vehicle. |
| Vehicle tags. Multiple tags are separated by semicolon, e.g. “tag1;tag2” | Use tags to describe specific vehicle features like cold storage, tailgate lift, or zone classification. When creating a customer order, you can specify one or more vehicle tags, ensuring the order is planned only on a vehicle that matches those tags. A vehicle with tags can still handle orders without tags. |
| CO2/km (In grams, integer) | Specify the amount of CO2 emissions produced per kilometer driven by the vehicle. |
| Use individual speed factor | Select this if you want to adjust the calculated speed for this vehicle in route optimization. |
| Speed factor percentage | This factor specifies how fast the vehicle should be calculated for route optimization compared to the speed limit, useful for larger vehicles with different speed considerations. |
Delivery groups
Delivery groups are essential when planning in pinDeliver, as they help organize various entities. Entities can be associated with one or more delivery groups, making it easier to divide deliveries into planning orders. This division can be based on factors such as distinct warehouse locations or user permissions. It is important to note that a delivery can only be linked to one delivery group. Consequently, planning orders can only consist of deliveries belonging to the same delivery group, resulting in routes exclusively containing deliveries from that group. It is entirely possible to have multiple planning orders for the same delivery group scheduled for the same day.
Additionally, each delivery group can be assigned a depot, which functions as a loading location. The depot does not necessarily need to be physically located where the vehicles begin their routes. However, a depot becomes mandatory when utilizing dynamic pickup and delivery or reloading features. If you intend to include loading time in your routes, using depots is also compulsory.
To create a new delivery group, navigate to Admin/Delivery groups in the main menu. A list of all delivery groups created will be displayed, and at the bottom of this list, you can click on Add new delivery group to create a new one.

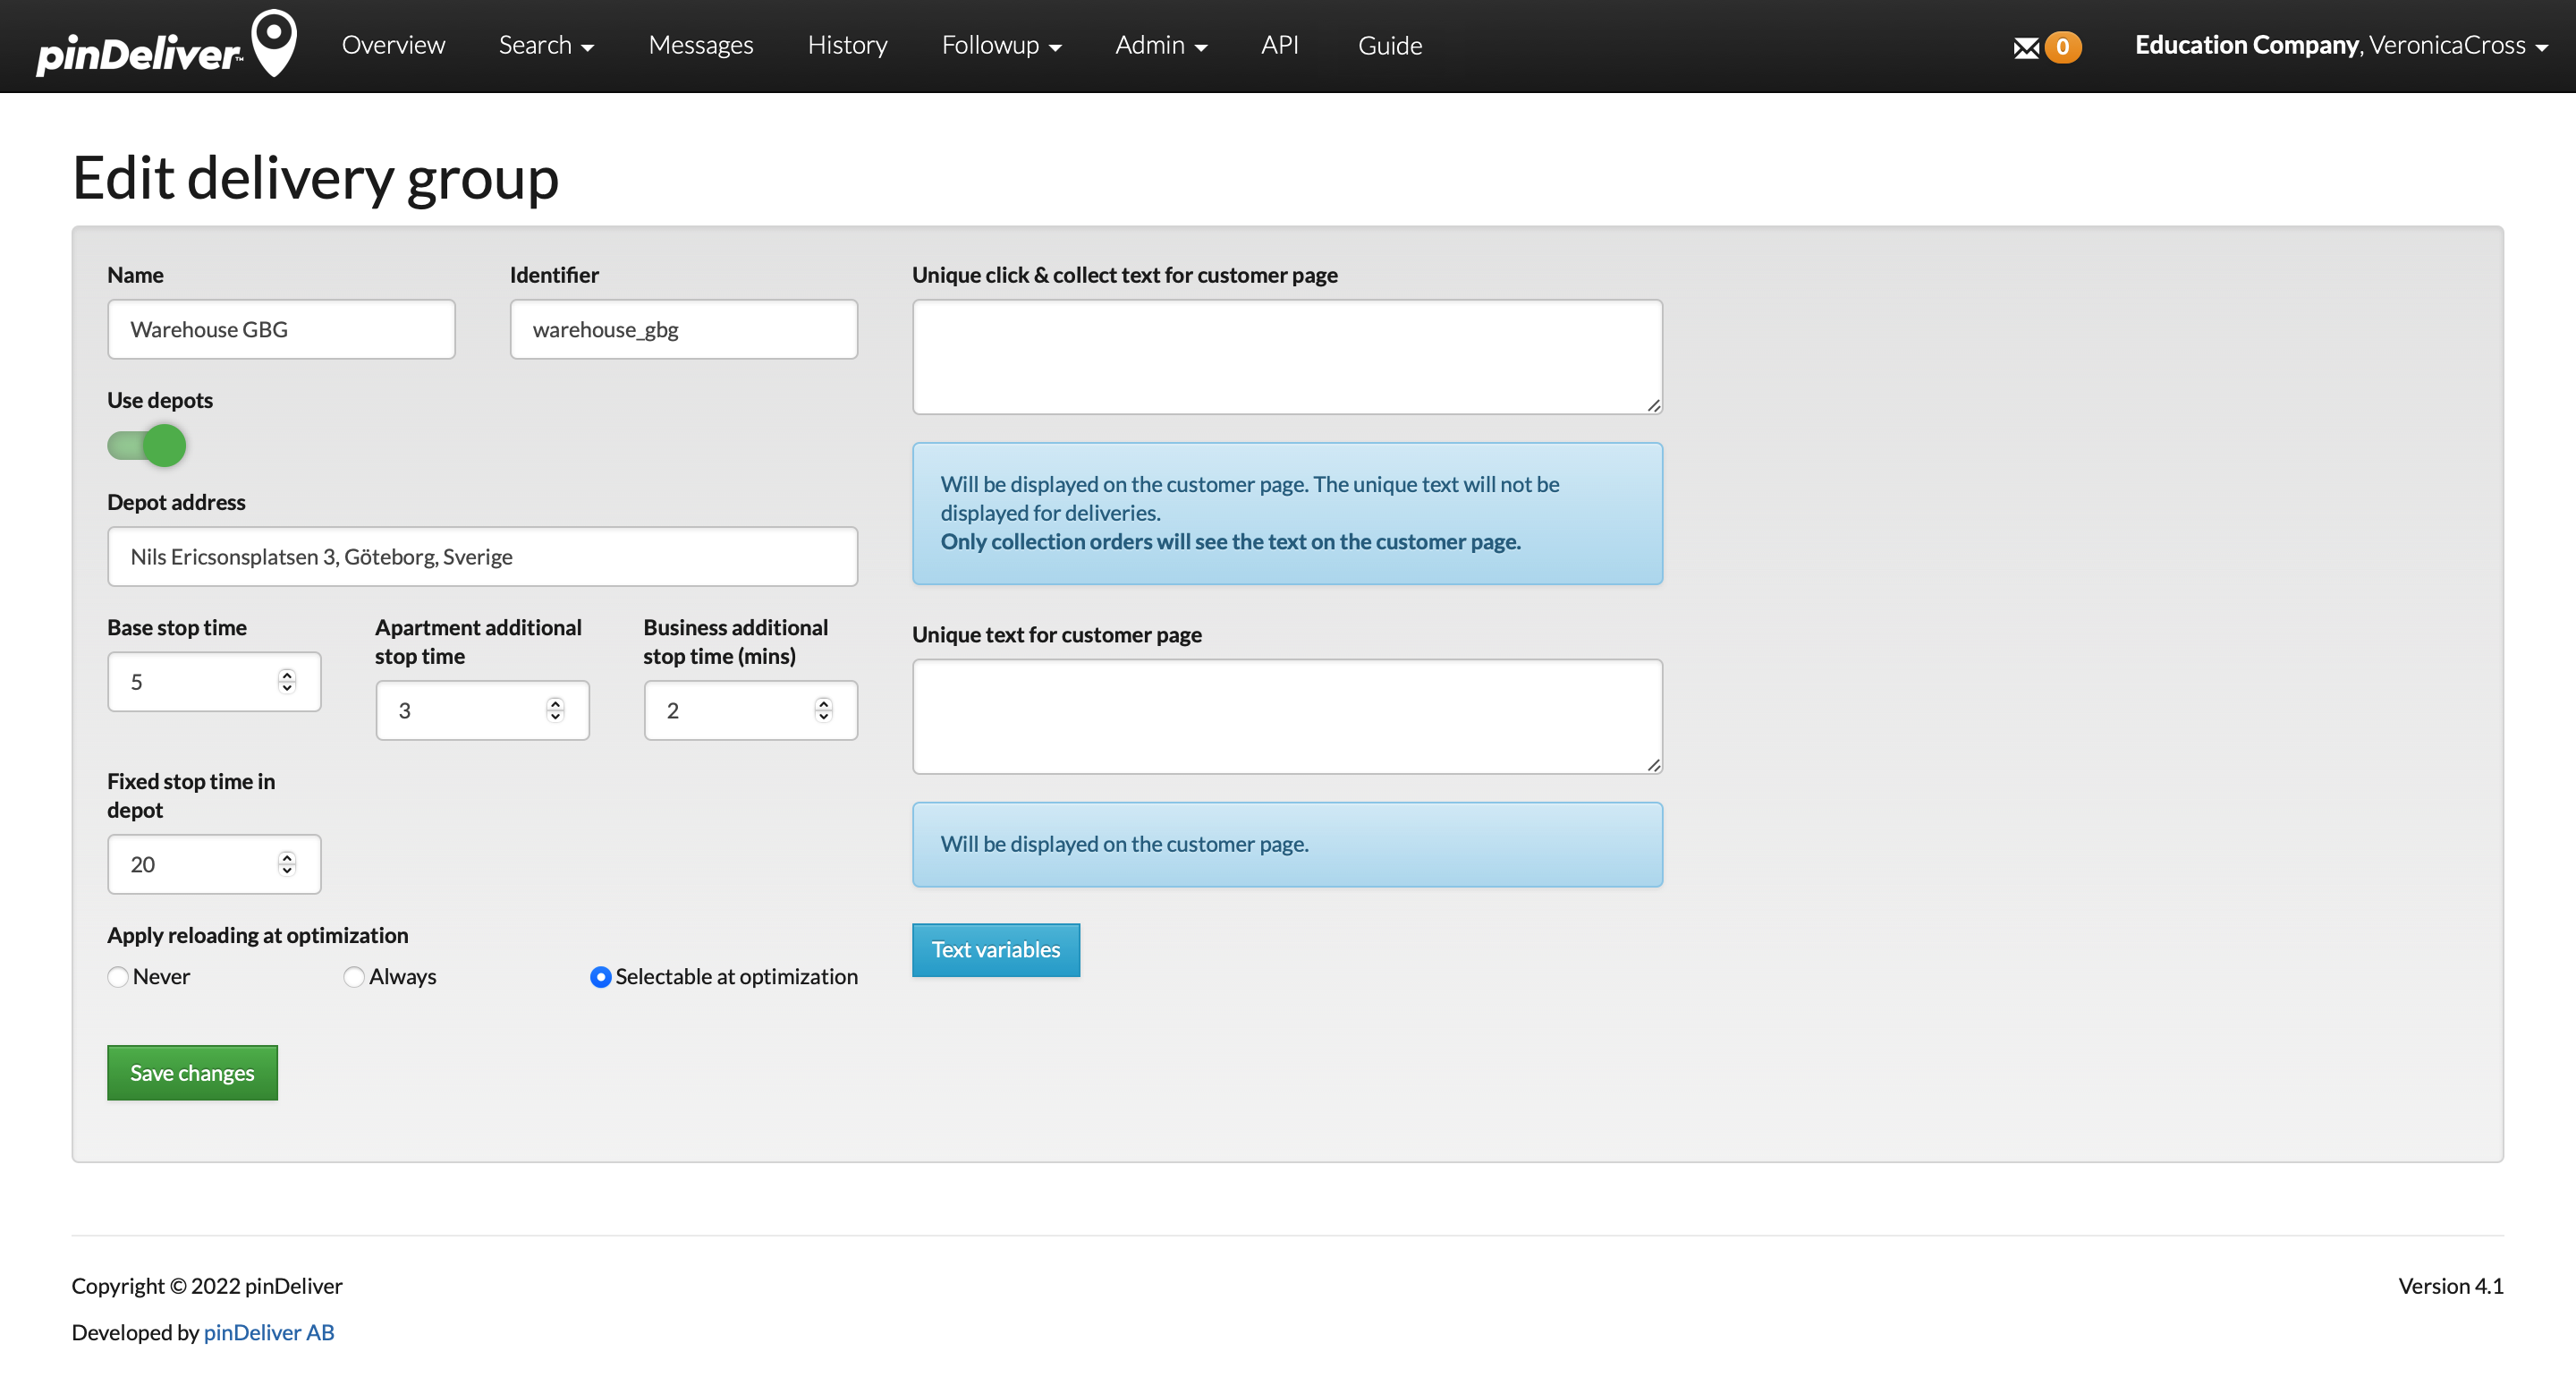
Fill in all the relevant fields in the delivery group card, and then click Create delivery group to save your changes. Refer to the image and field explanations provided below for further guidance.
| Field | Explanation |
|---|---|
| Name | The name that appears in lists visible to users. |
| Identifier | An internal code used for integration purposes. |
| Use depots | Shift to “Yes” if you want to utilize default loading time, reloading, or dynamics pickup and deliveries. |
| Depot address | The address of the physical depot, used in route optimization to plan vehicle routes to the depot before starting. |
| Base stop time | Default stop time (in minutes) if no other stop time is imported for a specific order. |
| Apartment additional stop time | Additional minutes added to the “Base stop time” for customer orders delivered to apartments. |
| Business additional stop time (min) | Additional minutes added to the “Base stop time” for customer orders delivered to companies (see field B2B in a delivery). |
| Fixed stop time in depot | The stop time in a depot, used for both initial loading and reloading. |
| Apply reloading at optimization | Defines if reloading should be possible and/or mandatory during route optimization. Options include:
|
| Unique click & collect text for customer page | Text displayed on the customer page for collection orders. This unique text is not displayed for deliveries. |
| Unique text for customer page | Text displayed on the customer page. |
Users
To access and use pinDeliver for planning and follow-up, you need to have a registered user account. This applies to all users except for drivers who utilize the Go-app for their work tasks and initiate the app through a clickable link, rather than using a traditional username and password login.
User accounts in pinDeliver can be configured with different permissions, granting access to specific platform functions and delivery groups.
When you create a new pinDeliver account, one user is automatically generated. However, you have the flexibility to add an unlimited number of users as needed.
There are three different login methods available:
- Username and password
- Microsoft Office 365 login
- API login (Note: It is not recommended to use an API user for interface login purposes)
To create a new user, navigate to Admin/Users in the main menu. A list of all existing users will be displayed, and you can simply click Add new user at the bottom of the list. User settings are organized into different tabs, as described below. Fill in the relevant fields on the user card and click Create user to save the user profile. For detailed explanations of each tab and its fields, refer to the image and field descriptions below.

Basic information
The first settings tab is the fundamental configuration section, where you provide essential information such as the user’s name and related details.
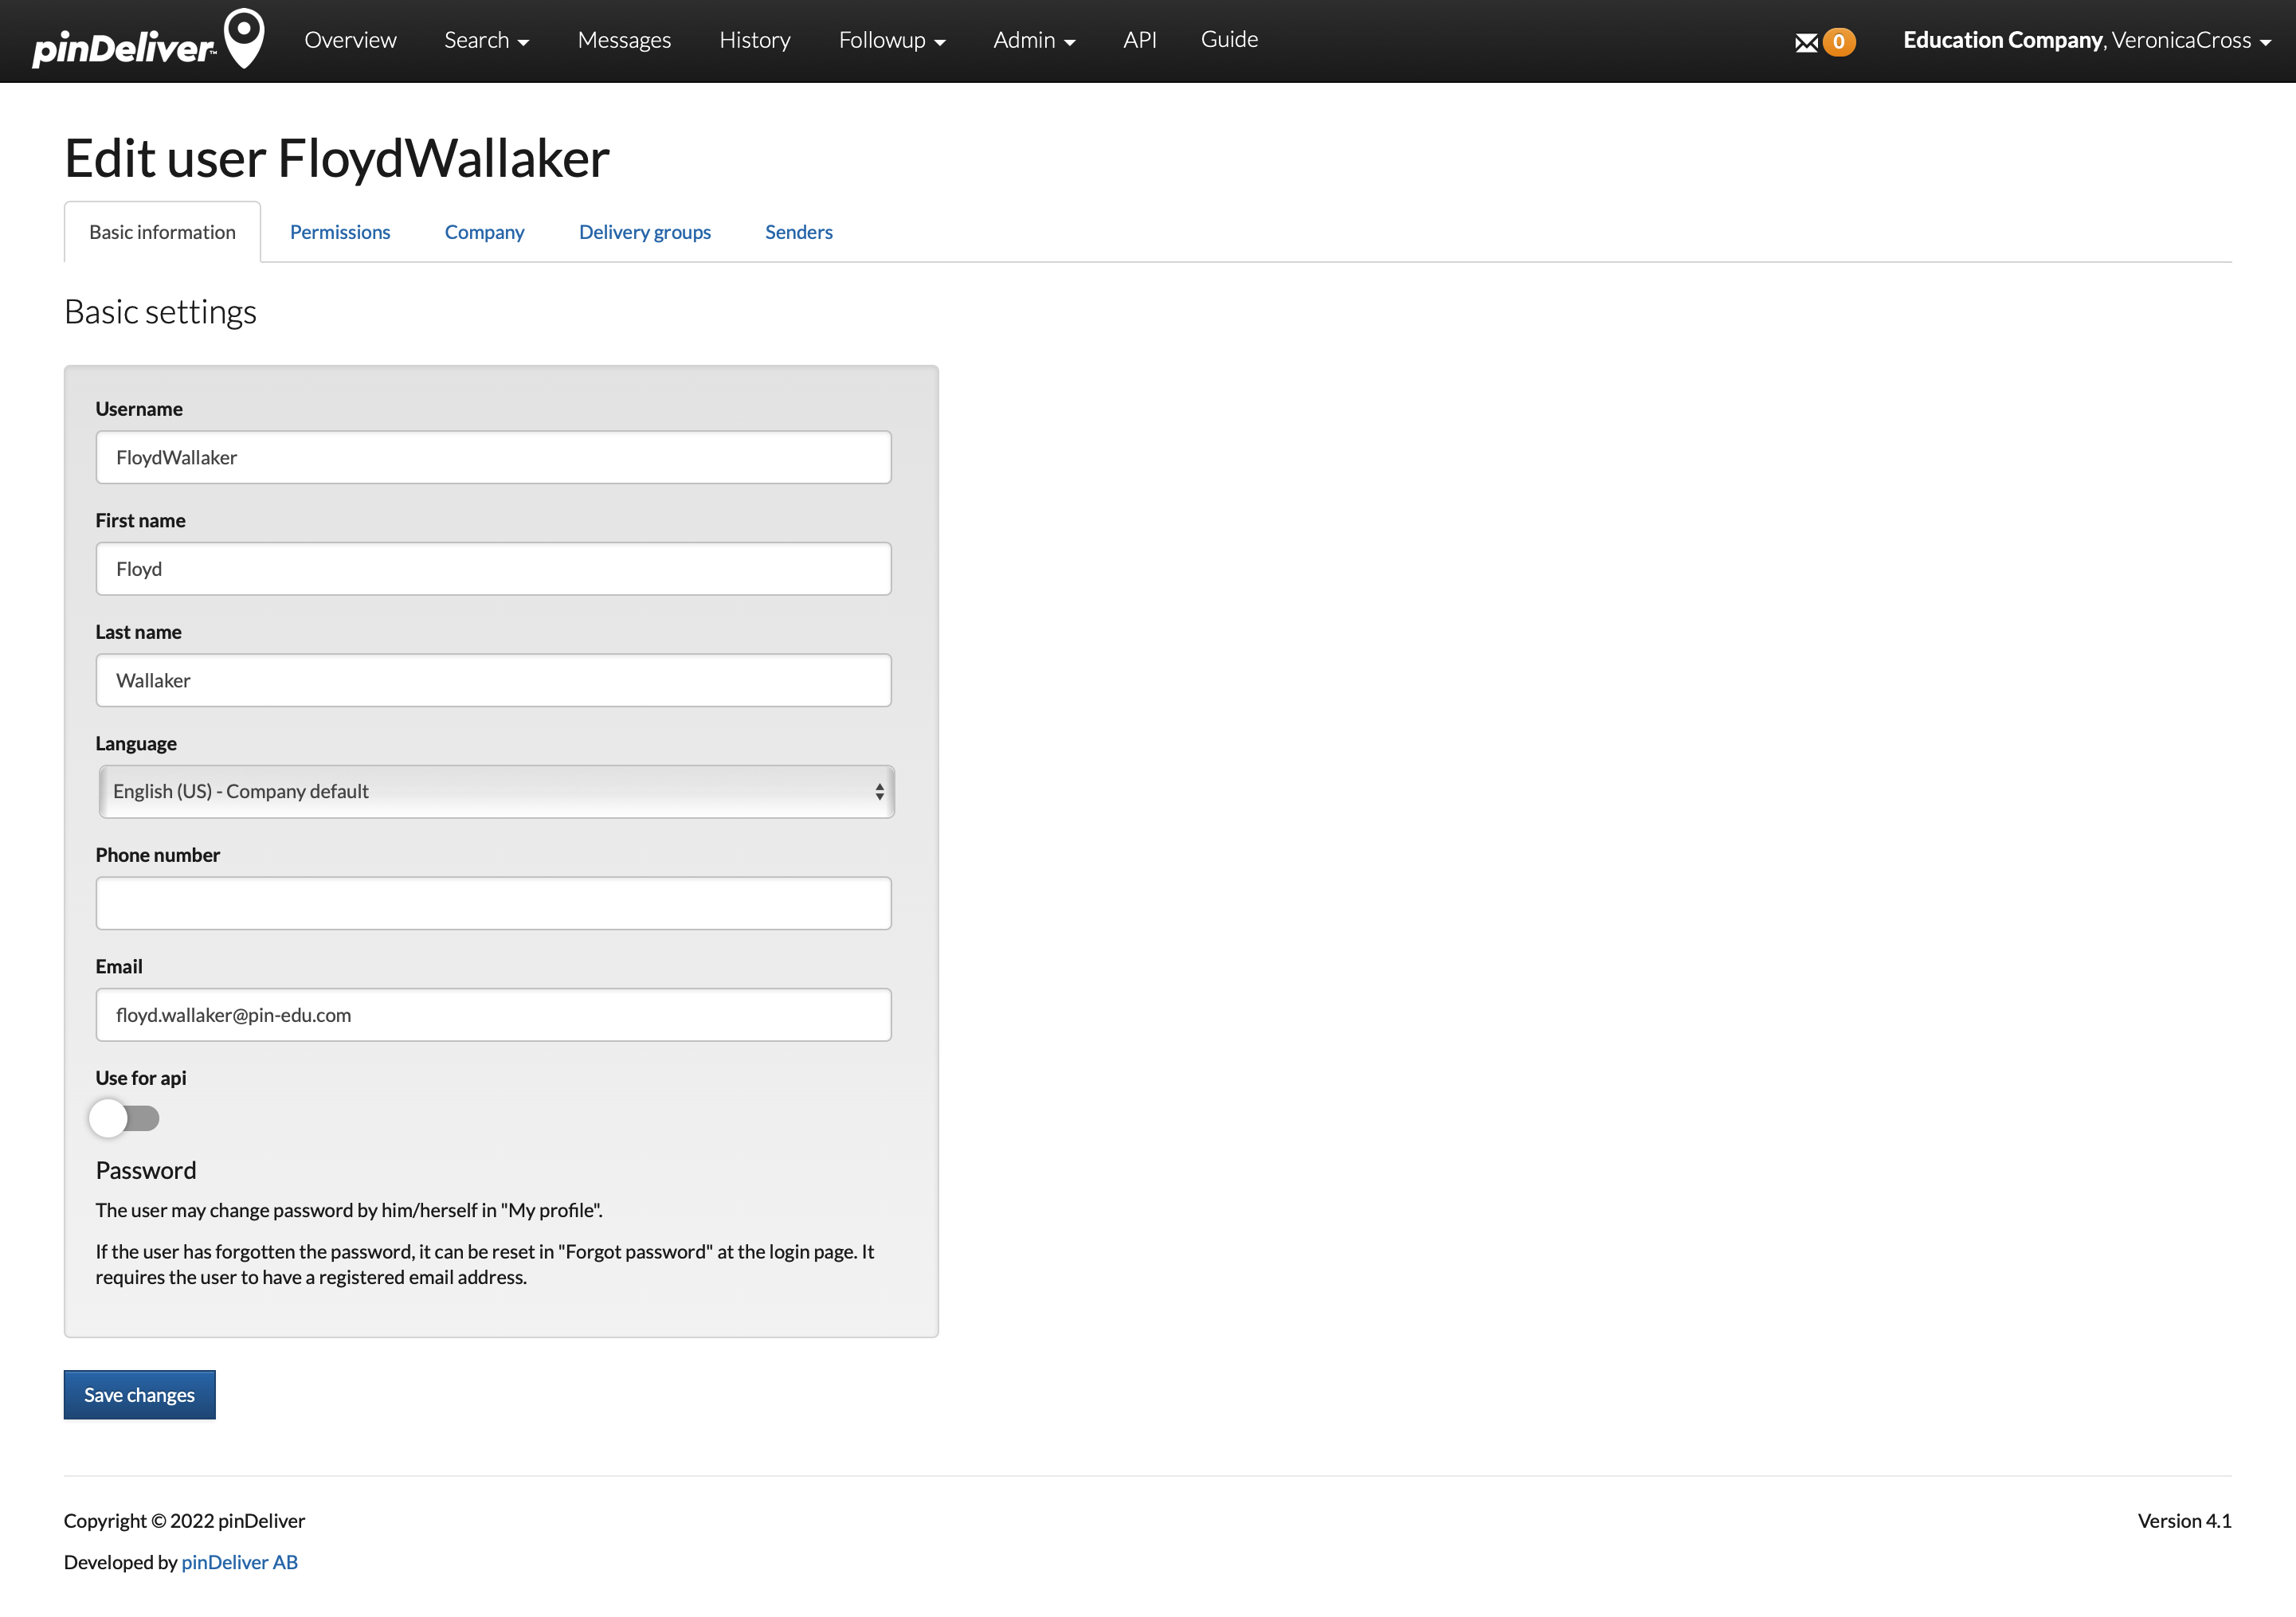
| Field | Explanation |
|---|---|
| Username | The user’s login username. If Office 365 is used as the login method, this should be the Office 365 account, typically the user’s email address. |
| First name | The user’s first name. |
| Last name | The user’s last name. |
| Language | Choose the language preference for the pinDeliver interface. |
| Phone number | The user’s phone number (for reference). |
| The user’s email address. | |
| Use for API | Indicate whether the user should be used for integration purposes. If selected, an API key is required and can be generated by clicking New key. |
| Password | Set a password for the user. This password must be changed upon the user’s first login. It is not used for Office 365 or API users. |
| Confirm password | Re-enter the same password for confirmation. |
| API key | Displays the generated API key for an API user. |
Permissions
After creating the user, the next step is to assign permissions to them. Permissions determine the user’s access to various functionalities within the platform. You can individually select specific functionalities for each user. Below, you will find suggested User permission groups for different user roles, but ultimately, the choice depends on your company’s needs and preferences.
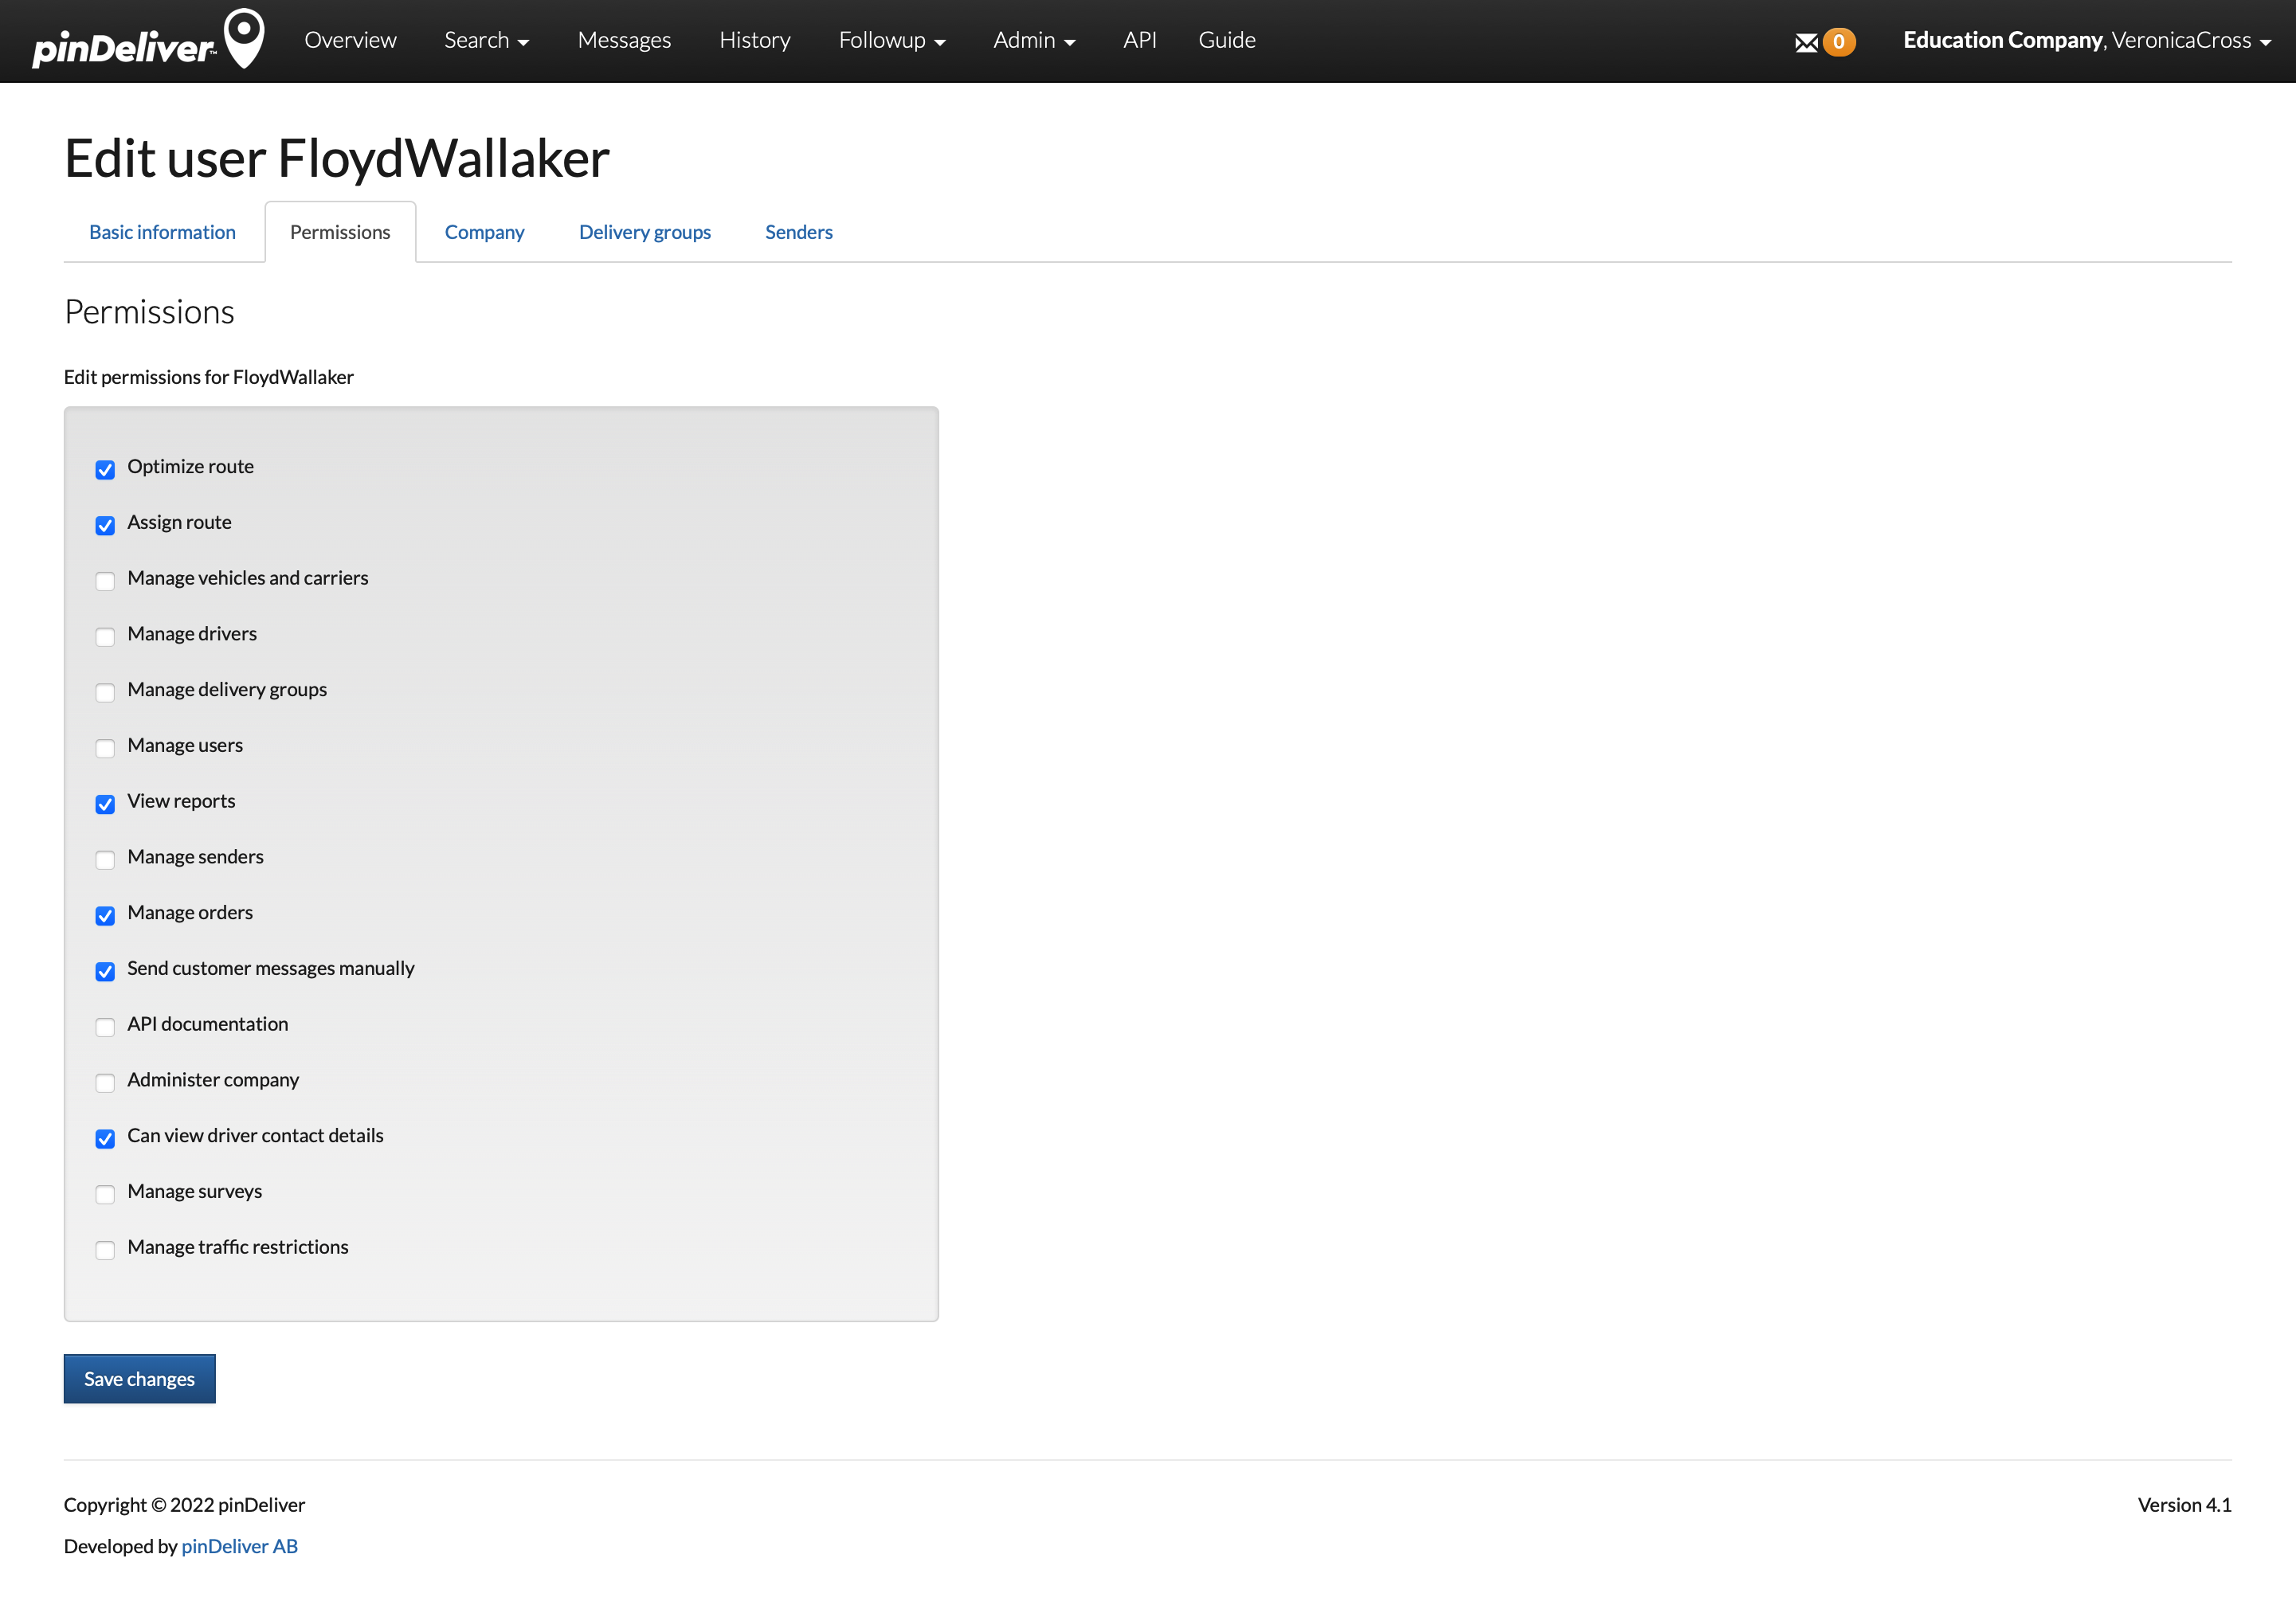
| Permission | Explanation |
|---|---|
| Optimize route | Allows the user to perform route optimization and make modifications to existing routes. |
| Assign route | Enables the user to assign drivers to specific routes. |
| Manage vehicles | Enables the user to add, modify, and delete vehicles. |
| Manage drivers | Enables the user to add, modify, and delete drivers. |
| Manage delivery groups | Enables the user to add, modify, and delete delivery groups. |
| Manage users | Enables the user to add, modify, and delete user accounts. |
| View reports | Enables the user to view and export follow-up reports. |
| Manage senders | Enables the user to add, modify, and delete senders. |
| Manage orders | Enables the user to add, modify, and delete planning orders and customer orders. |
| Send customer messages manually | Enables the user to manually trigger messages to customers from the Office interface. |
| API documentation | Provides access to the API menu. |
| Administer company | Enables the user to administer company settings that apply to the entire license (all delivery groups, senders, etc.). |
| Can view driver contact details | Provides access to view driver details such as phone numbers and email addresses. |
| Manage surveys | Enables the user to add, modify, and delete surveys and activate/deactivate them. |
| Manage traffic restrictions | Enables the user to add, modify, and delete traffic restrictions for the entire license. |
Permission groups / User roles
Predefined permission groups, also known as user roles, are not provided in pinDeliver. This flexibility allows each company to tailor permissions according to its unique requirements. Below, you will find suggested user roles, and a specific user can hold multiple roles, combining permissions as needed:
- Transport Planner: Users with this role focus on transport planning.
- Customer Service: Users in this role handle customer service tasks.
- Administrator: Administrators have authority over various platform settings.
- Superuser: Superusers possess comprehensive access and control within the system, often a combination of the above roles.
| Permission | Transport planning | Customer service | Administrator | Superuser |
|---|---|---|---|---|
| Optimize route | X | |||
| Assign route | X | |||
| Manage vehicles | X | X | ||
| Manage drivers | X | X | ||
| Manage delivery groups | X | X | ||
| Manage users | X | X | ||
| View reports | X | X | X | |
| Manage senders | X | X | ||
| Manage orders | X | |||
| Send customer messages manually | X | |||
| API documentation | X | |||
| Administer company | X | |||
| Can view driver contact details | X | X | ||
| Manage surveys | X | |||
| Manage traffic restrictions | X | X |
Company
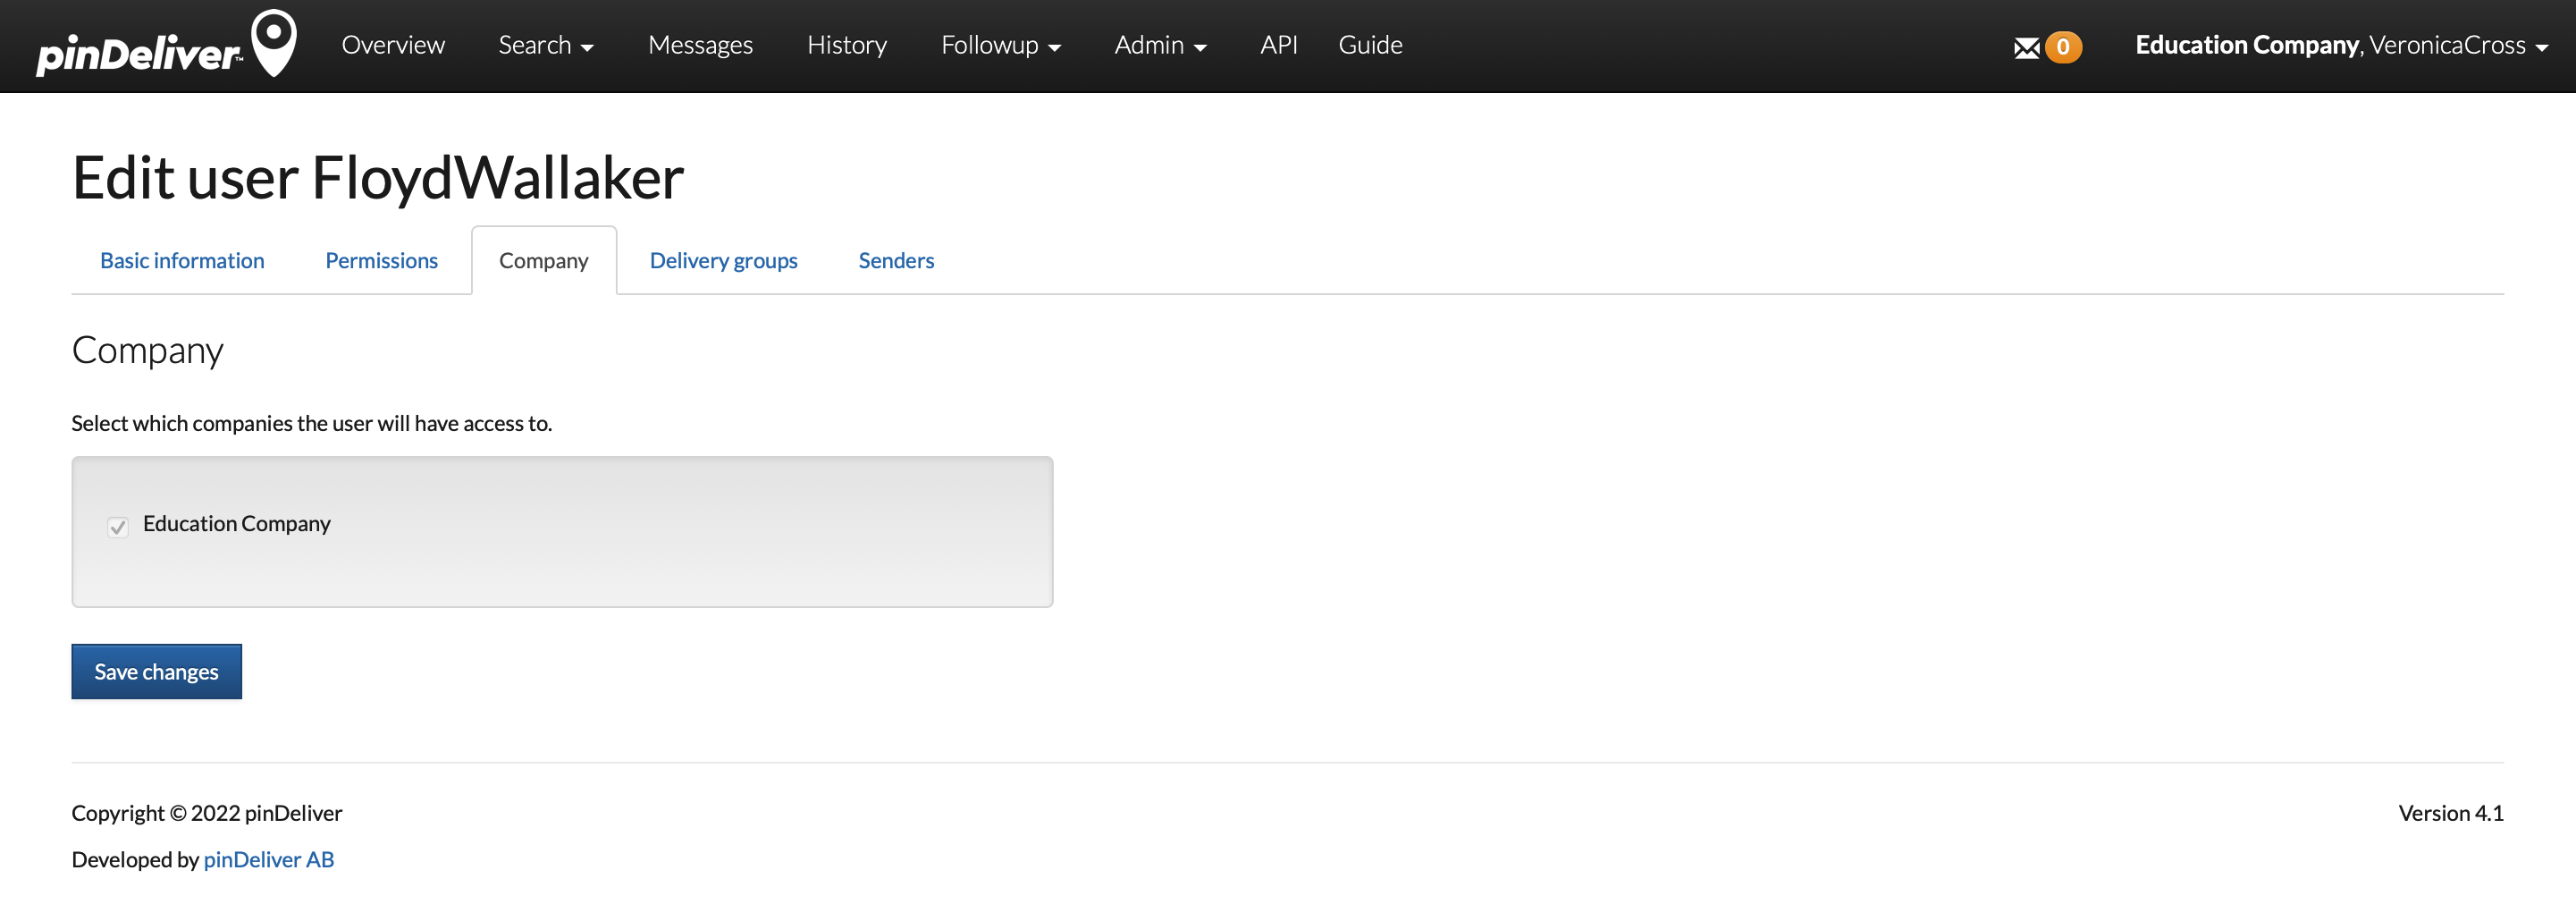
In this tab, you determine which companies the user should be able to access. In most cases, users will only have access to their own company.
Delivery groups
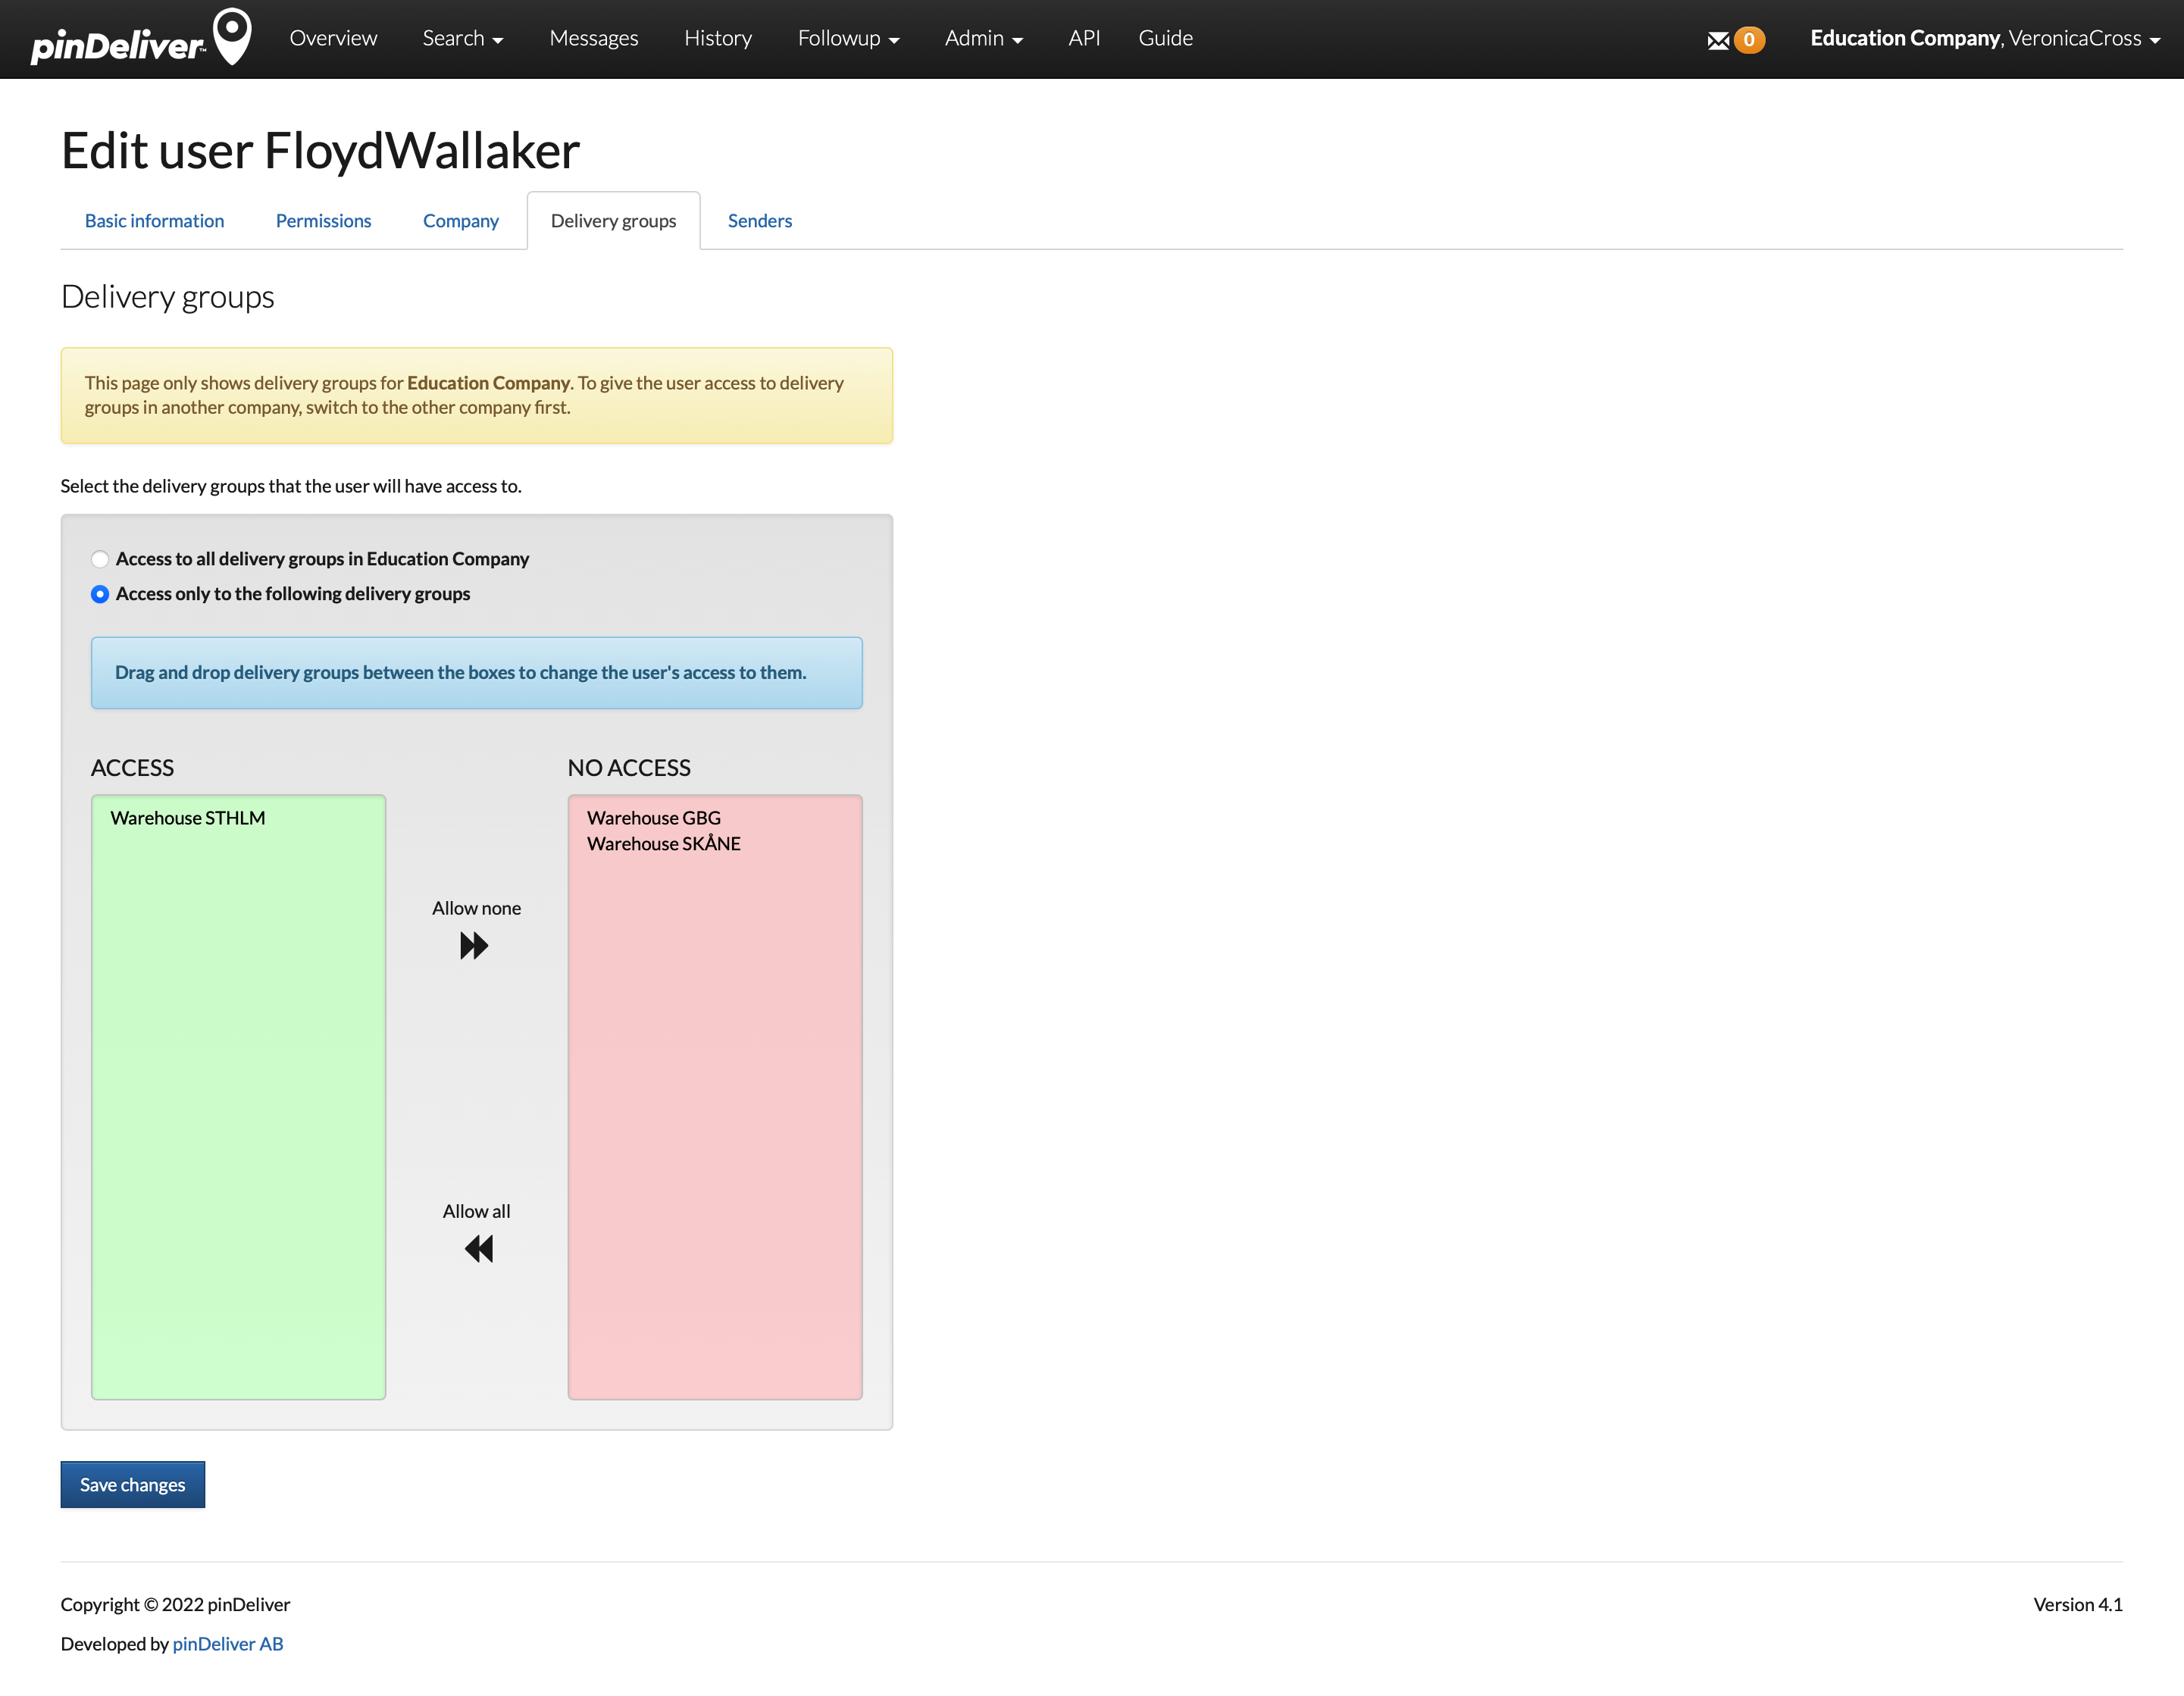
In this tab, you specify which delivery groups a user should be able to access. By default, users have access to all delivery groups, so no changes are required. However, if you need to restrict access, you can choose Access only to the following delivery groups and then use drag-and-drop to move the delivery groups from the red No access section to the green Access section on the left. You can also use the arrows between the sections to move all groups at once, which can be helpful if a user should have access to most or only a few delivery groups and you want to add or remove access accordingly.
Senders
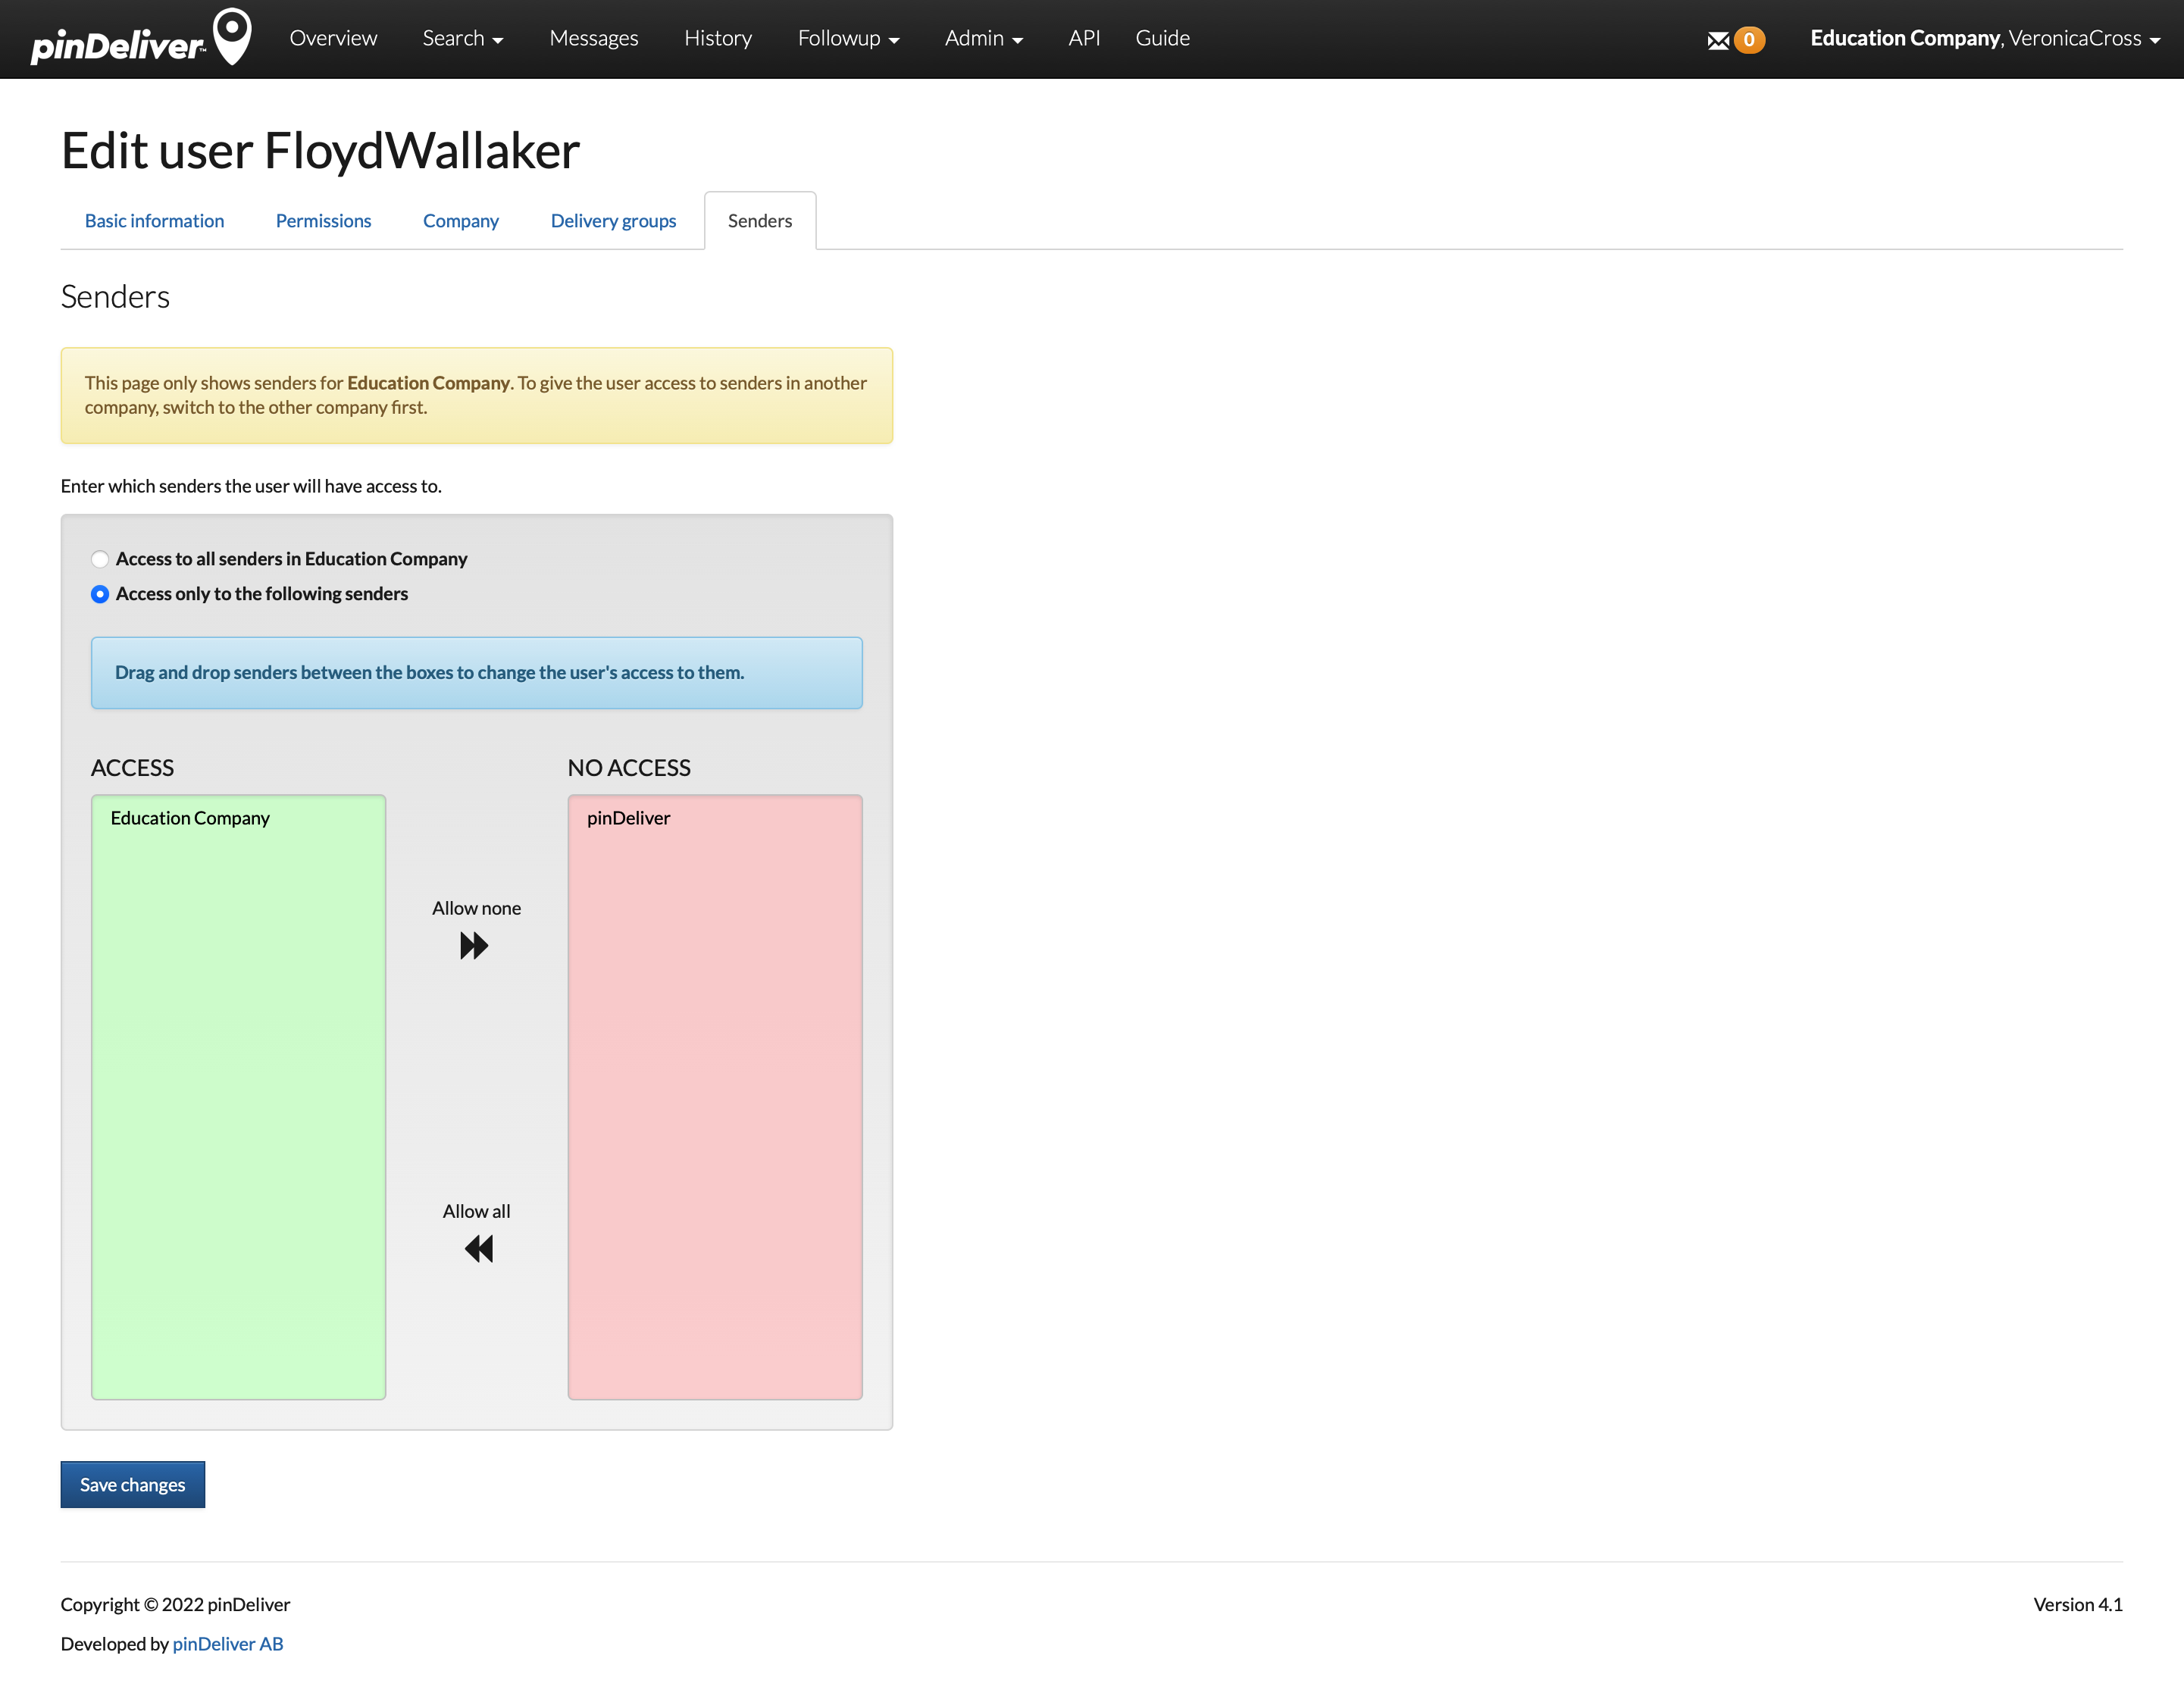
In this tab, you specify which senders a user should be able to access. By default, users have access to all senders, so no changes are required. However, if you need to restrict access, you can choose Access only to the following senders and then use drag-and-drop to move the senders from the red No access section to the green Access section on the left. You can also use the arrows between the sections to move all senders at once, which can be helpful if a user should have access to most or only a few senders and you want to add or remove access accordingly.
Senders
Every customer order is associated with a sender. For instance, this can be the transportation company handling the delivery or the retailer that sold the goods. Each customer order can have only one sender, but within a planning order, different customer orders can have different senders. Senders play a crucial role in customer communication, informing recipients of the source of the goods. As a result, each customer order is branded based on the sender, even when multiple senders share the same route and vehicle.
Senders can be branded with distinct logos, colors, instructive text, and customer service phone numbers, which are displayed on the customer page (GET page).
By default, pinDeliver includes one primary sender. This means that if you do not specify a particular sender for a customer order, the default sender will be used.
To create a new sender, navigate to Admin/Senders in the main menu. A list of all senders will be displayed, and you can click Add new sender at the bottom of the list to create a new one. To modify an existing sender, simply click the sender’s name or the Edit button to access the sender card.

Sender
The sender’s primary tab provides essential details about the sender’s name and contact information. Complete all the relevant fields in the sender card, and then click Create to save the information. Refer to the image and field explanations below for guidance.
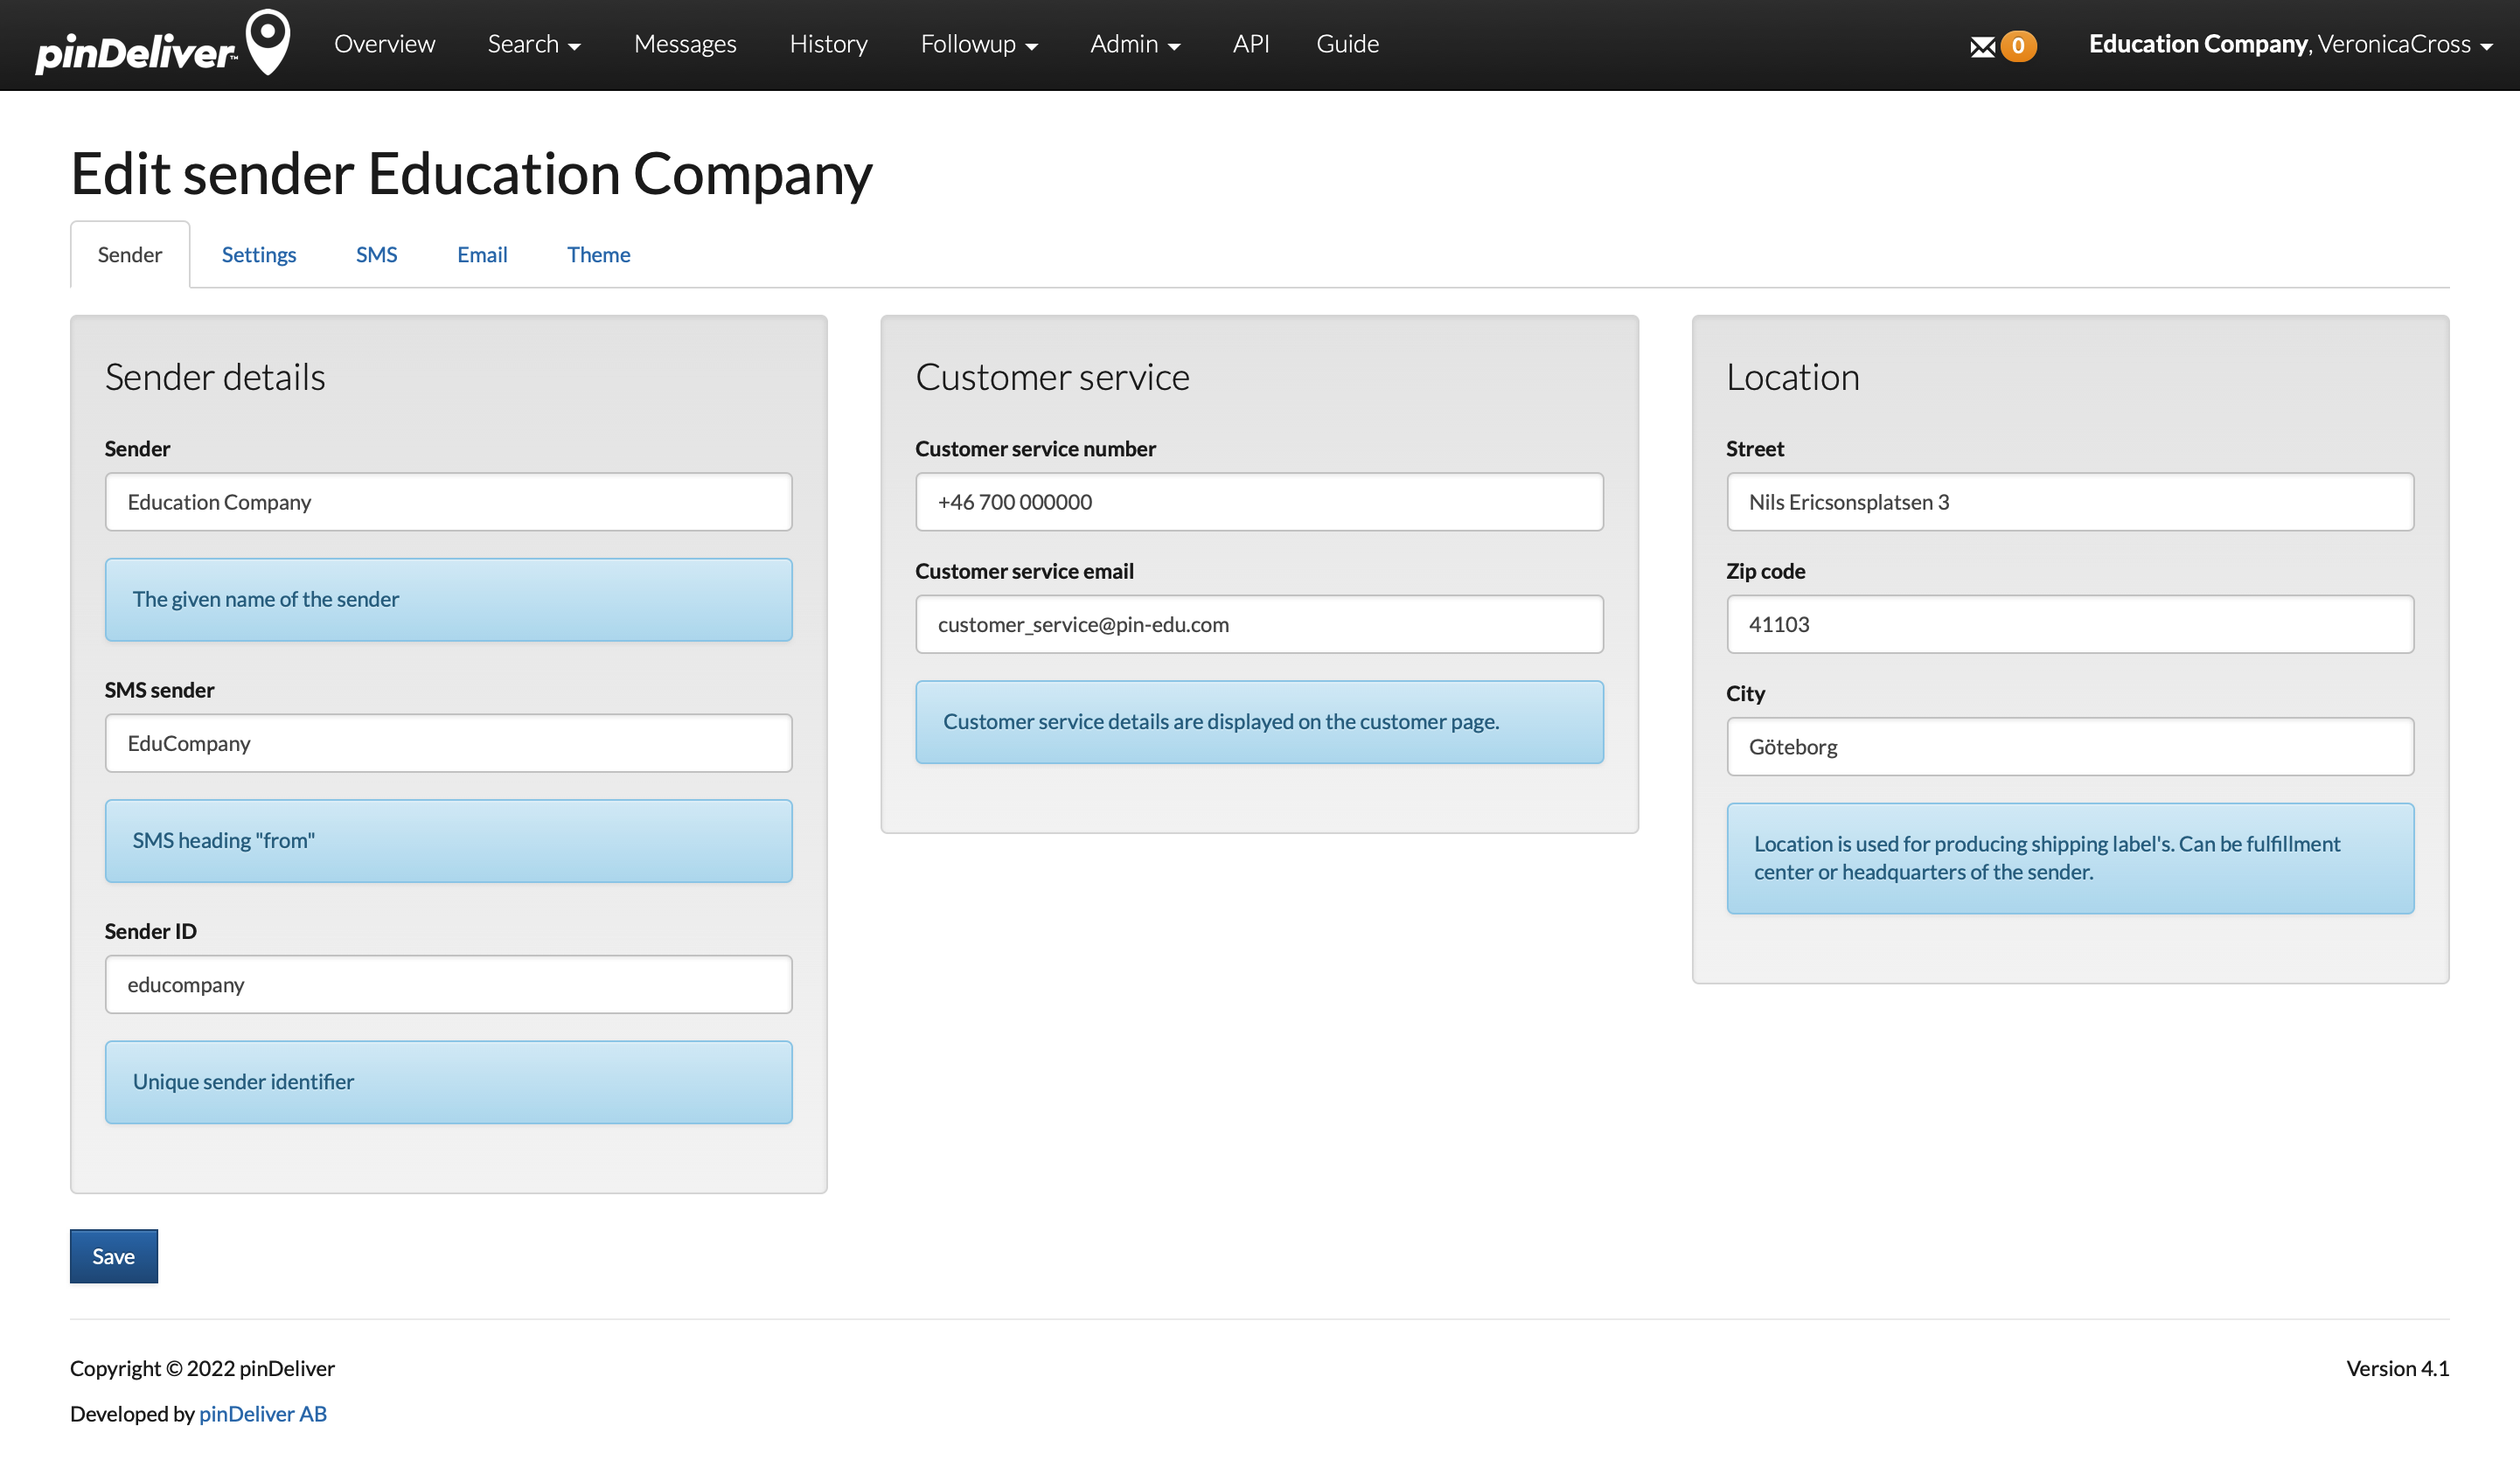
| Field | Explanation |
|---|---|
| Sender | The official name of the sender, displayed to the end customer. |
| SMS sender | A short name, up to 11 characters, displayed as the SMS sender name. |
| Sender ID | A unique identifier used for integration or Excel uploads of customer orders. |
| Customer service number | Phone number to the sender’s customer service, displayed to the end customer. |
| Customer service email | Email address to the sender’s customer service, displayed to the end customer. |
| Street | Street address to the sender, displayed to the end customer. |
| Zip code | Sender’s zip code, displayed to the end customer. |
| City | The city where the sender is located, displayed to the end customer. |
Settings
Customized settings for individual senders allow you to tailor your communication based on the sender’s identity. This flexibility enables distinct messaging or SMS triggers depending on the sender.
In pinDeliver, a default sender is a standard feature. Therefore, if a customer order is not assigned a specific sender, the default sender will be applied automatically.
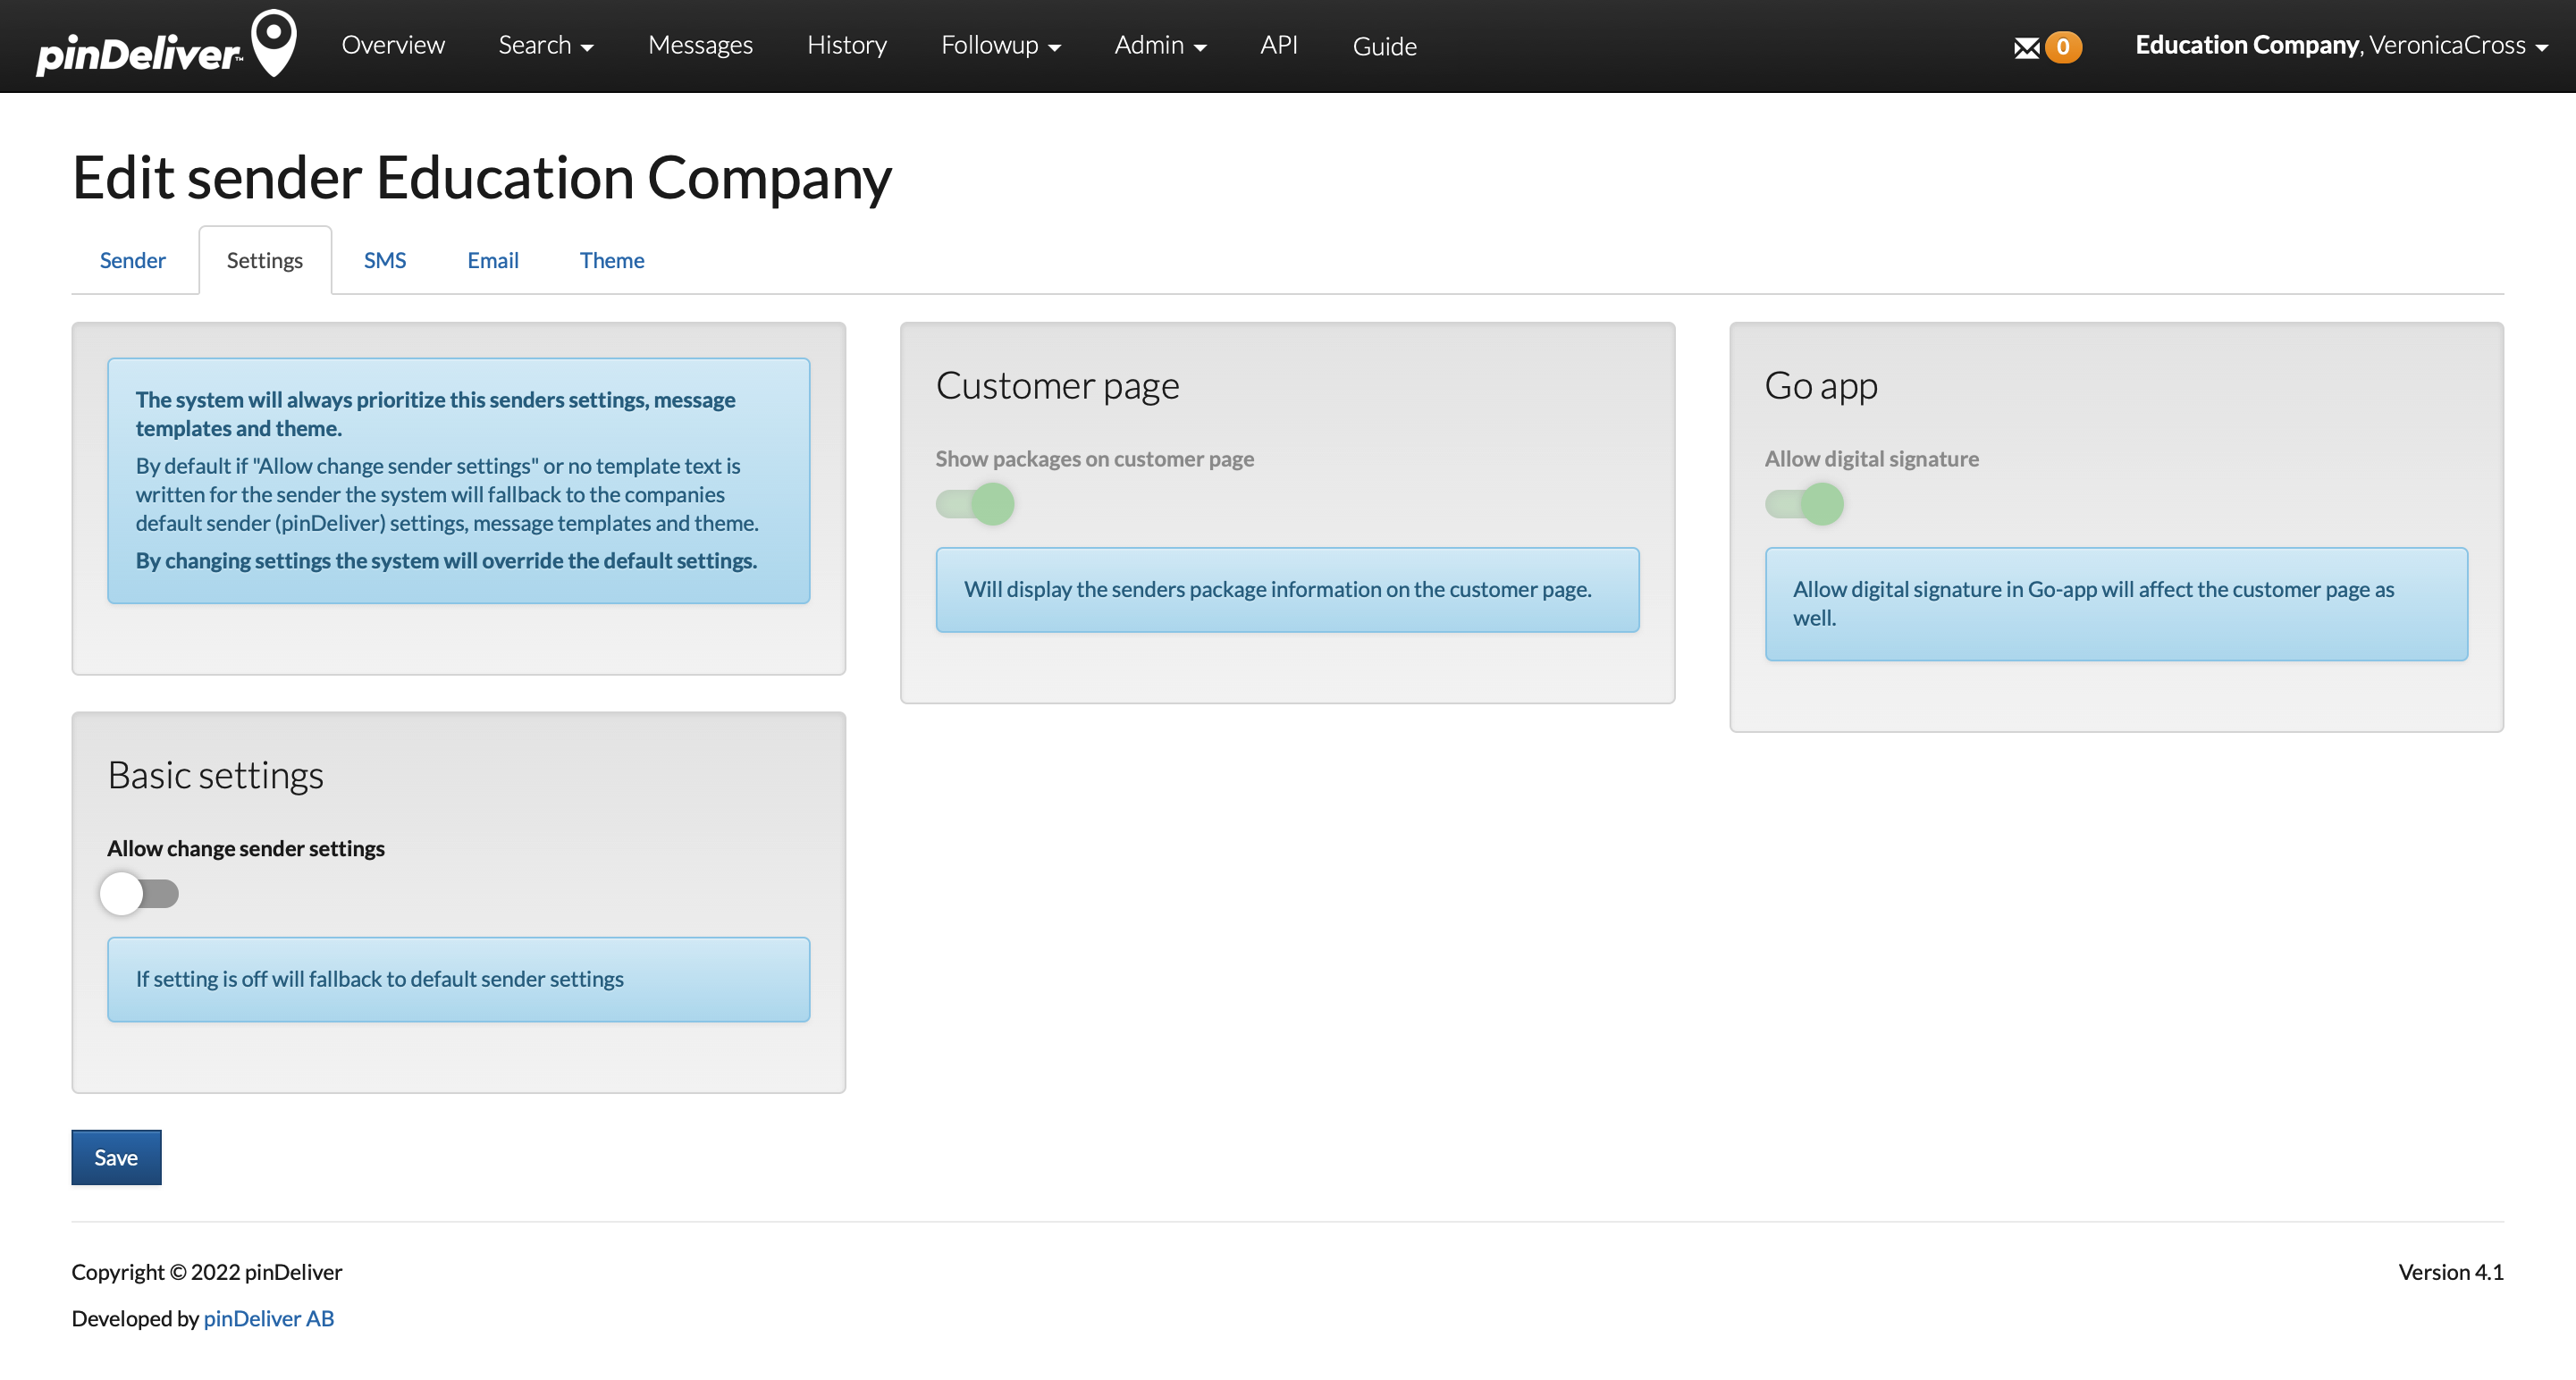
| Field | Explanation |
|---|---|
| Allow change sender settings | Lets you set unique options for a specific sender. |
| Show packages on customer page | Displays packages on the customer’s page. |
| Allow digital signature | Allows customers to sign digitally upon delivery. |
SMS
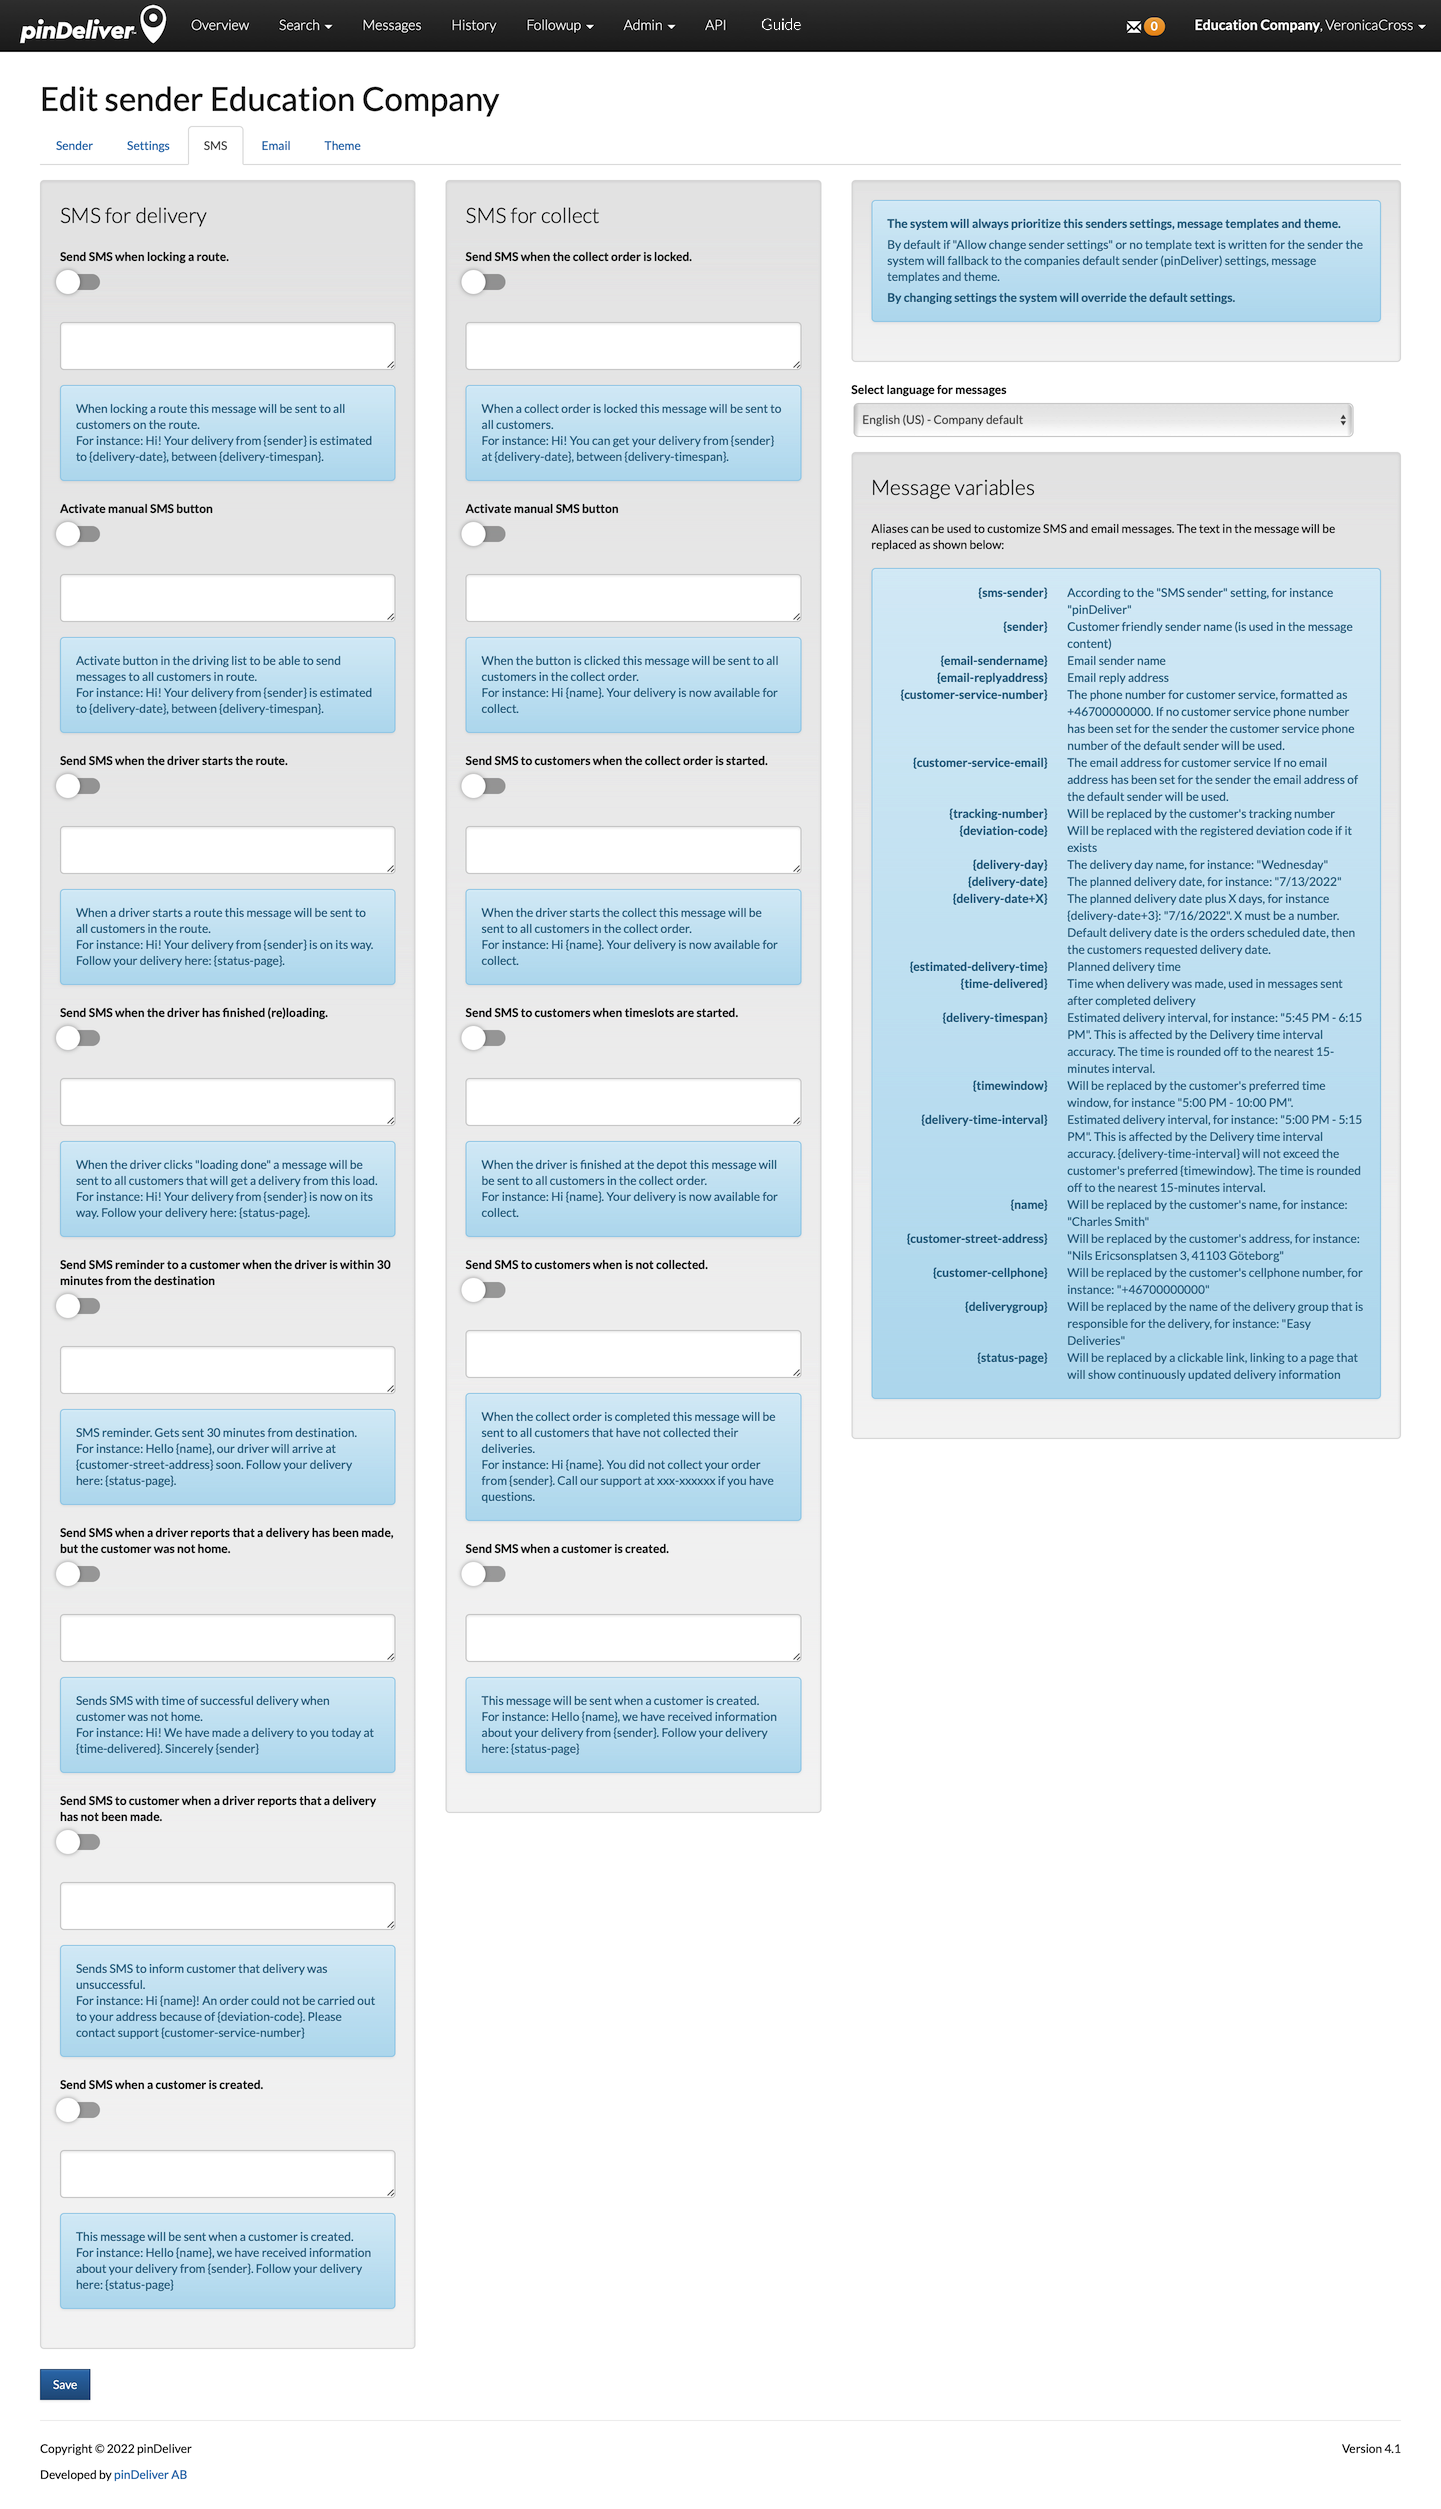
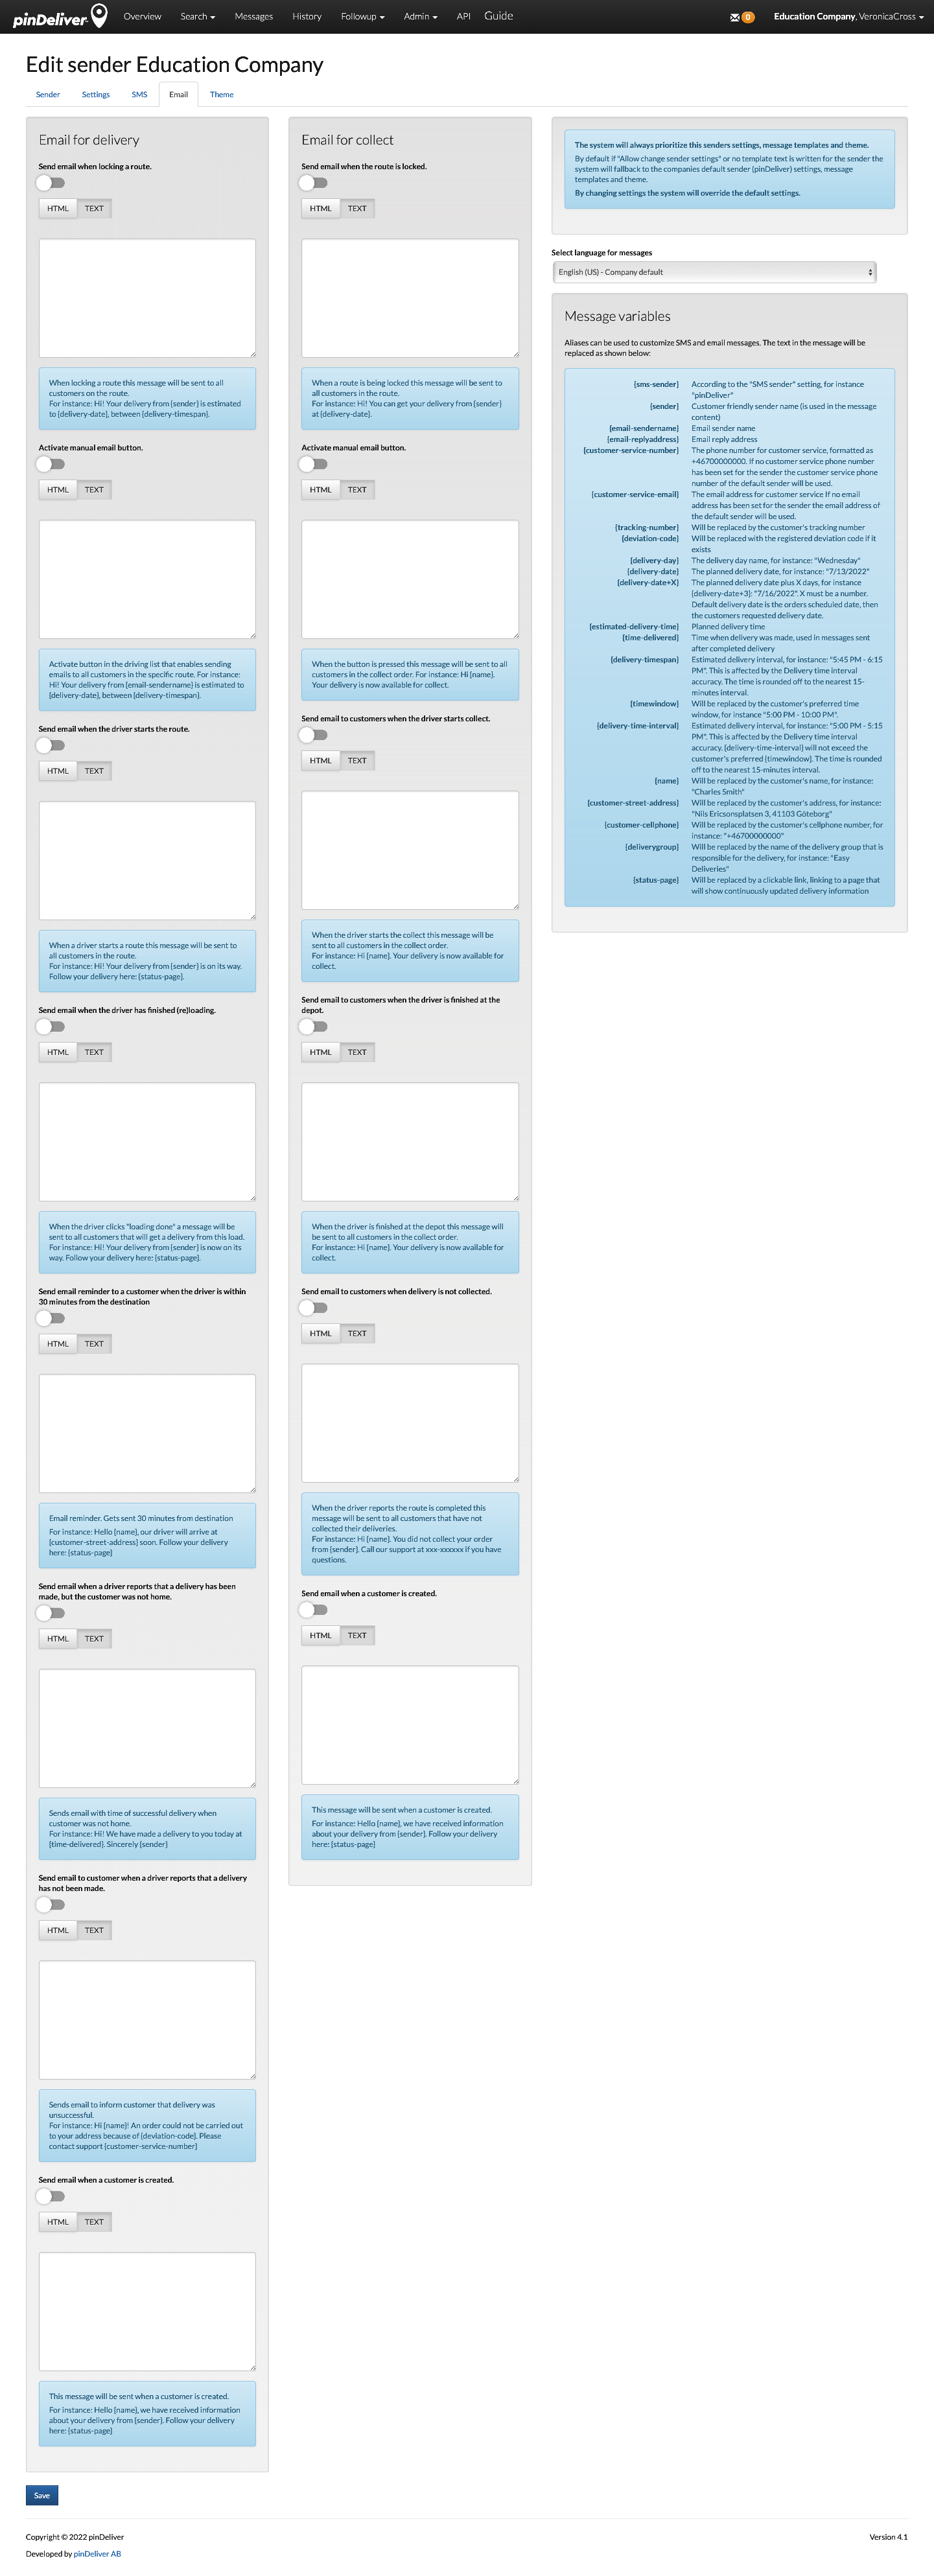
If you want unique SMS templates or triggers for a particular sender, you can set them up on this page. You will find detailed explanations of these SMS templates and triggers in the SMS settings tab.
If you want customized email templates or triggers for a specific sender, you can configure them on this page. Detailed explanations of these email templates and triggers can be found in the Email settings tab.
Theme
On this tab, you can personalize the appearance of the customer information page. If you do not add any colors or images here, the settings of the default sender will be applied. Since pinDeliver allows for multiple senders (one per customer order), you can provide customers with a distinct look and feel based on the sender of the goods.
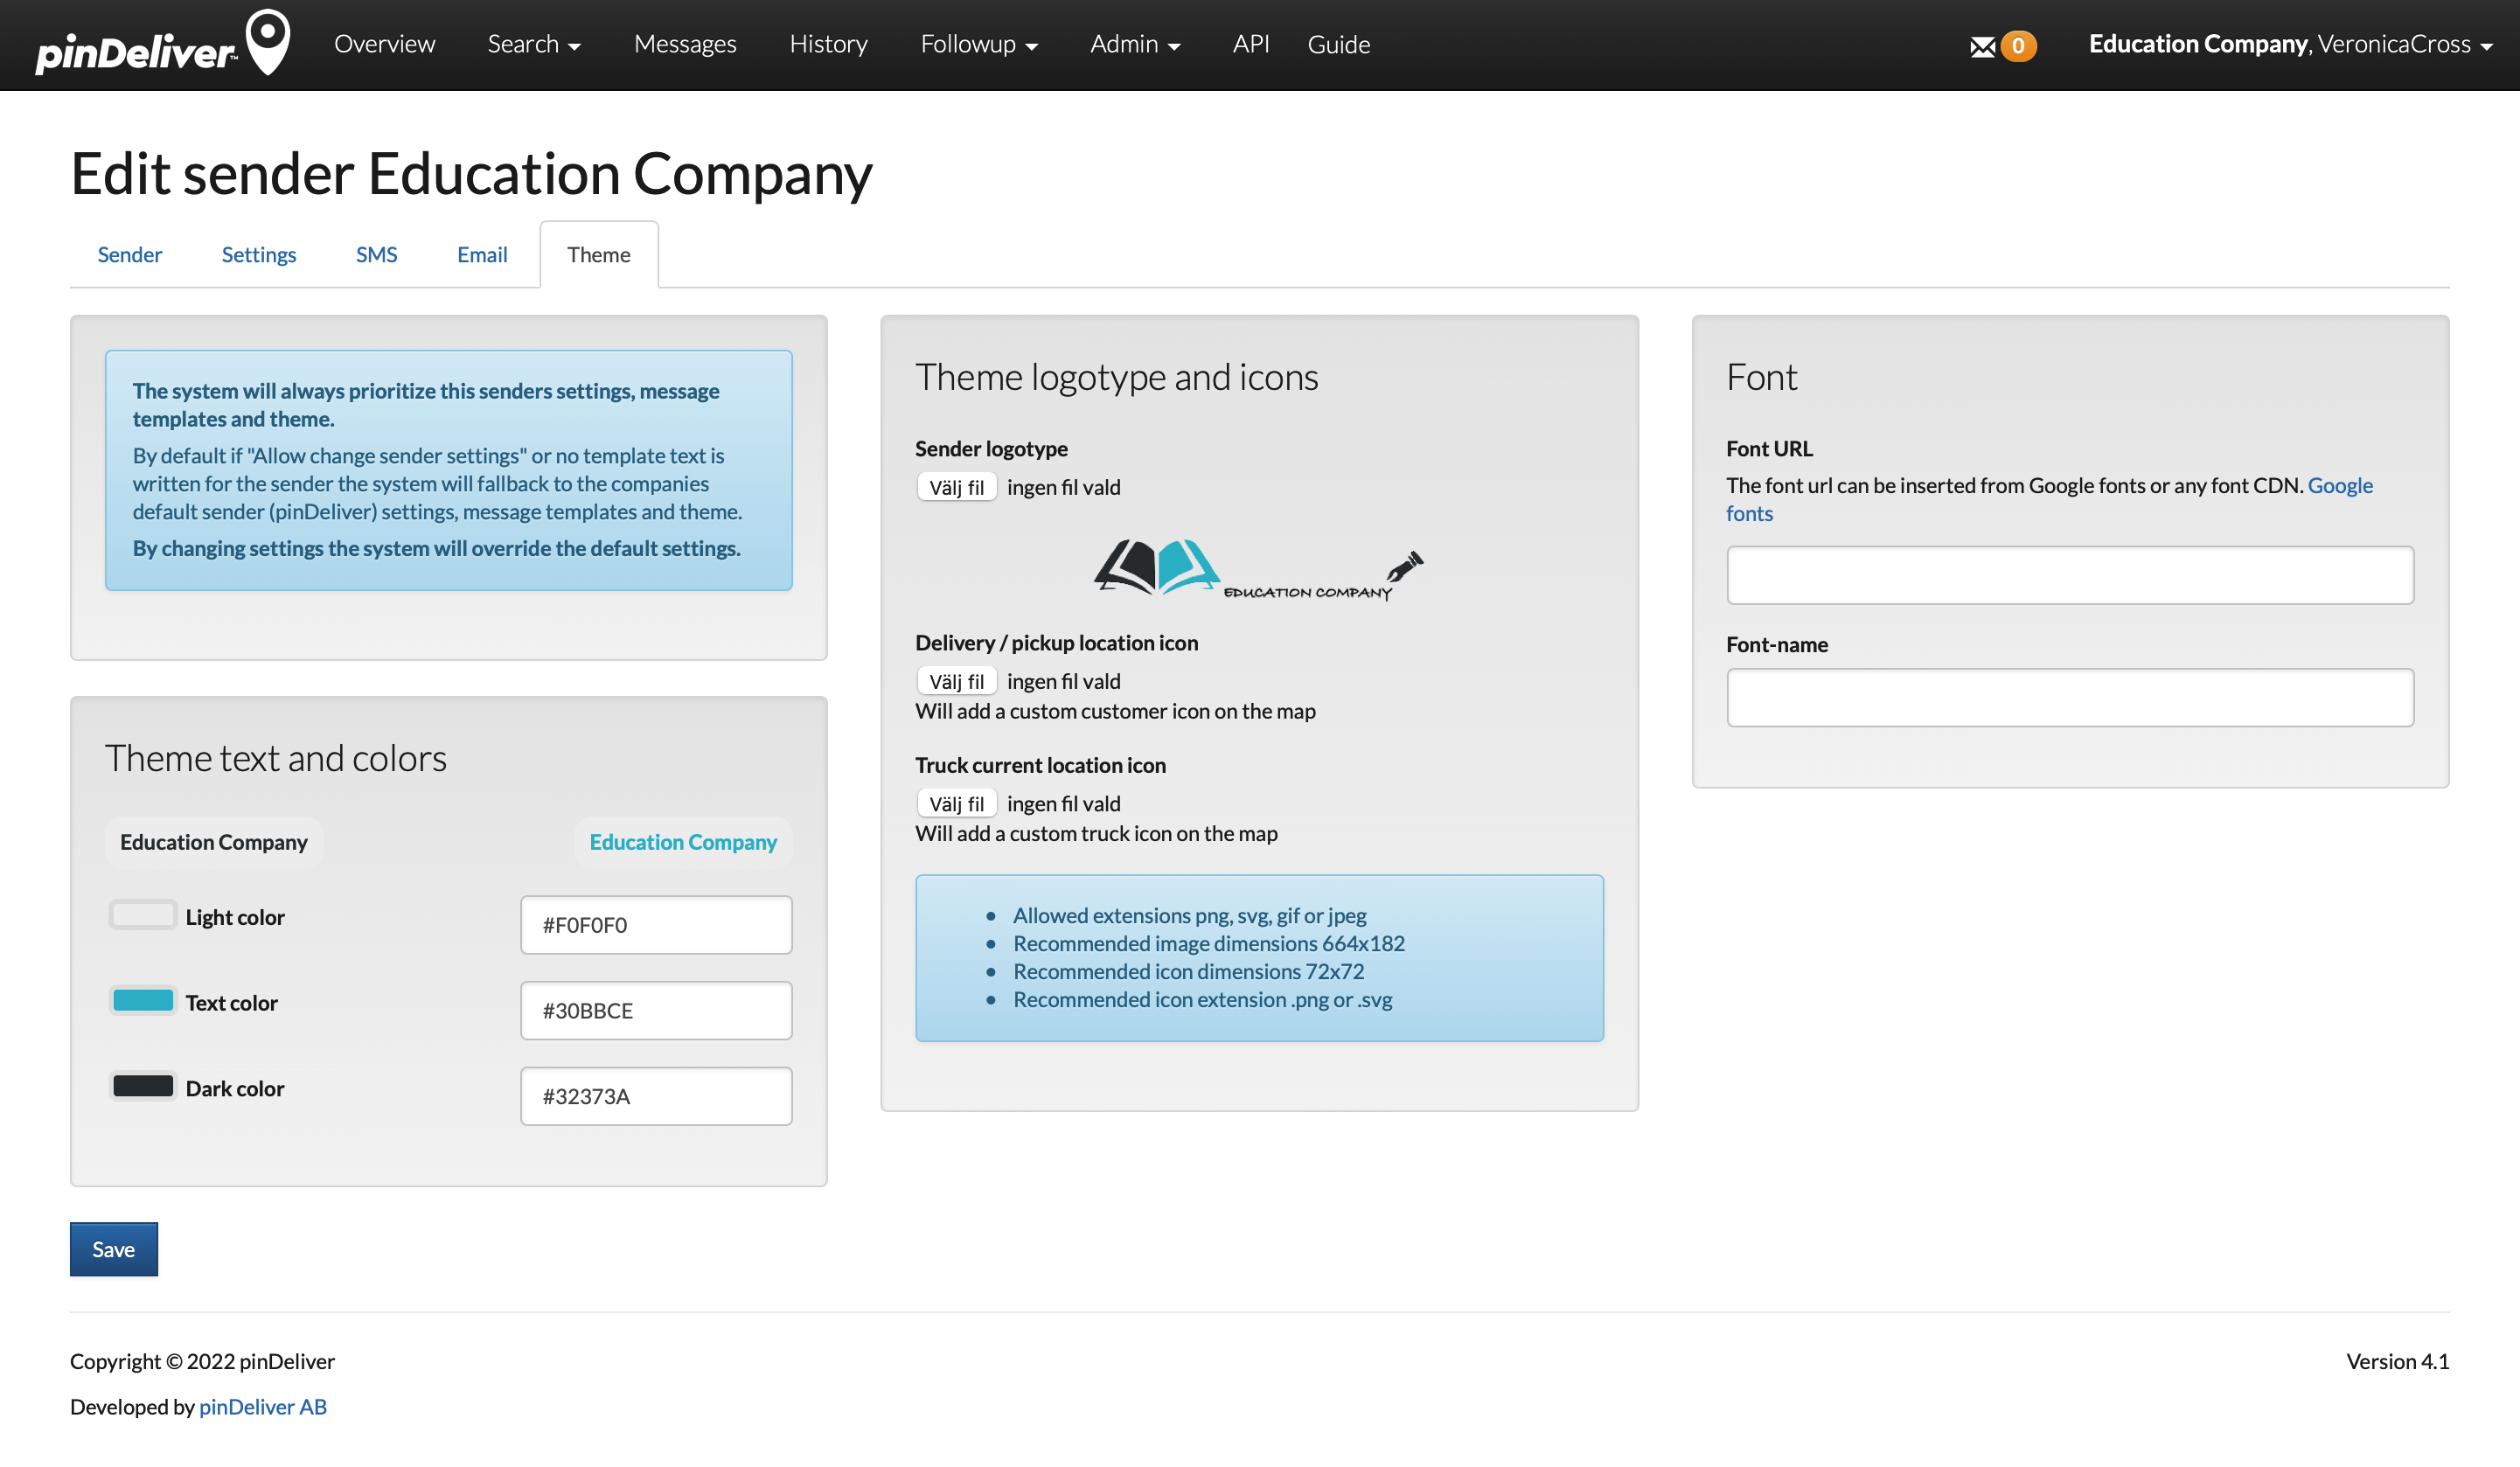
| Field | Explanation |
|---|---|
| Light color | Background color in text areas on the customer information page. A recommended color code is #F0F0F0, as it provides a bright but not white background. |
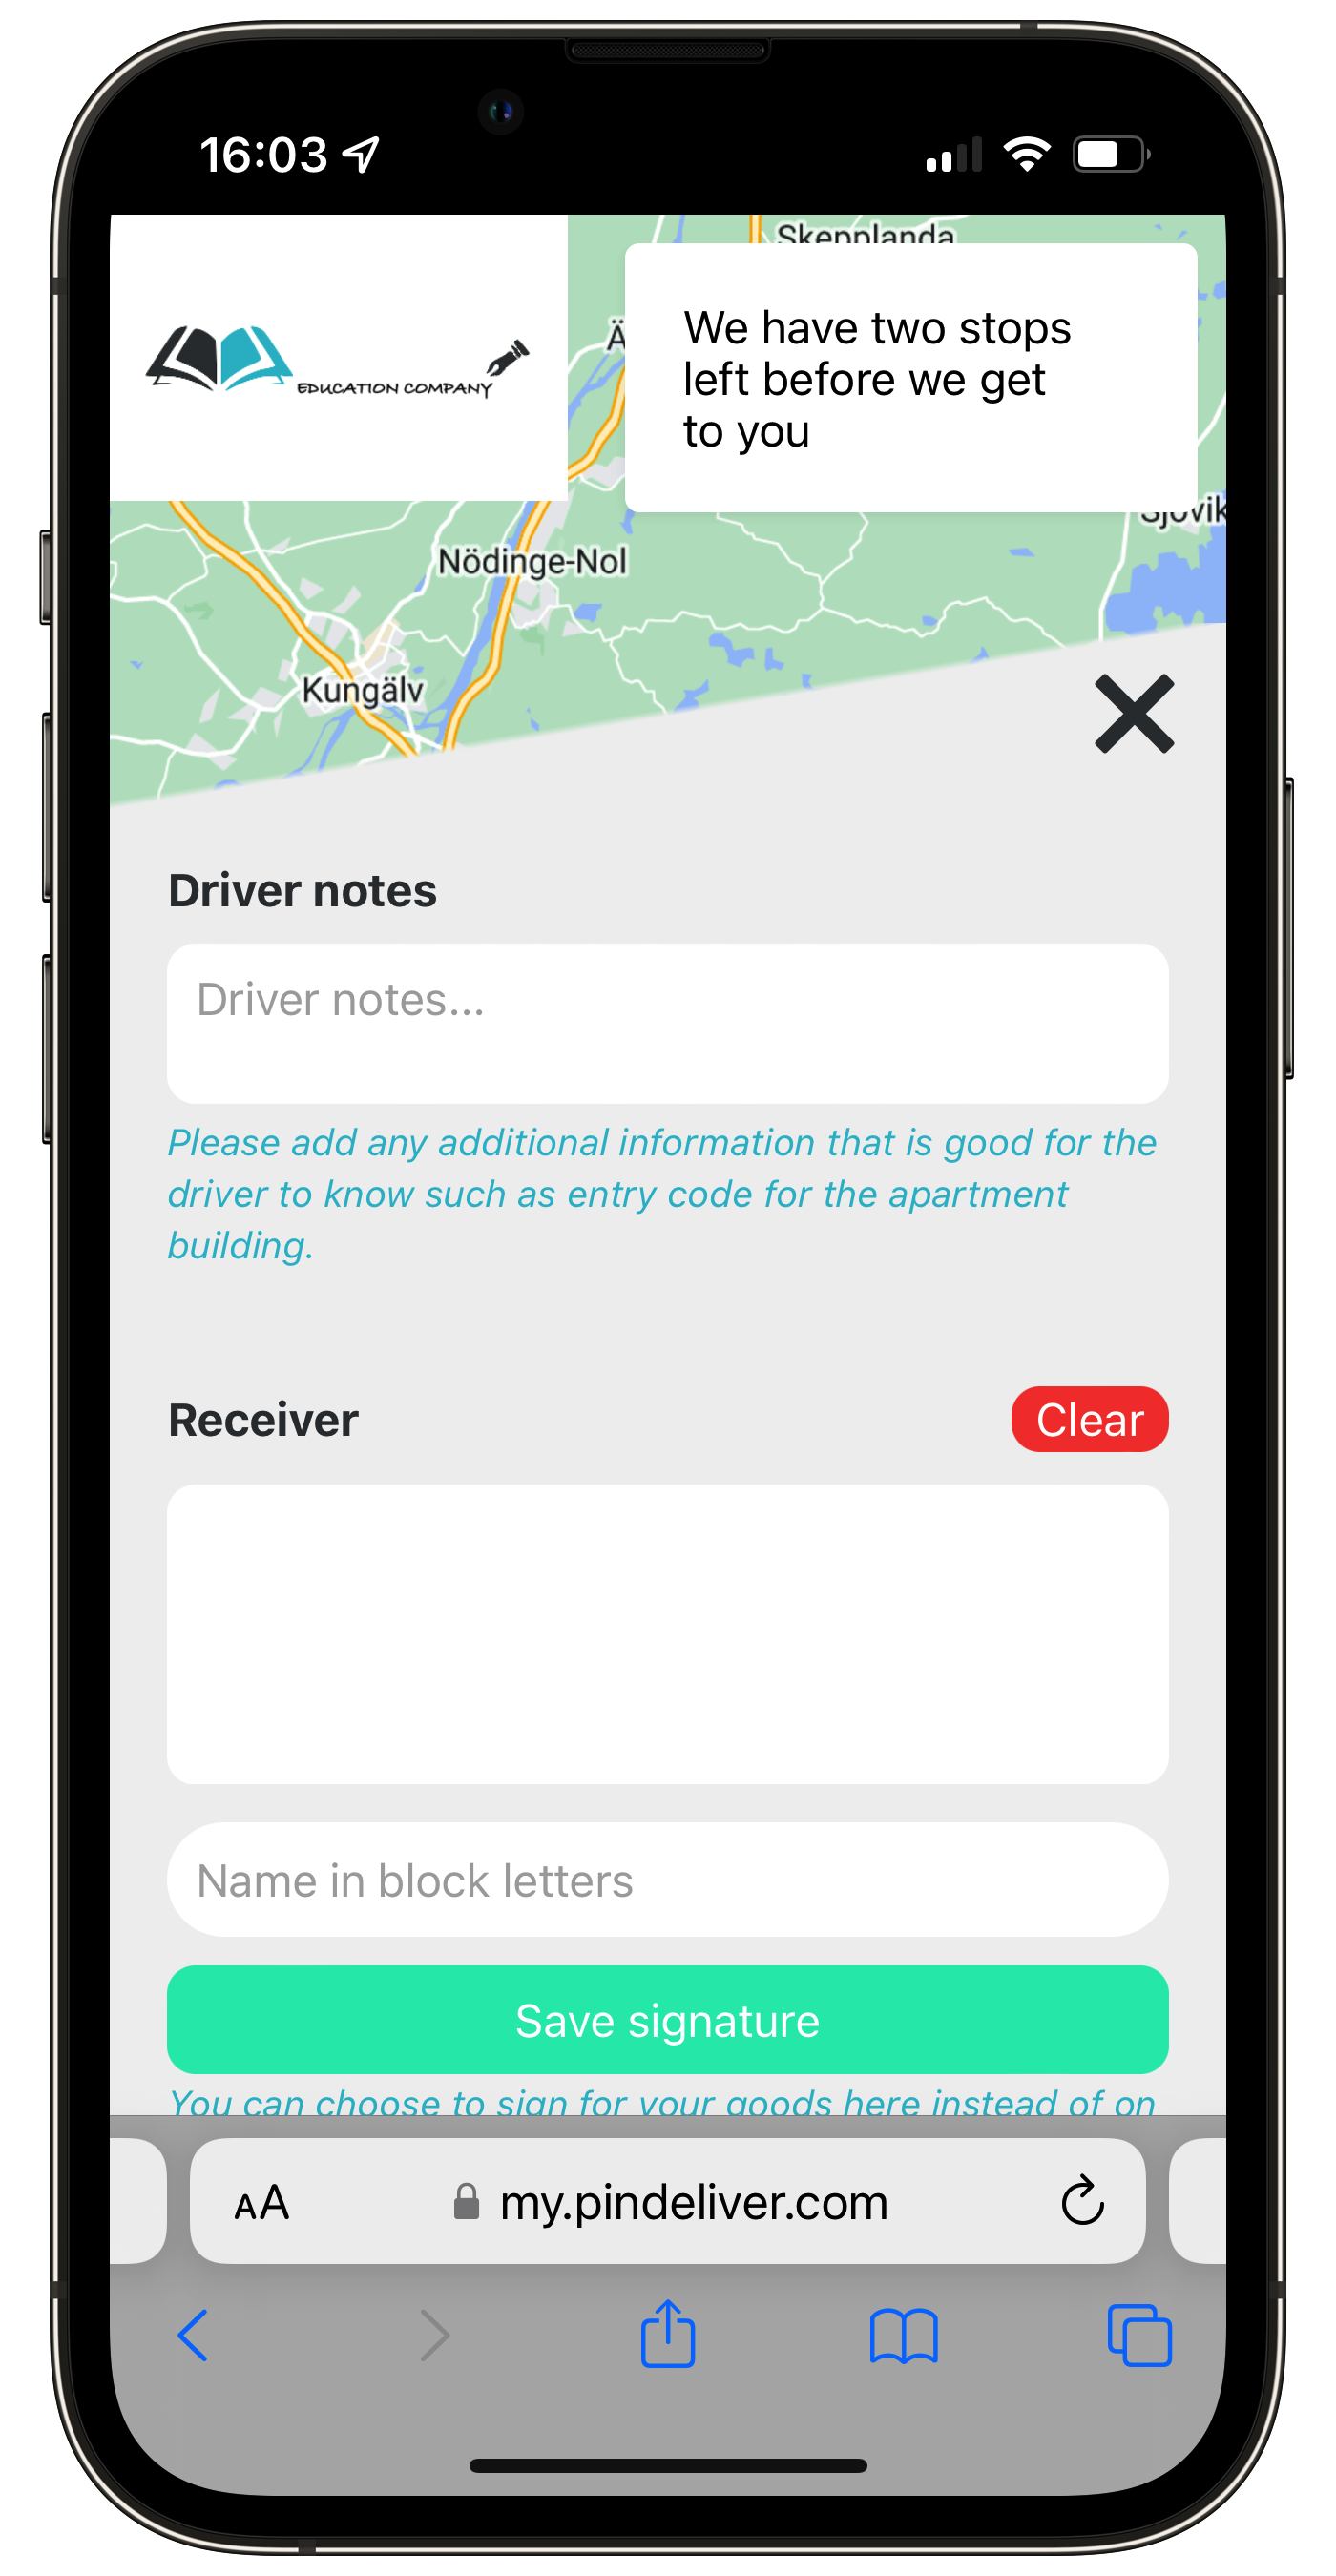
| Text color | Text color for lead texts (see explanatory text under the field Driver notes in the right example image below). |
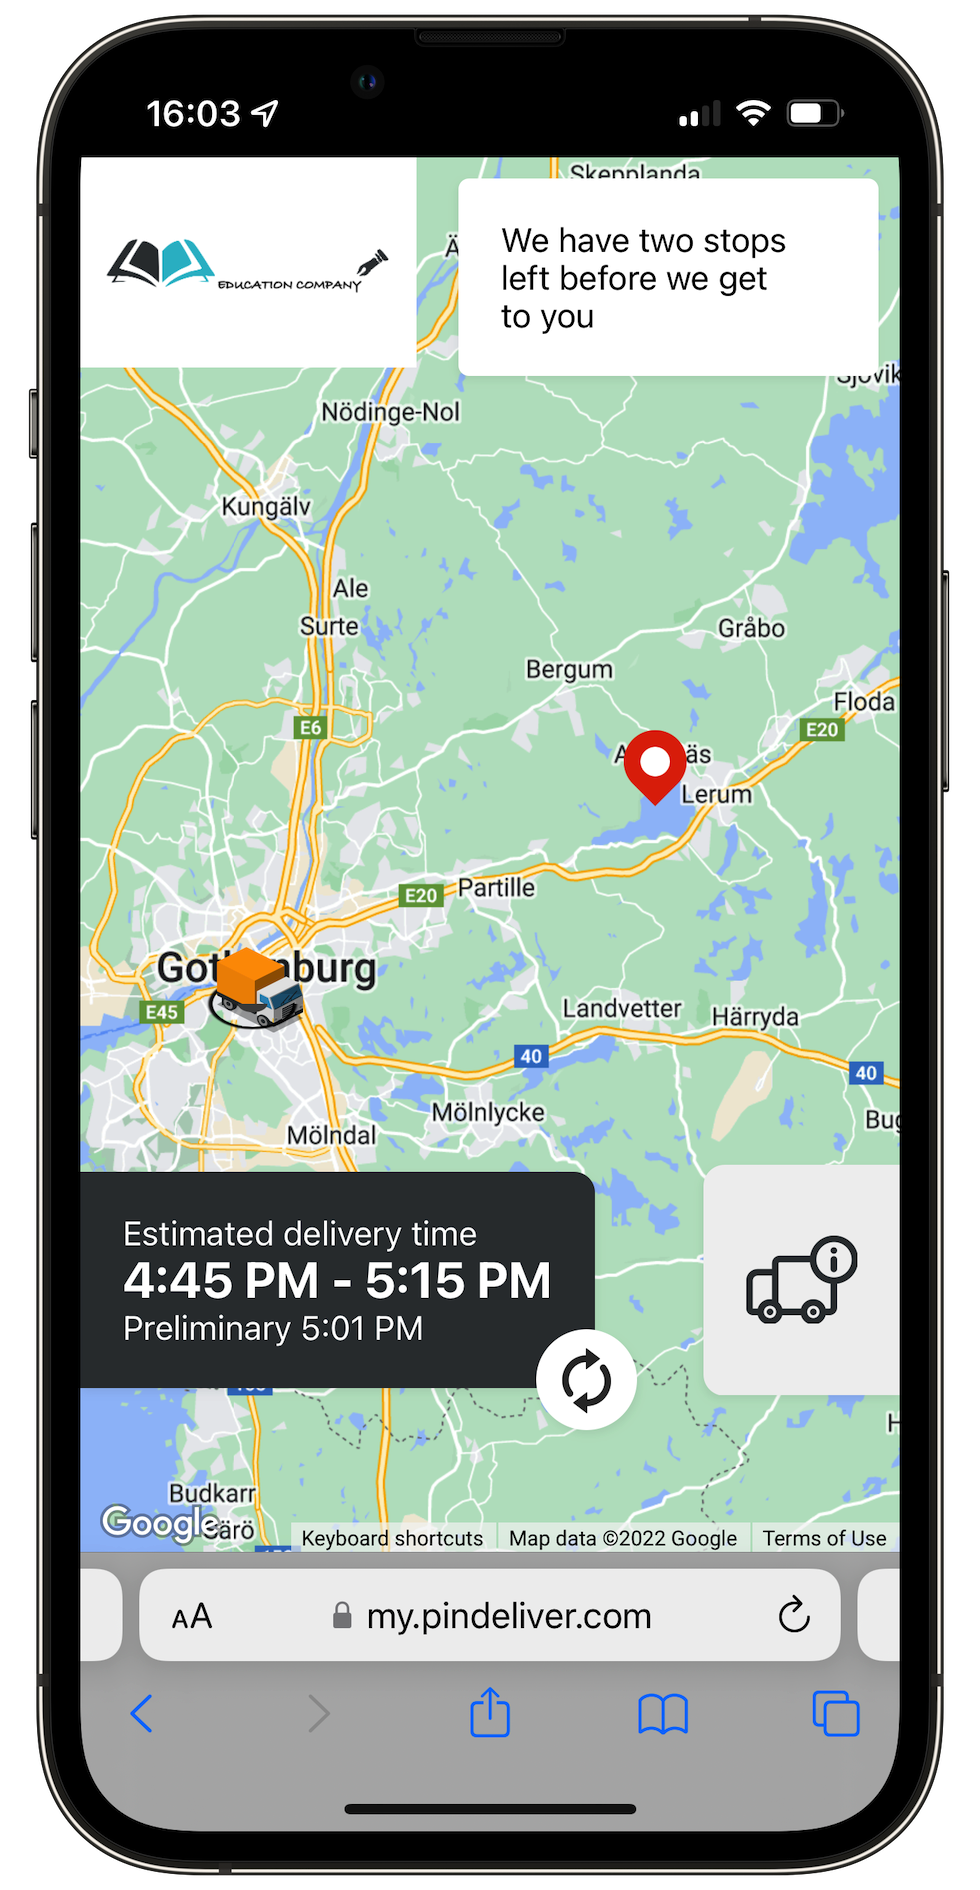
| Dark color | Background color on the time schedule sign on the first page and header texts (see header text Driver notes in the right example image below). |
| Sender logotype | Click the button to upload a file that will appear in the top left corner of the customer information page. Recommended size is 664×182 pixels. It is recommended to use a transparent background for the best appearance. |
| Delivery/pickup location icon | Click the button to upload an icon representing pickup or drop-off locations. Recommended size is 72×72 pixels. |
| Truck current location icon | Click the button to upload an icon indicating the current position of the vehicle. Recommended size is 72×72 pixels. |
| Font URL | A URL link to a specific font for text on the customer information page. |
| Font name | The name of the font specified in the Font URL. |
Examples of customer information page:
Traffic restrictions
It is possible to use unlimited traffic restrictions to specify areas, including combinations with rush hours, where driving speed should be adjusted. These adjustments will be factored into the route optimization calculations.
To get started, activate Traffic restrictions in the Settings-Optimization tab. Additionally, define time windows for both morning and evening rush hours.
Once you have completed these steps, you can create traffic regions. If you wish to modify an existing region, you can select:
- Edit traffic factors to adjust driving speeds for the region.
- Edit traffic region to modify the map area for the region.

Click Add new traffic region below the list to create a new traffic region.
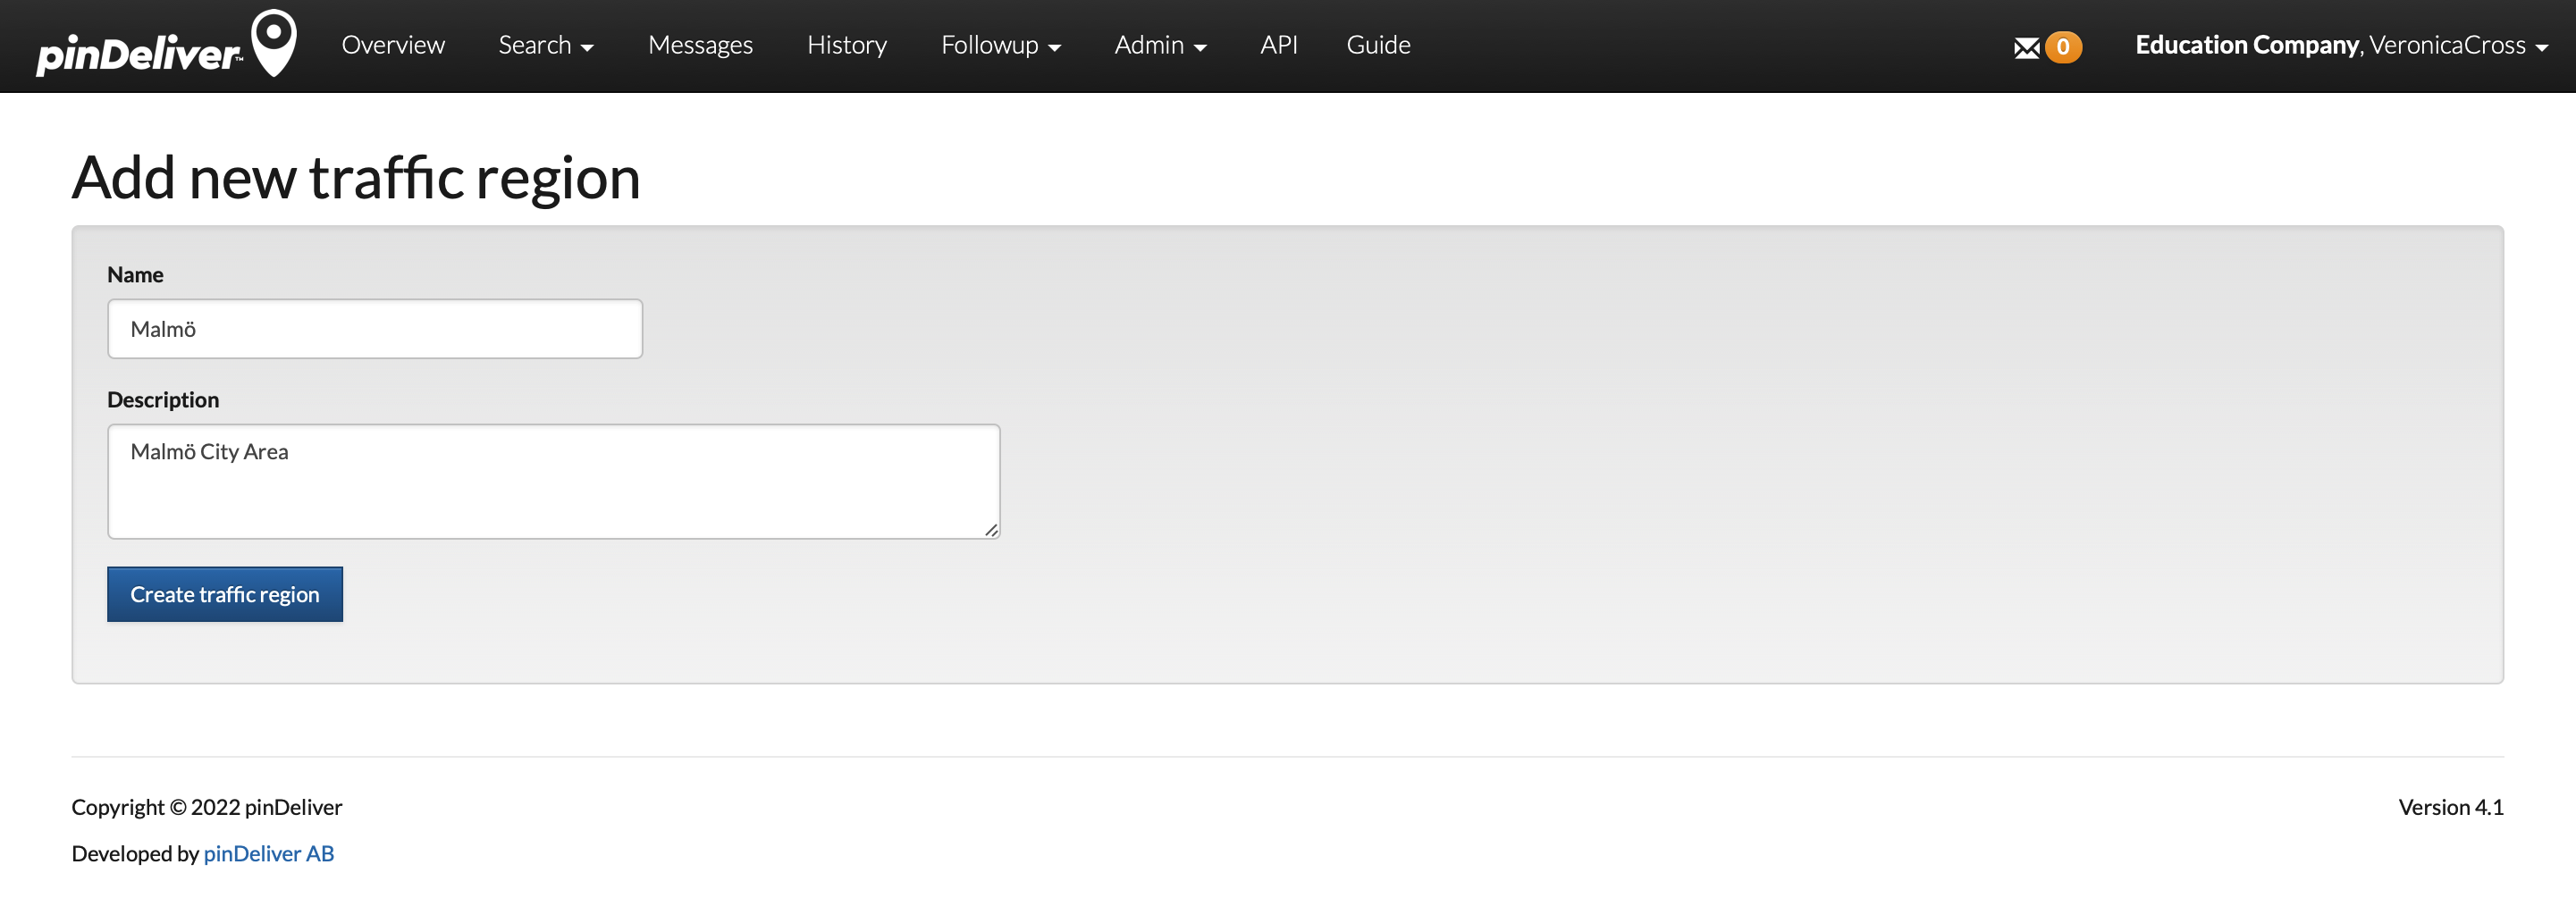
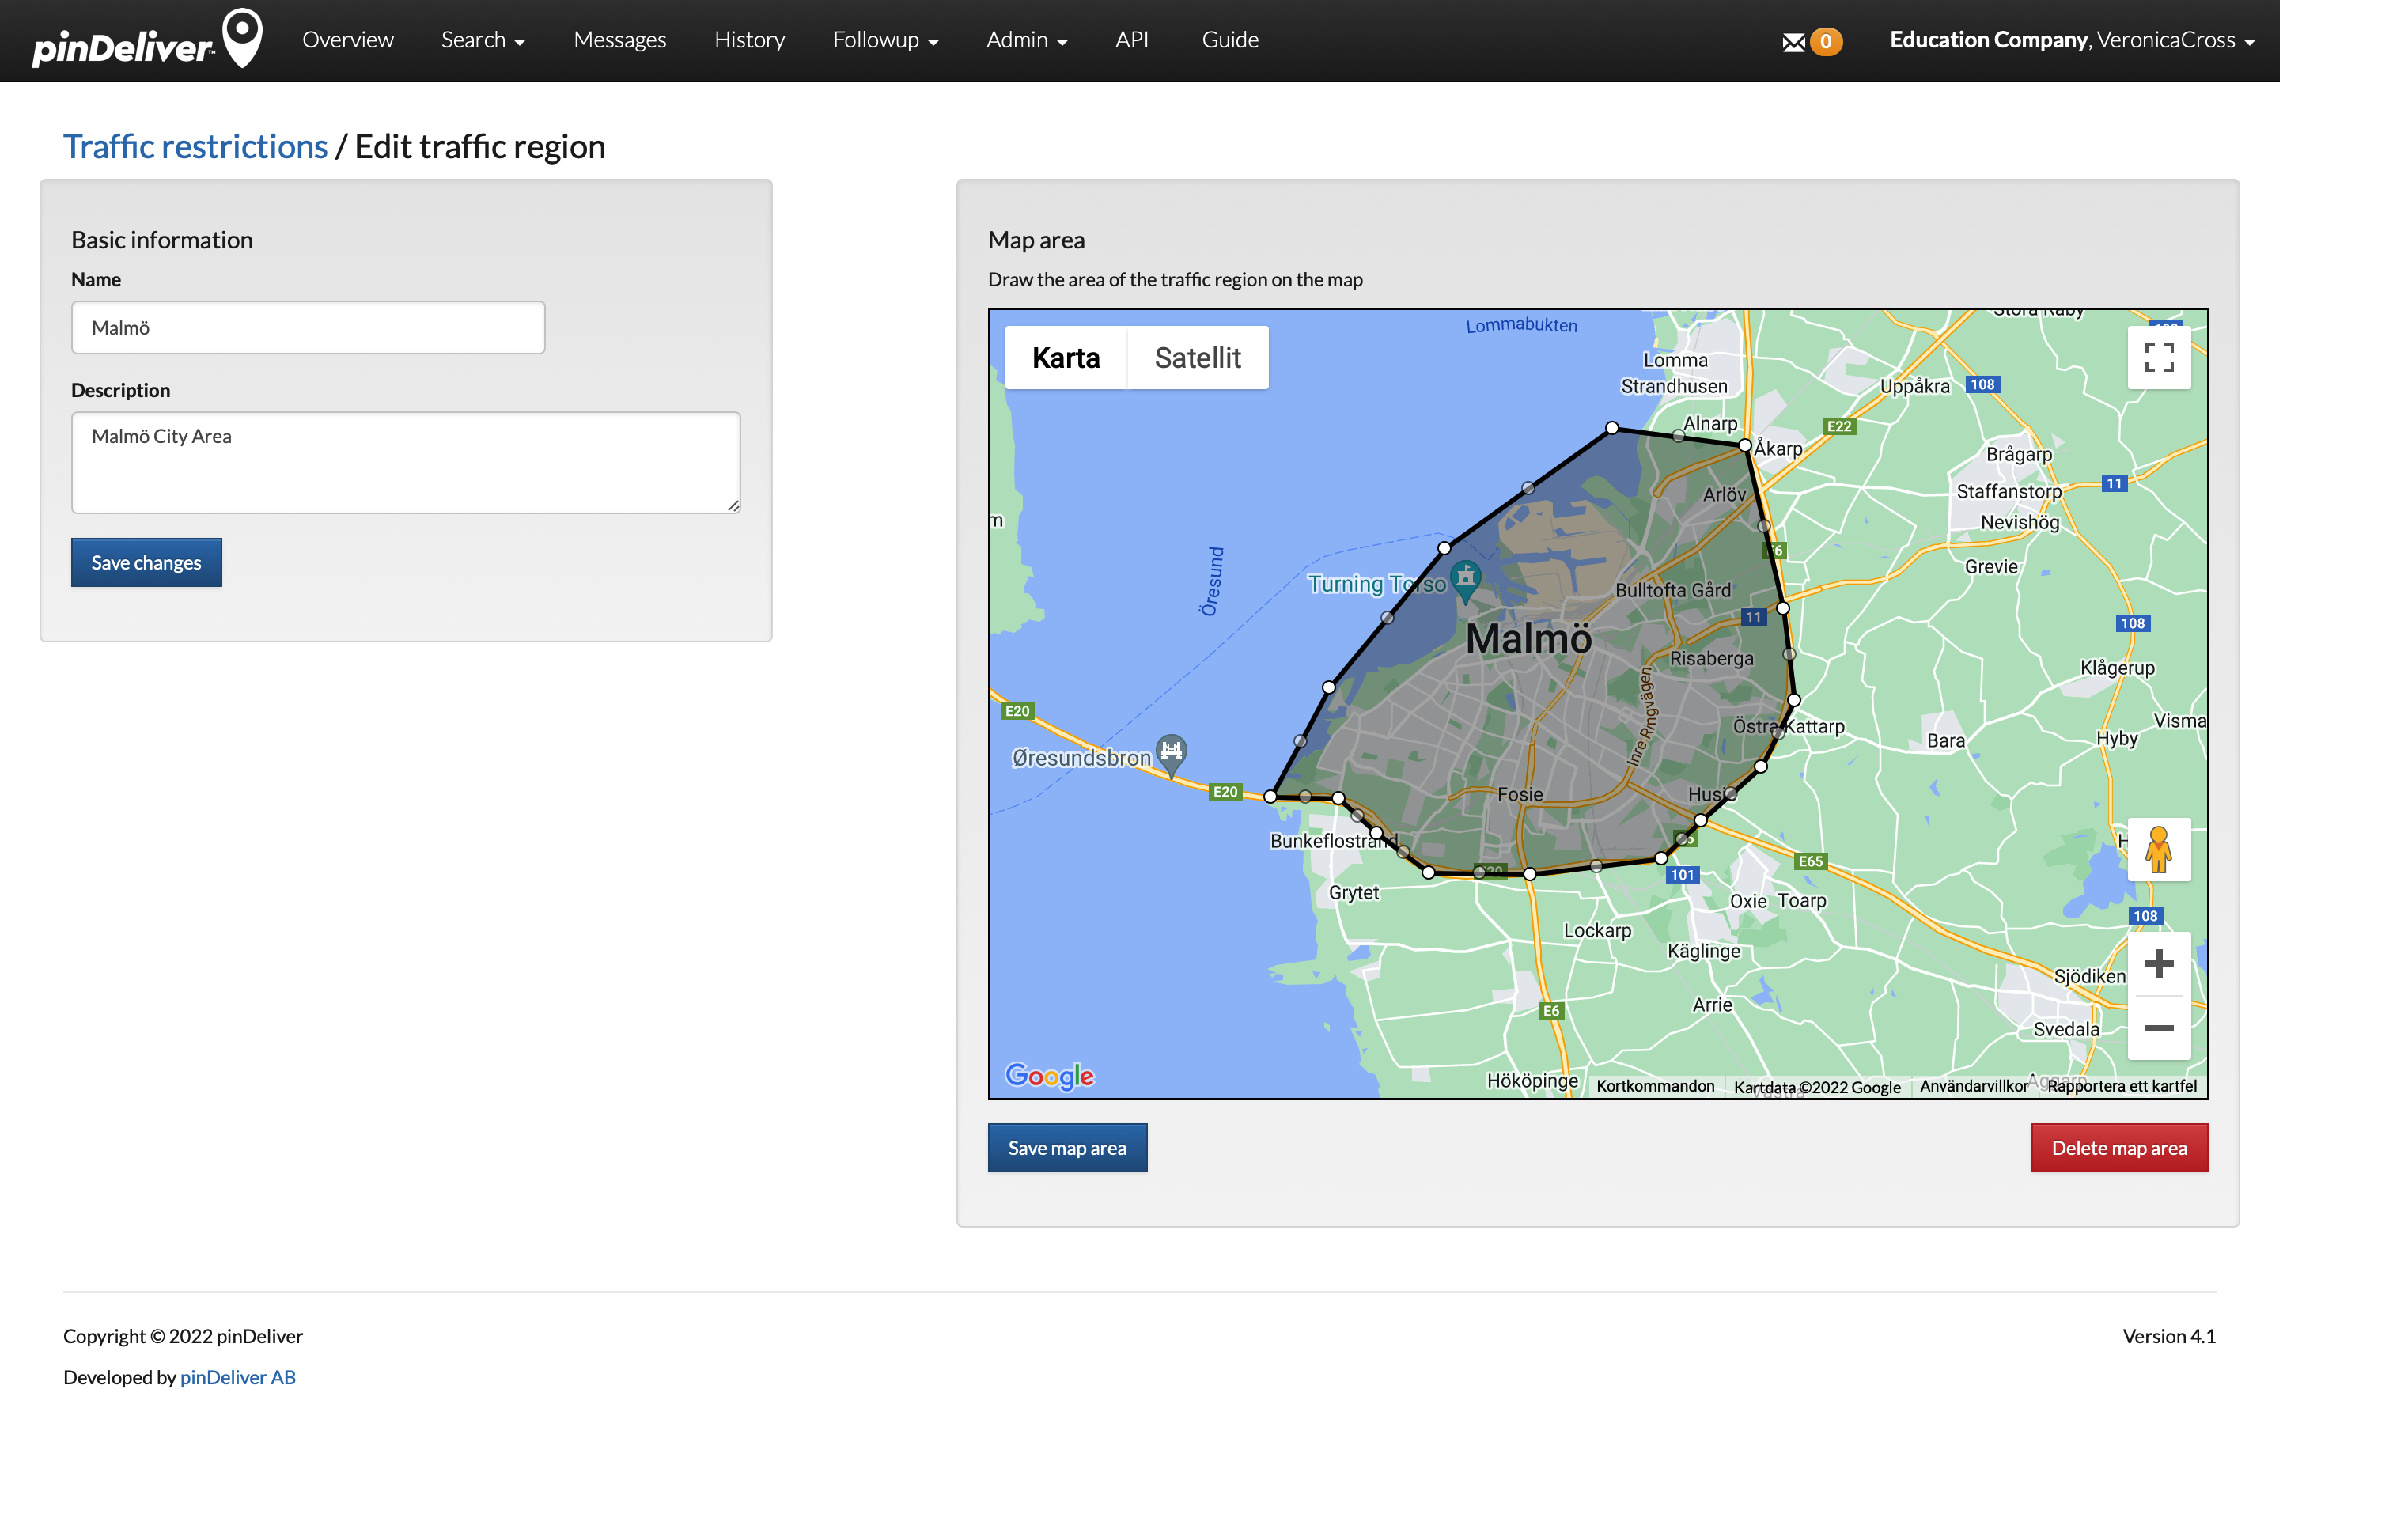
Provide a name for the traffic region and, if desired, add an optional description. Then, click Create Traffic Region. This will open the next window, where you can define the area by drawing lines on the map. Zoom in on your region and use the drawing tool to connect the lines and create the desired area.

Use lines to define the area where you want to set specific driving speeds. Each traffic region should cover only one area. If you have multiple separate areas, make a new region for each. Once you finish drawing lines, the mapped area will be shaded. Then, click Save map area.
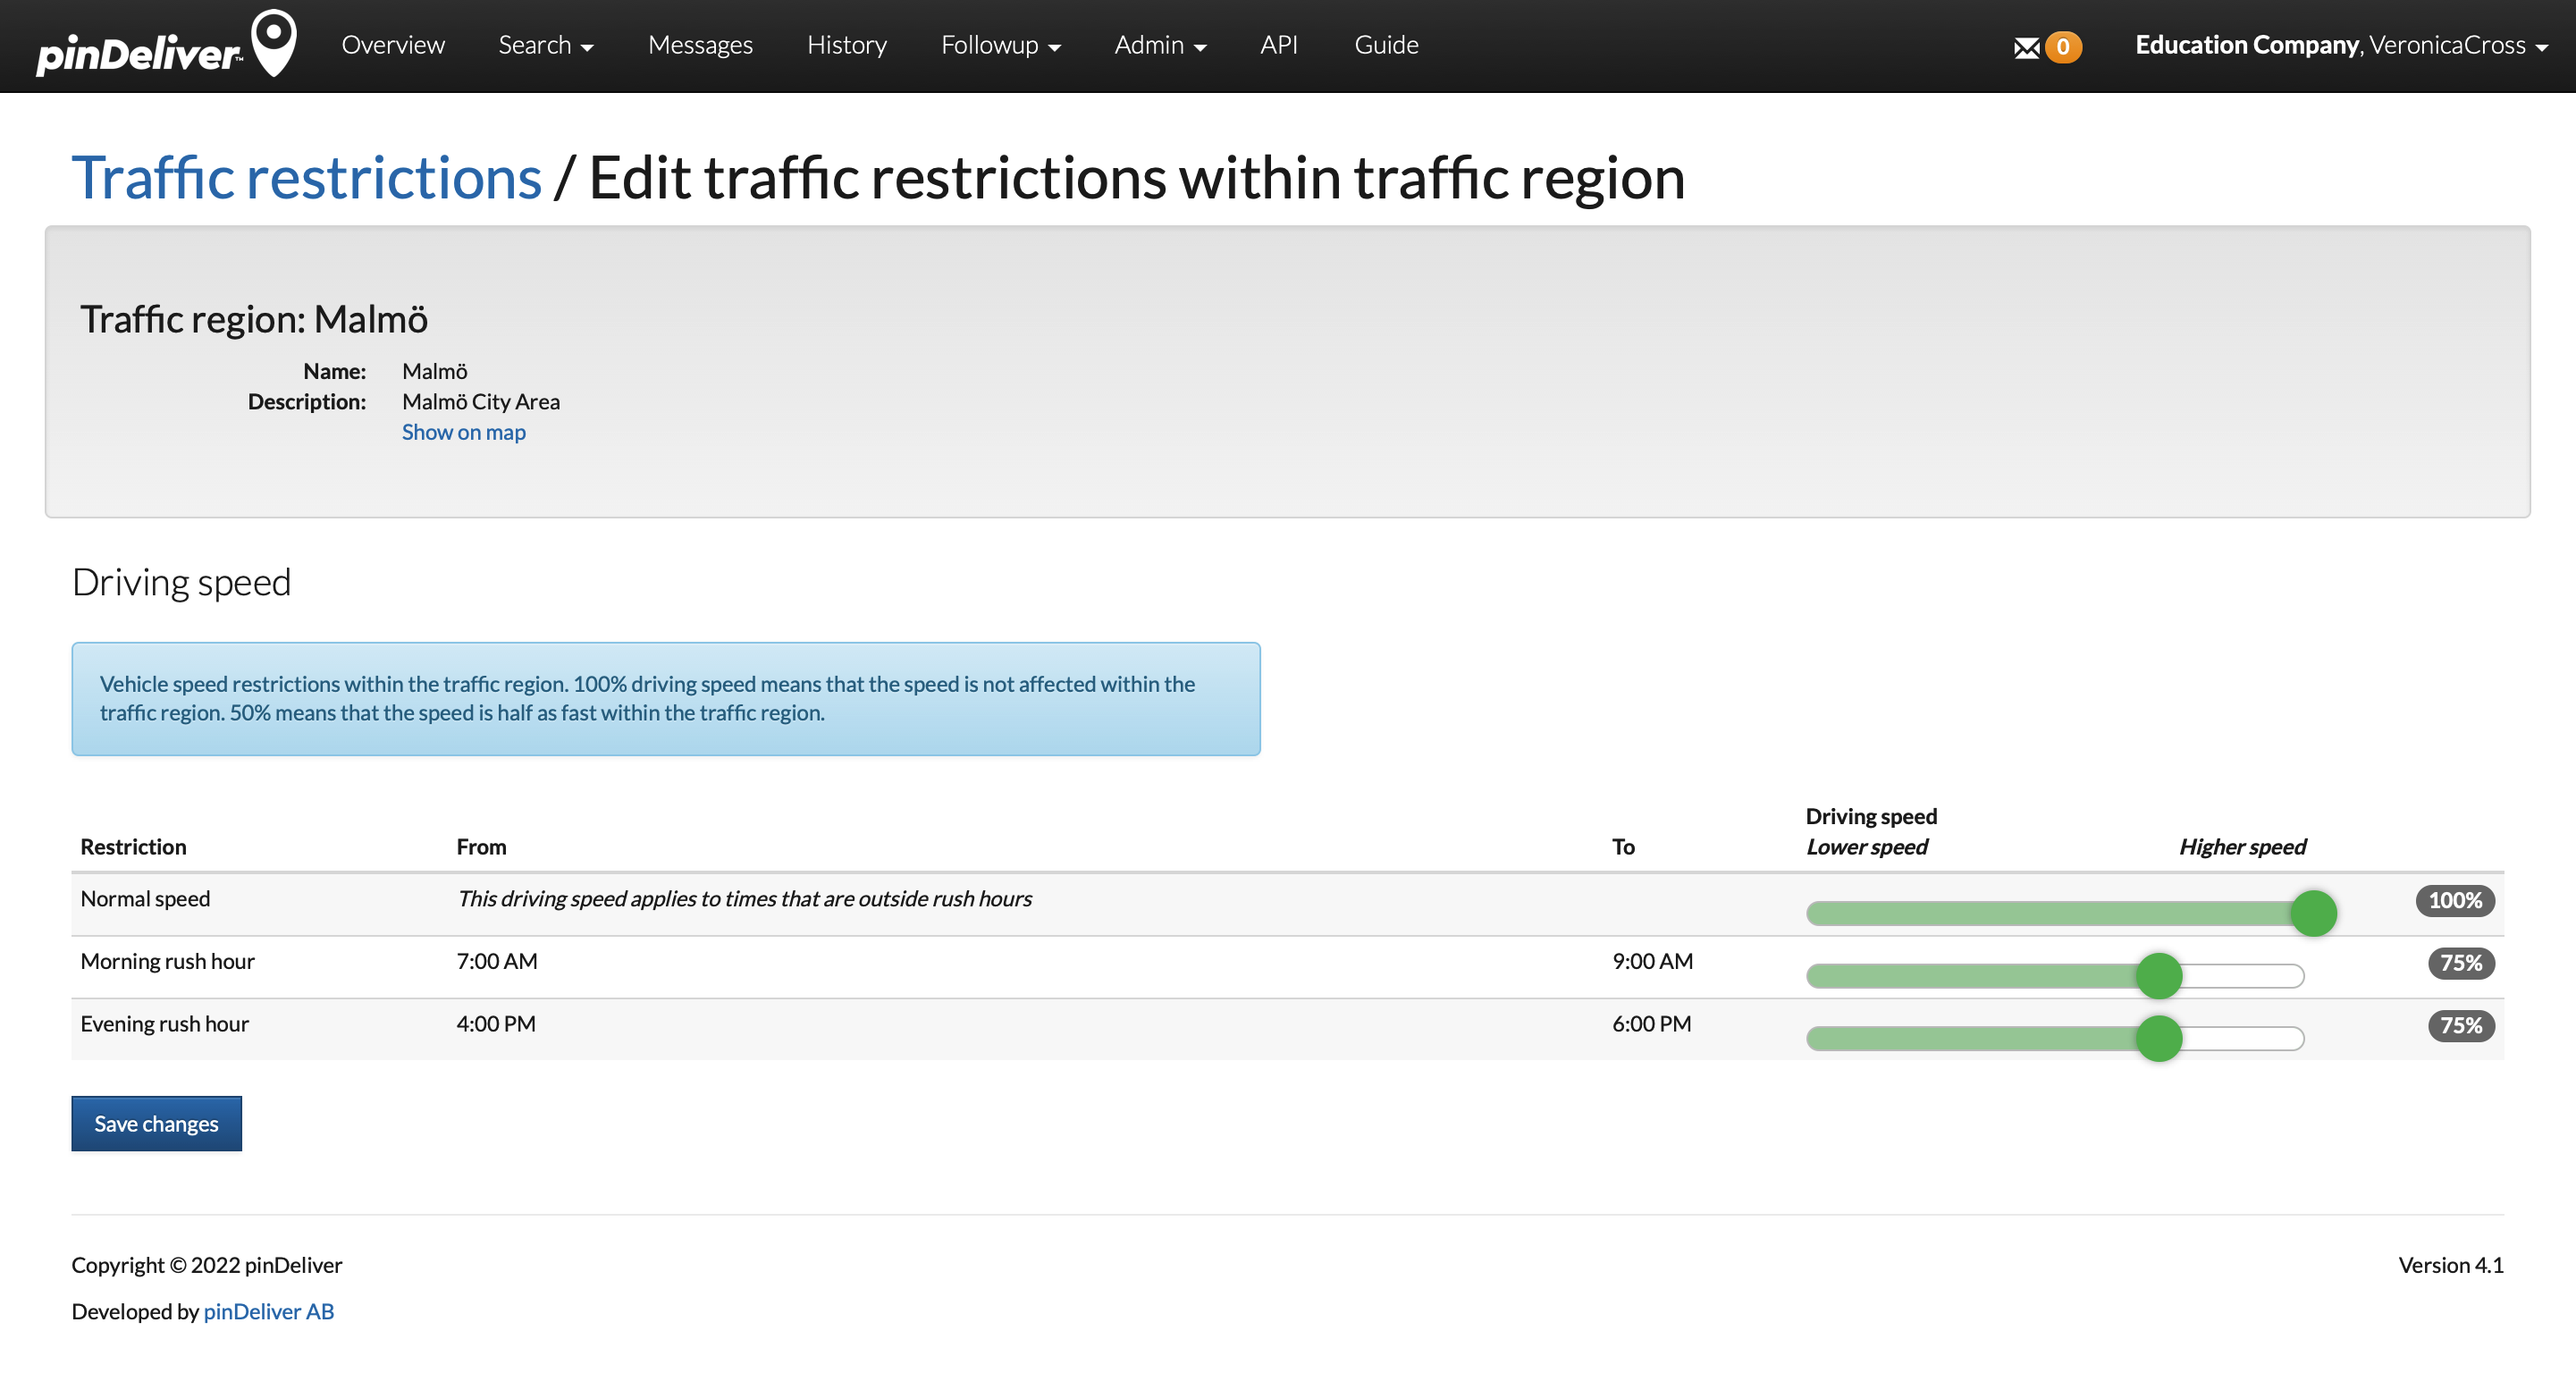
Once you have saved the mapped area, you will be directed to the page where you can adjust driving speeds. By default, all speeds are set to 100%, but you can modify them using three sliders:
- Normal Speed: This determines the driving speed outside of both morning and evening rush hours.
- Morning Rush Hour: This sets the driving speed during the specified morning rush hour period defined in Settings Optimization.
- Evening Rush Hour: This sets the driving speed during the specified evening rush hour period defined in Settings Optimization.
Send custom messages to customers
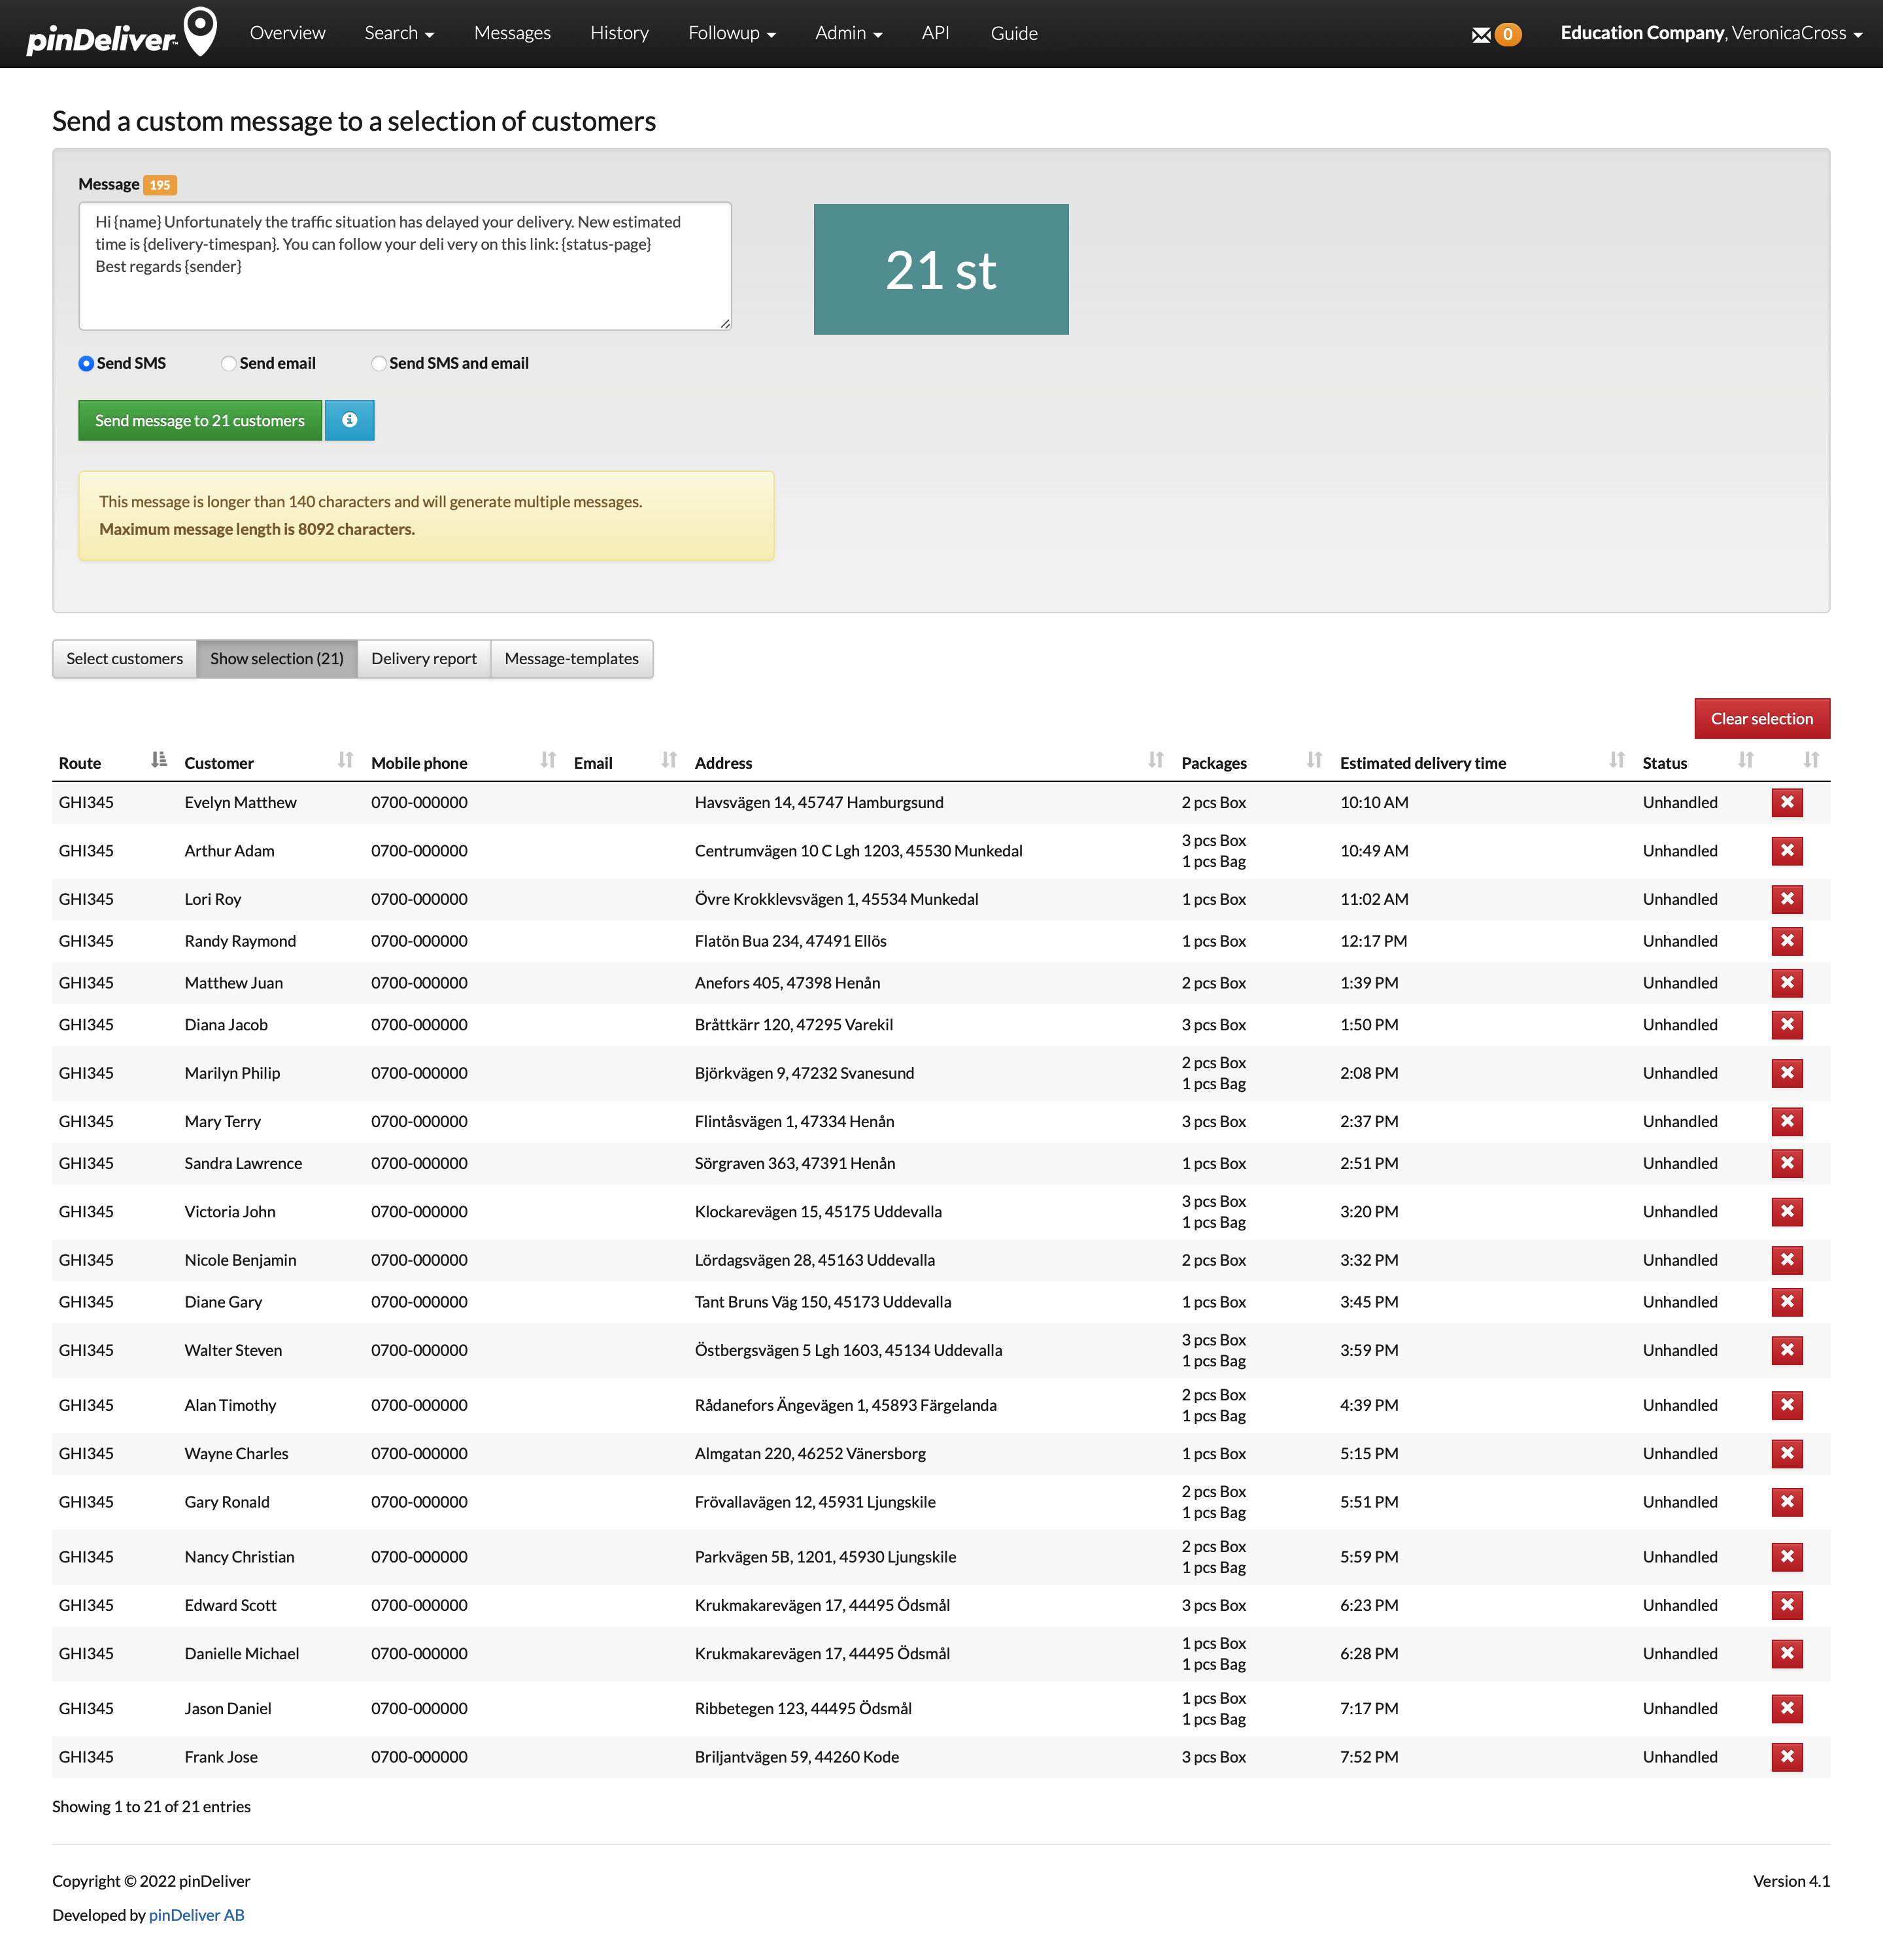
You have the option to send custom messages via SMS or email. This functionality can be triggered from various routes or manually accessed by clicking on Messages in the main menu. The primary distinction lies in the fact that when triggered from a route, there is no need to manually select customers on this page.
You can compose ad-hoc messages or use templates for convenience.
The messaging feature proves valuable, particularly when you need to manually send messages due to route delays or other reasons, reaching out to all remaining customers.
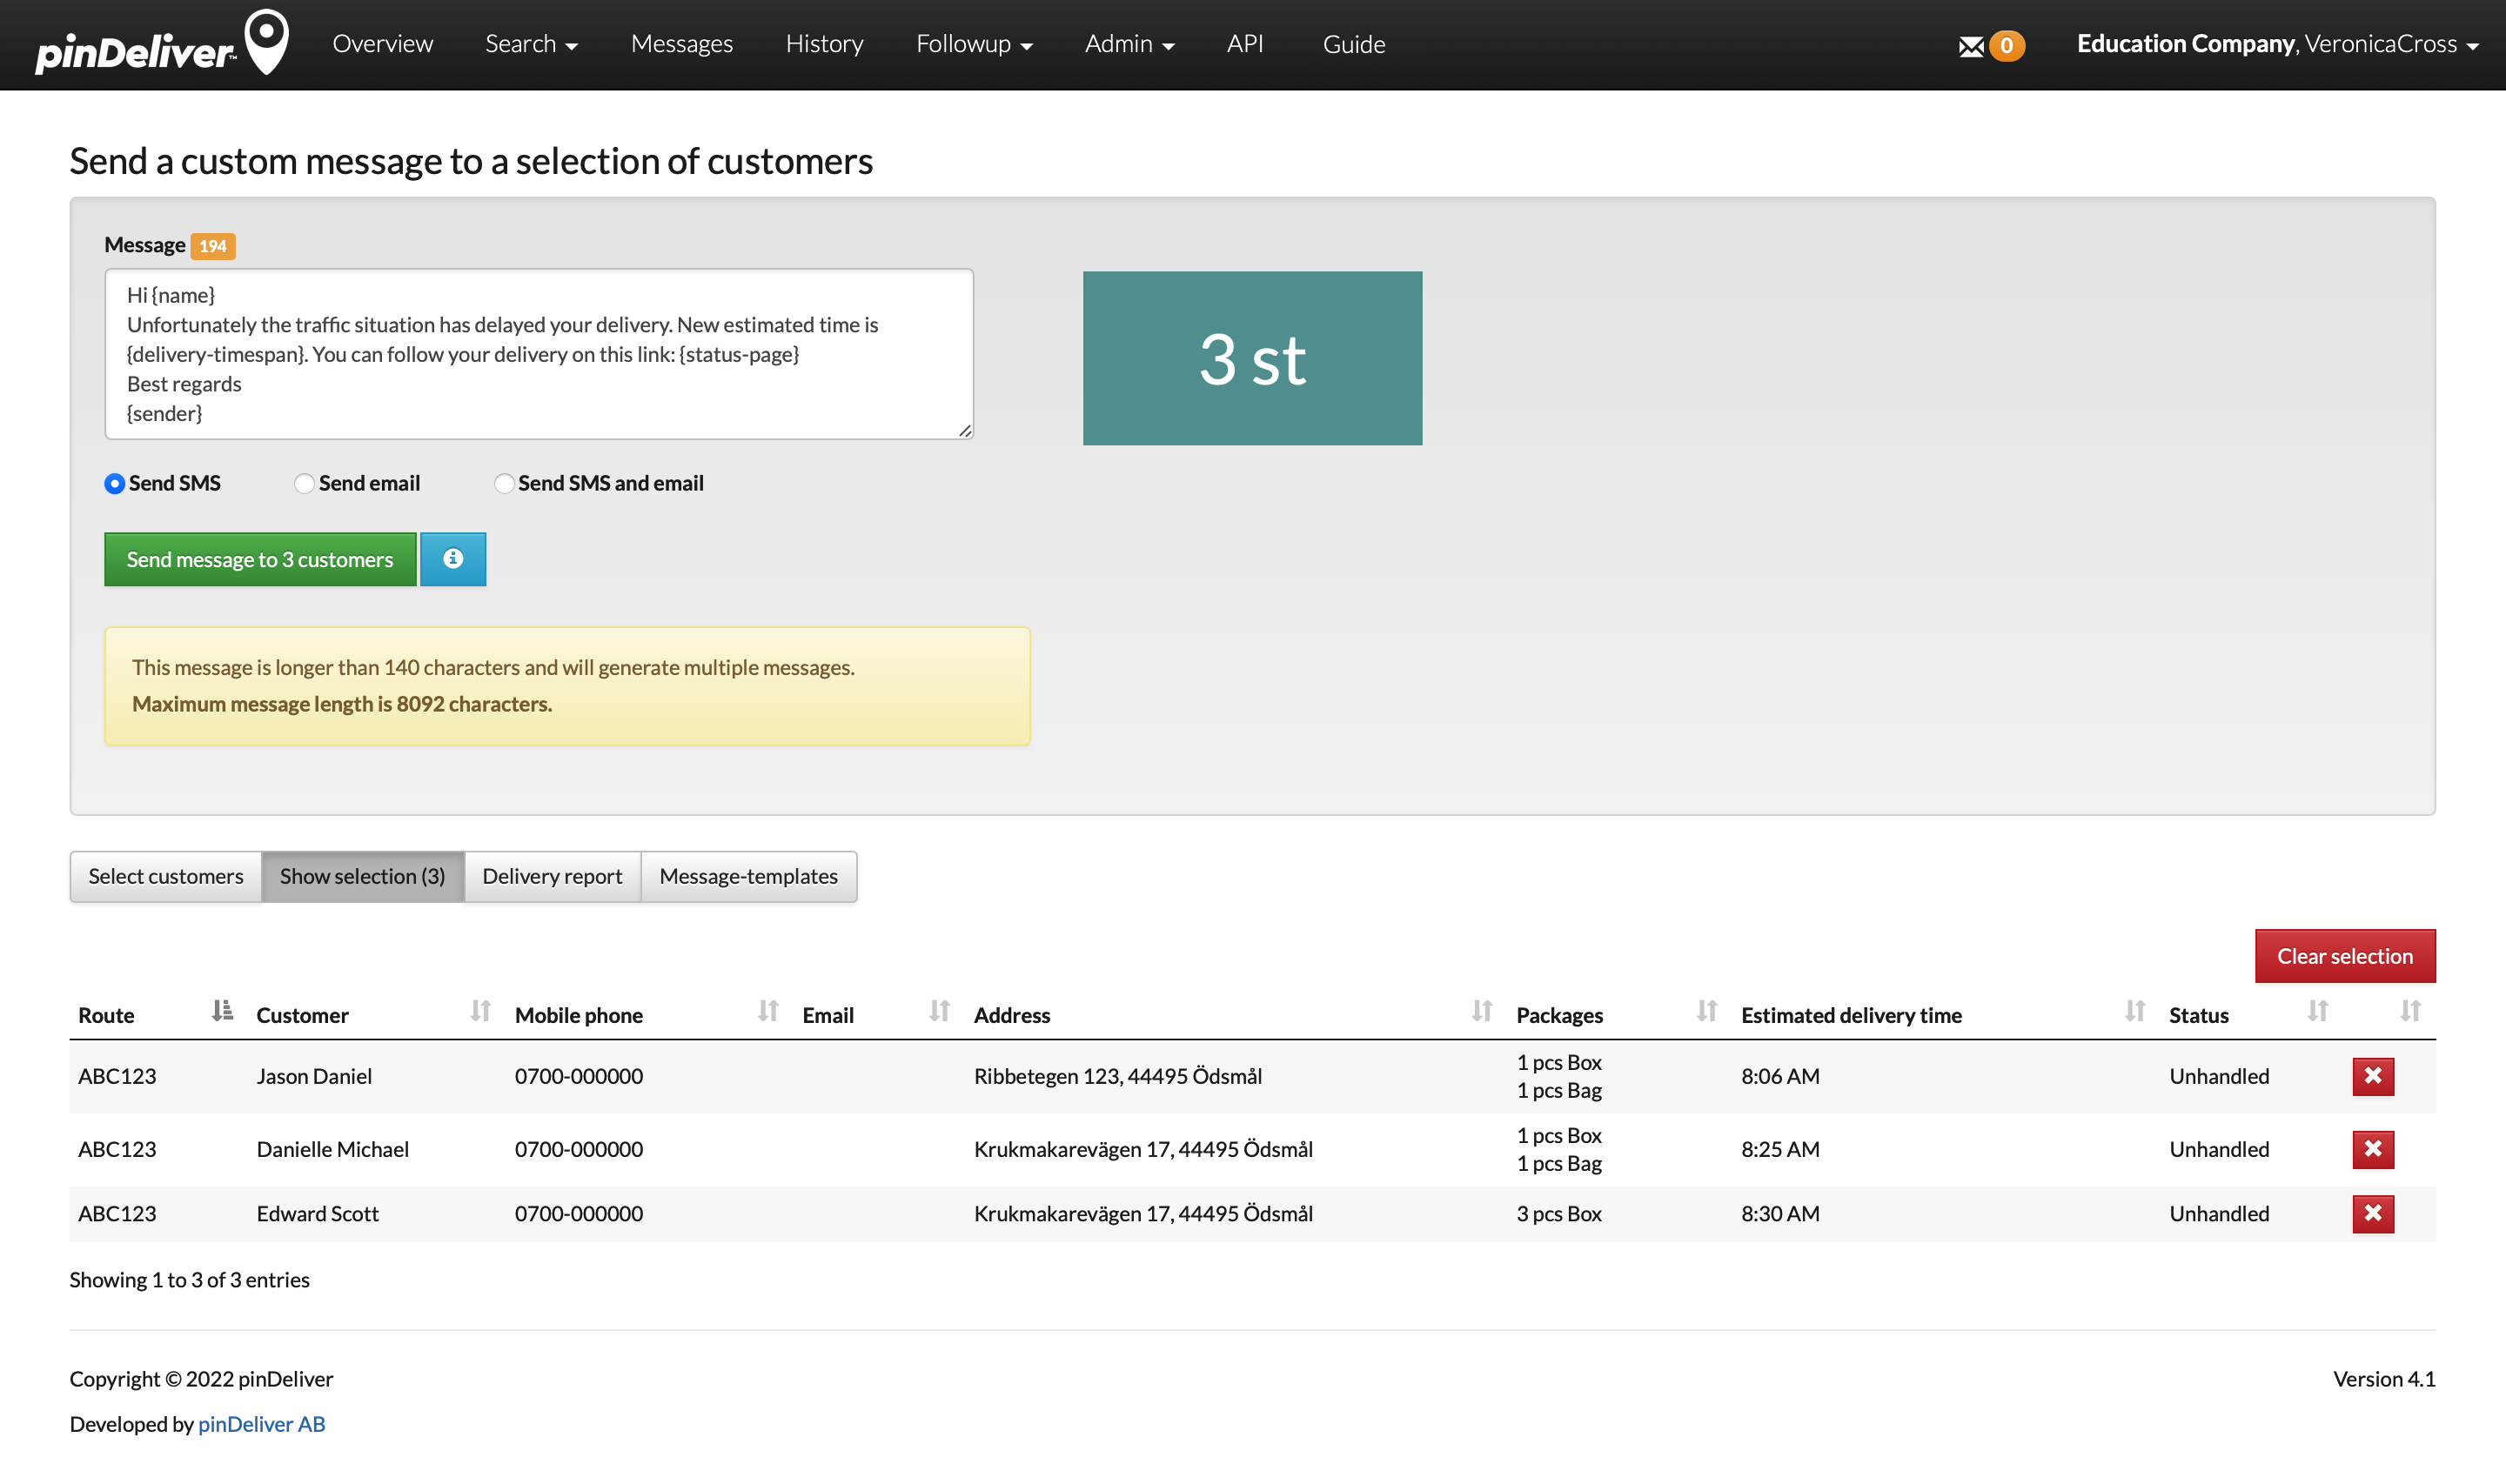
Messages can be sent as SMS, email, or a combination of both. Please bear in mind that SMS messages exceeding 140 characters will be counted as more than 1 message. The message length calculation displayed in the yellow box is an approximate estimate, particularly when using placeholders. The precise message length will vary across different customer orders.
Writing a message
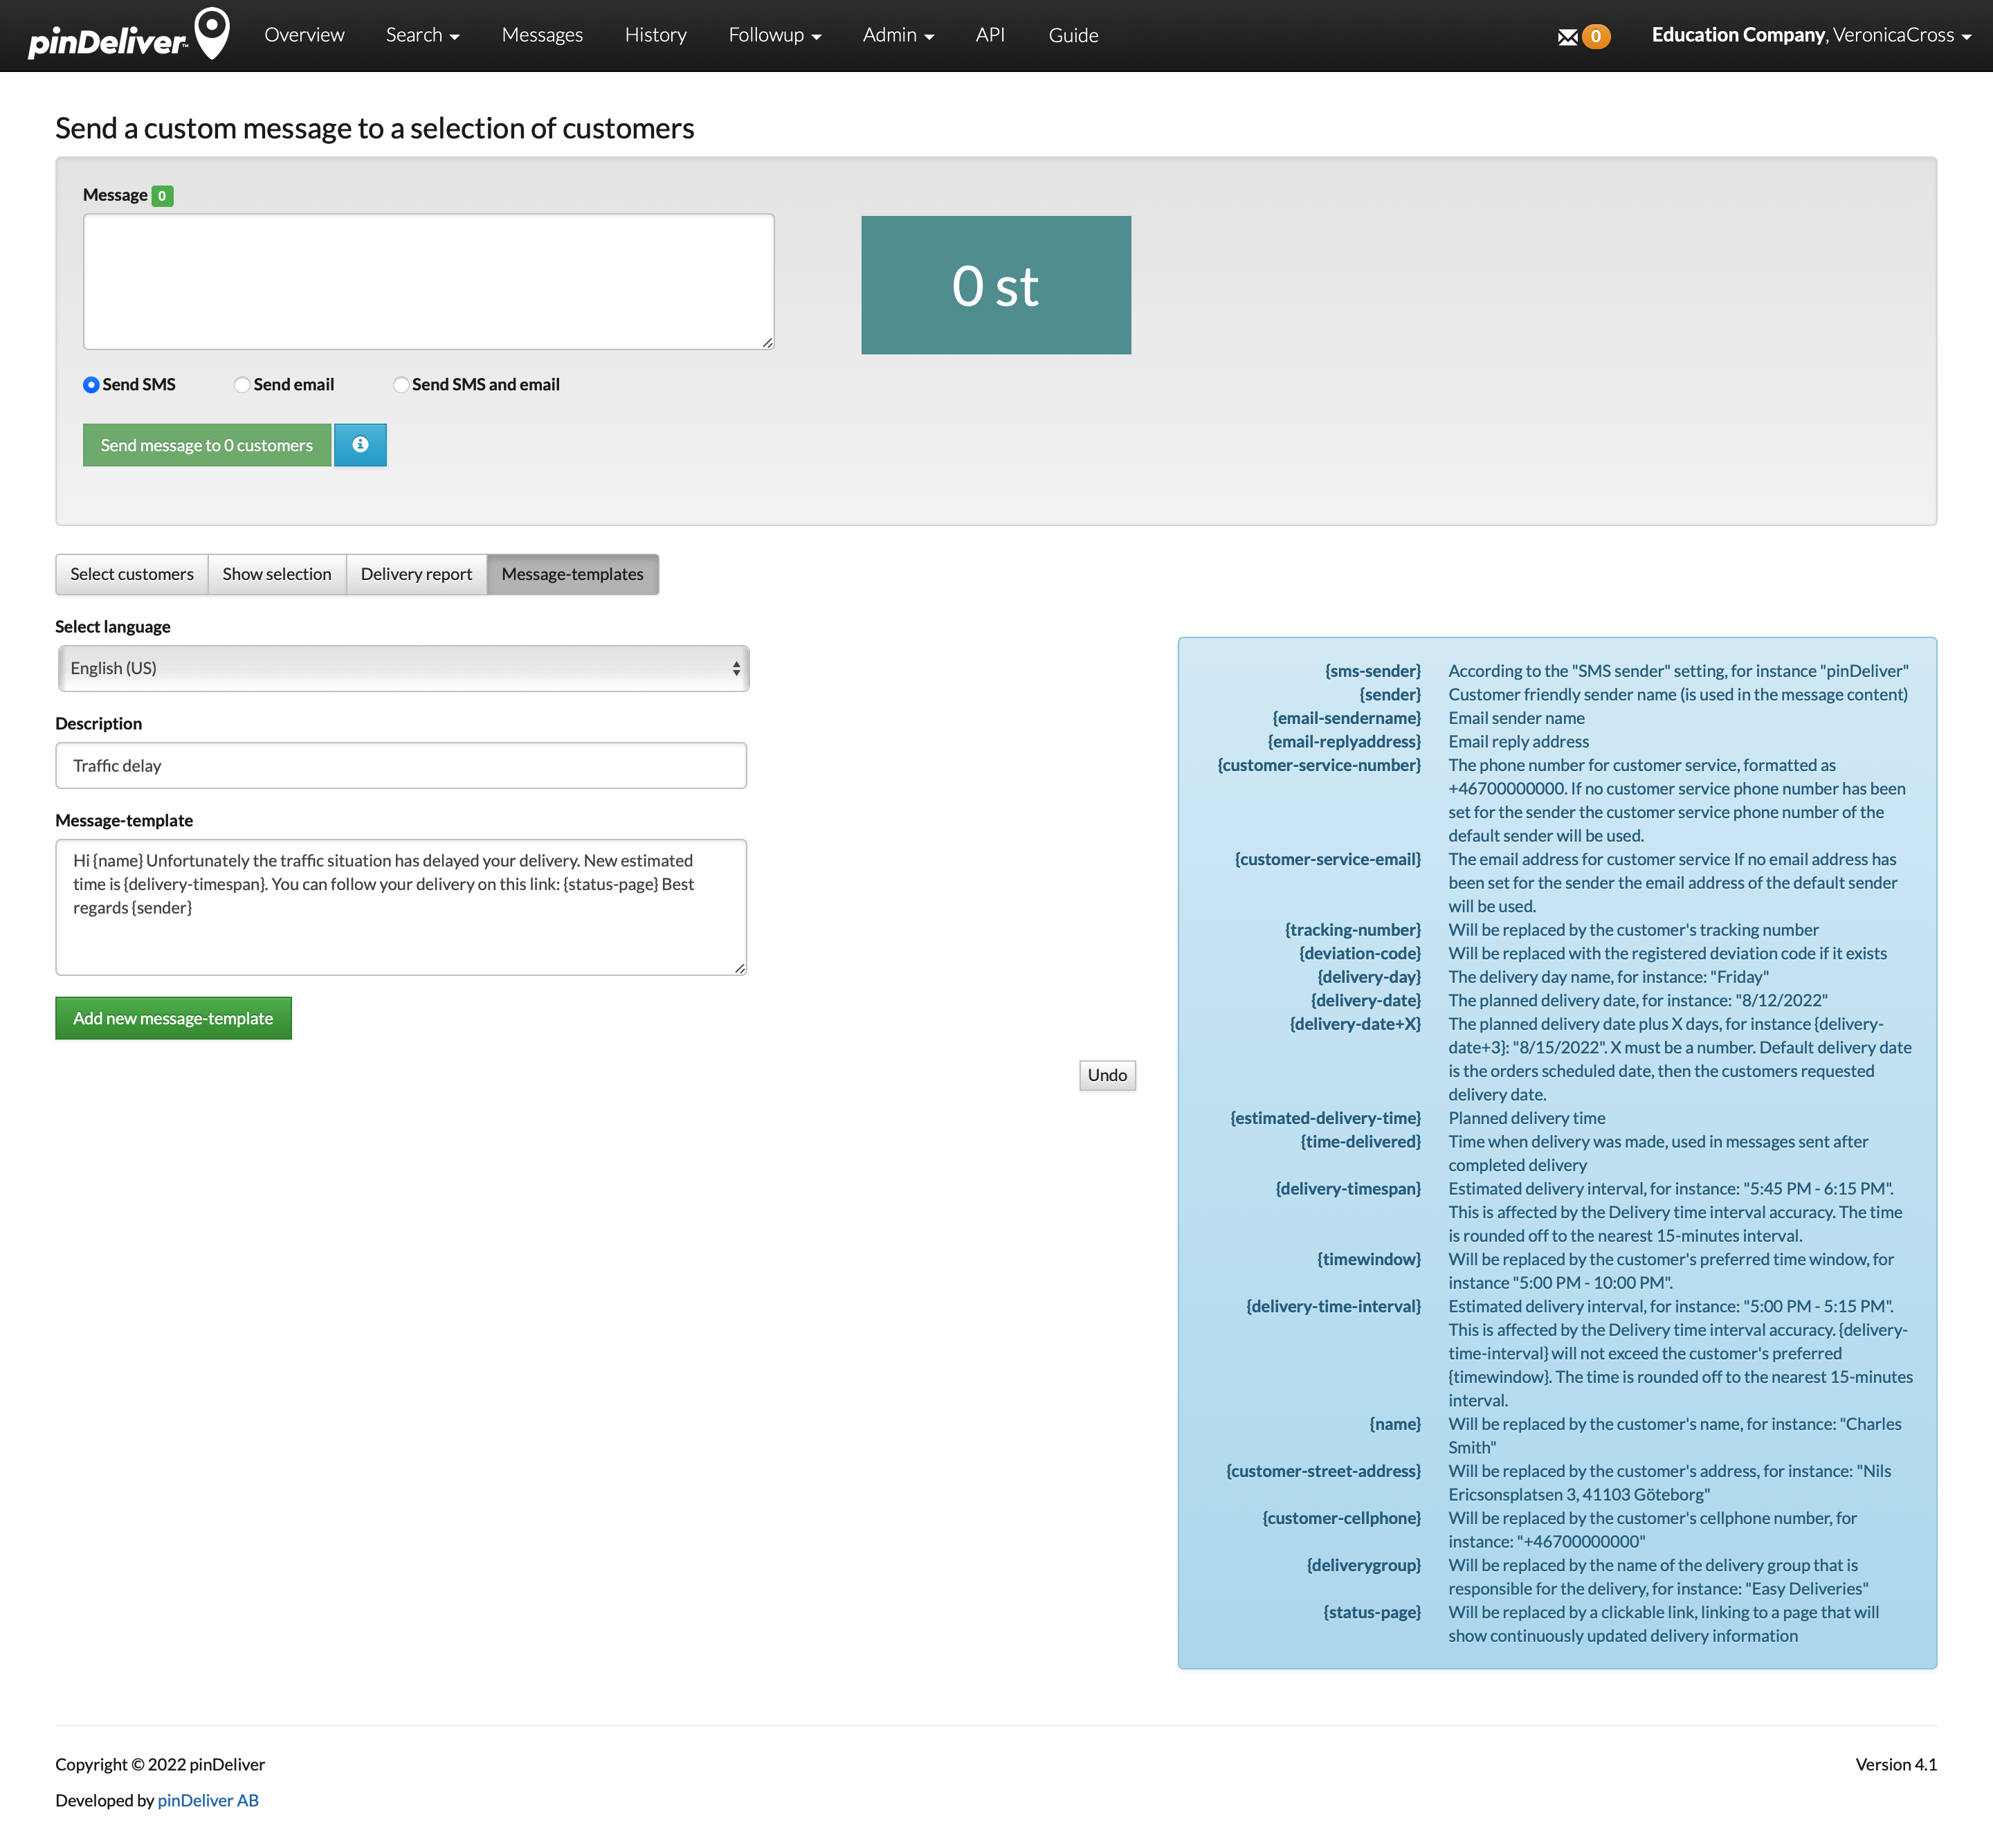
To compose an ad-hoc message, simply enter the desired text into the large message box. Alternatively, you can utilize placeholders to retrieve information from the customer order, such as the recipient’s name or sender’s name. For guidance on available placeholders, click the blue Info button.
If you have created templates, you can access them by clicking on Message Templates and selecting the template from the list at the bottom of the page.
To send the message, you will need to select the intended recipients, unless the message is triggered from a route, as explained below.
Create a message template
Preparing message templates ahead of time offers a highly efficient method to ensure rapid and precise communication as the situation demands. These templates are particularly advantageous when time is limited, and it mitigates the risk of forgetting valuable information.
To create a new message template, follow these steps:
- Click the Message Templates button.
- Select the language for the template text.
- Provide a brief description for your template. This will help when selecting the appropriate template from the message list.
- Compose the message template itself that will be sent to the customer. You can, of course, incorporate placeholders in your templates, and these are displayed in the blue box to the right.
- Once you have completed the template, click the Add New Message Template button.
The template will now be accessible below the form for creating new messages.
To send the message, you are required to select customers, unless triggered from a route, as explained further below.
Selectinging customers
To manually choose customers, follow these steps:
- Begin by clicking on Select customers.
- Enter the name of the route you are looking for; in the provided example, the route is named “GHI345”.
- Next, you will need to specify which customers from that route you wish to send messages to by selecting their status. In the example, only unhandled customers have been chosen as displayed with the green button in the Add depending on status column.
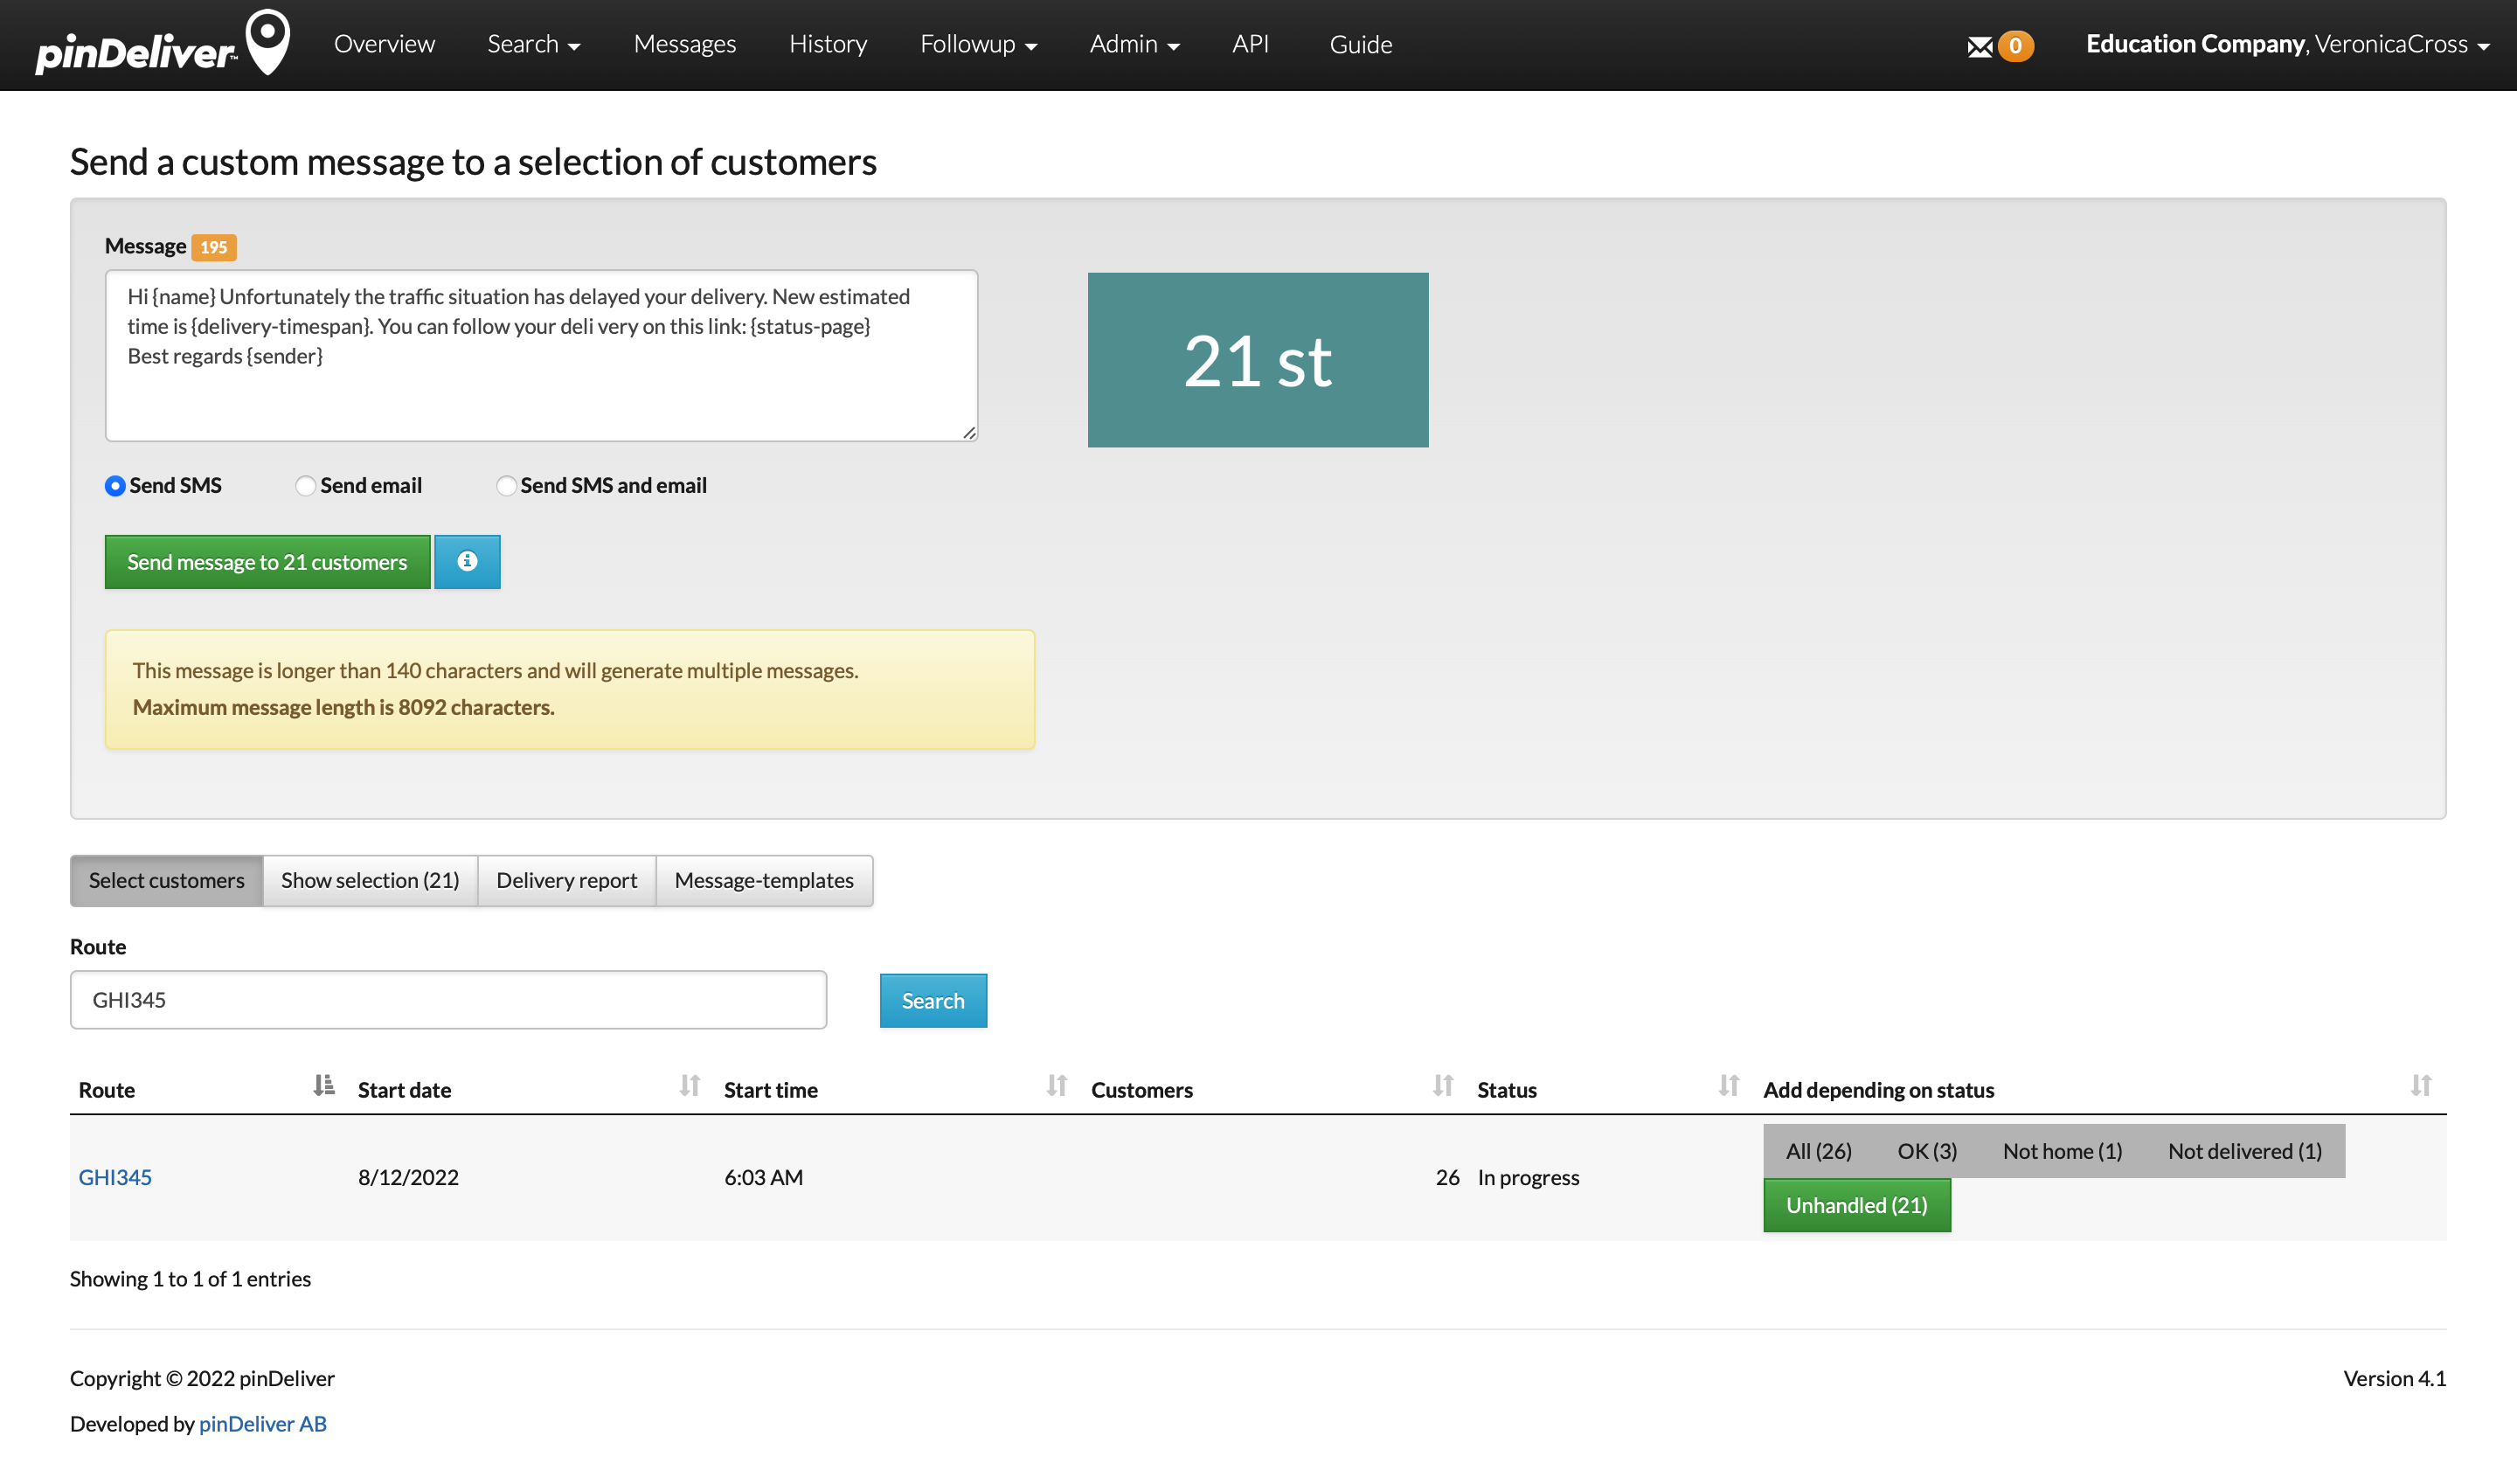
To review and remove selected customers, simply click the Show Selection button. To remove a customer, click on the red Delete button located to the right within the customer order line.
